Advertise on fullfatrr.com »

Home > Technical (L322) > Delayed Air Con
Post Reply  Down to end
Page 4 of 8 <12345678>
Print this entire topic · 
GraemeS


Member Since: 06 Mar 2015
Location: Wagga area
Posts: 2475

Australia 2012 Range Rover Autobiography TDV8 Bournville


The Sanden number that I referenced wasn't specifically for our vehicles so an error on my part for posting it.

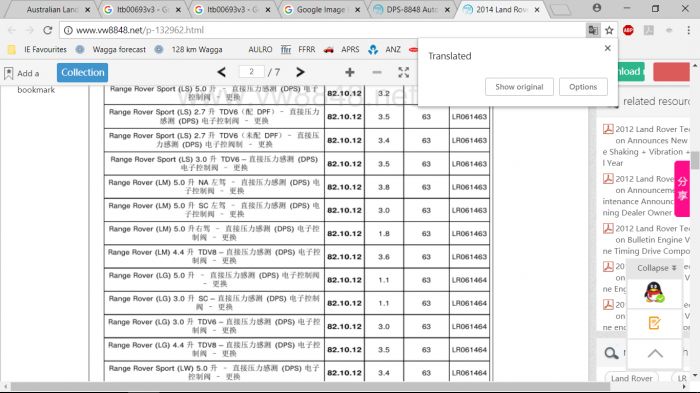
Apologies for the blurry picture but the LR number for the 4.4 TDV8 in the LM can be seen.

Post #485003 2nd Aug 2018 12:15pm
View user's profile Send private message View poster's gallery Reply with quote
John w


Member Since: 14 Jan 2018
Location: Cranleigh, Surrey
Posts: 439

United Kingdom 2011 Range Rover Autobiography Black TDV8 Barolo Black

Thanks guys.

So I had a chat with the dealer.
They could not find the Tech Bulletin anywhere on their system. They noted it is dated 2014 and has possibly been withdrawn now.
That said, they gave me both a price for the part number, and price to fit it.

LR061463 £88.92 + vat
3.6 hours labour to fit £540 + vat

The guy I spoke with said the tech said its not an easy job to do, but I think that could be because they wanted to relieve me of 750 quid for them to do it Shocked Rolling Eyes Laughing

Cass, thanks for that number. It doesnt come up on my parts list, but I will ask.
I may well just buy the one from my dealer and get on with it. Too many toys, not enough time

2011 4.4 TDV8 AB Black

Post #485004 2nd Aug 2018 12:45pm
View user's profile Send private message View poster's gallery Reply with quote
John w


Member Since: 14 Jan 2018
Location: Cranleigh, Surrey
Posts: 439

United Kingdom 2011 Range Rover Autobiography Black TDV8 Barolo Black

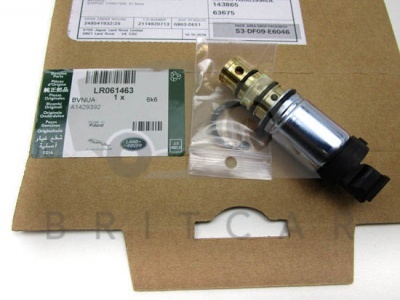
Just done a search for that part number.

Here is a picture of it from brit-car site.


Island 4x4 sell them for ~60+vat, so going to order one. Too many toys, not enough time

2011 4.4 TDV8 AB Black

Post #485008 2nd Aug 2018 1:31pm
View user's profile Send private message View poster's gallery Reply with quote
Sarchopperman


Member Since: 11 Aug 2017
Location: Aberdeenshire
Posts: 33

United Kingdom 2011 Range Rover Vogue TDV8 Epsom Green

Does the kit from Island 4x4 include replacement seals for the refrigerant pipes where they attach to the compressor? Or are they not required?

Is it a good idea to replace the oil or can it all be vacuumed out and then just re-introduced to the system.

There seems a reluctance for independents to take on these godly jobs with what appear to be complicated ac systems.

A vacuum pump, recovery cylinder and a set of manifold gauges seems to be all that is required and a bit of time? RR L322 TDV8 4.4 SE 2019 to present
RR L322 TDV8 4.4 - 2016 to present
Discovery 2 TD5 - 2010 to 2016
Discovery 1 - 2000 to 2010

Post #485279 6th Aug 2018 9:11am
View user's profile Send private message View poster's gallery Reply with quote
John w


Member Since: 14 Jan 2018
Location: Cranleigh, Surrey
Posts: 439

United Kingdom 2011 Range Rover Autobiography Black TDV8 Barolo Black

I don't think so, looking at the picture it is just the valve and circlip.

If you read the instructions in the manual for removing the compressor, it is pretty involved. It means removing the radiator, and a bunch of other pipes including the aircon ones.

That would potentially mean more than just the o rings at the compressor end.

I am speculating here as I haven't done it yet.
If you have the system drained they will pull a vacuum on it, which should remove most of the oil.
If however you manually spring a leak Mr. Green then I would expect most to remain.
When they refill it they should pull a vacuum again before recharging it.

I don't intend to drain it myself, I will get a local place to do that.

It will no doubt take me a bunch of time. The book time is 3.6 hours but if I can do it without having to remove so much, I will. Too many toys, not enough time

2011 4.4 TDV8 AB Black

Post #485306 6th Aug 2018 1:21pm
View user's profile Send private message View poster's gallery Reply with quote
Sarchopperman


Member Since: 11 Aug 2017
Location: Aberdeenshire
Posts: 33

United Kingdom 2011 Range Rover Vogue TDV8 Epsom Green

Can anyone confirm that for the L322 LM 2010 - 2012 the correct compressor oil is PAG46?

Has anybody tried replacing the oil and filtering the refrigerant to try to resolve this issue of a sticky solenoid valve or is it actually a fault with the valve? I believe that air con servicing machines such as the Bosch ACS 511/611 can do this? RR L322 TDV8 4.4 SE 2019 to present
RR L322 TDV8 4.4 - 2016 to present
Discovery 2 TD5 - 2010 to 2016
Discovery 1 - 2000 to 2010

Post #485503 9th Aug 2018 6:14am
View user's profile Send private message View poster's gallery Reply with quote
GraemeS


Member Since: 06 Mar 2015
Location: Wagga area
Posts: 2475

Australia 2012 Range Rover Autobiography TDV8 Bournville

The TSB states the cause as the valve being worn although I understood that it was a valve design issue, now rectified, but possibly prematurely worn due to a design shortcoming.

Post #485508 9th Aug 2018 8:14am
View user's profile Send private message View poster's gallery Reply with quote
John w


Member Since: 14 Jan 2018
Location: Cranleigh, Surrey
Posts: 439

United Kingdom 2011 Range Rover Autobiography Black TDV8 Barolo Black

Yeah, given the number of hits for this same issue on VAG cars using and having issues with PCVs, I would agree with Graeme that it is likely an issue with the valves.

A bit more reading has indicated the pumps vary the output from 5% to 100%, based on demand. When the valve fails it is only giving 5% output, so its not surprising it doesn't get very cold.

I've not tried to drain or separate the fluids.

I was planning on tackling this at the weekend, but got something else to fix first now Rolling Eyes Too many toys, not enough time

2011 4.4 TDV8 AB Black

Post #485538 9th Aug 2018 12:34pm
View user's profile Send private message View poster's gallery Reply with quote
John w


Member Since: 14 Jan 2018
Location: Cranleigh, Surrey
Posts: 439

United Kingdom 2011 Range Rover Autobiography Black TDV8 Barolo Black

OK, work is under way.
Rain keeps stopping play, but so far:
Plastic sump panel off,
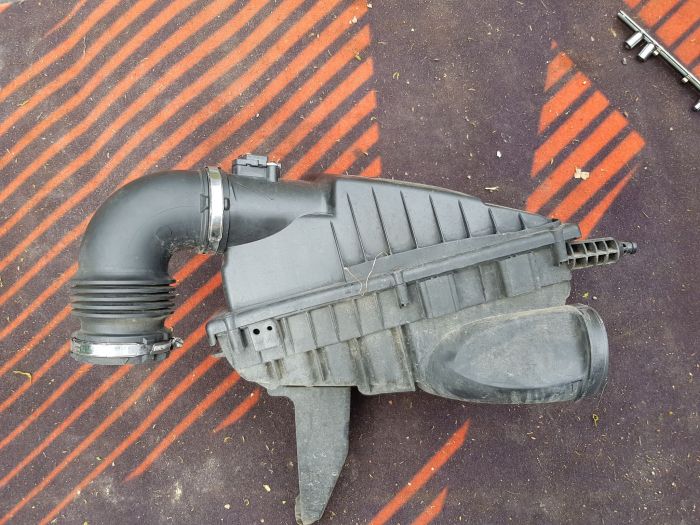
lhs air filter/box removed:


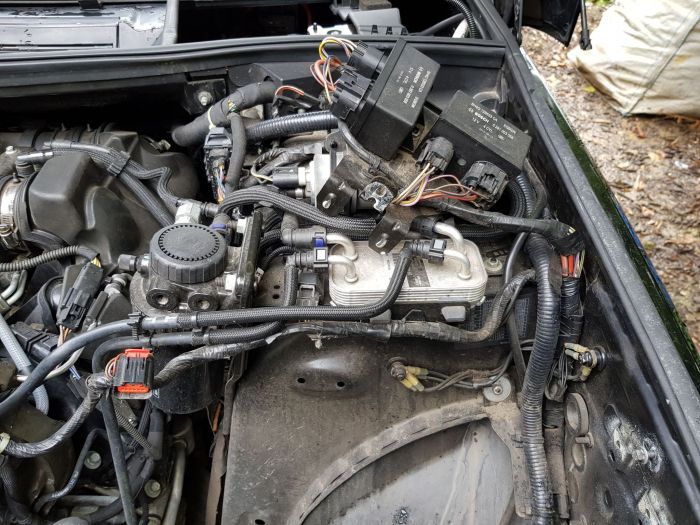
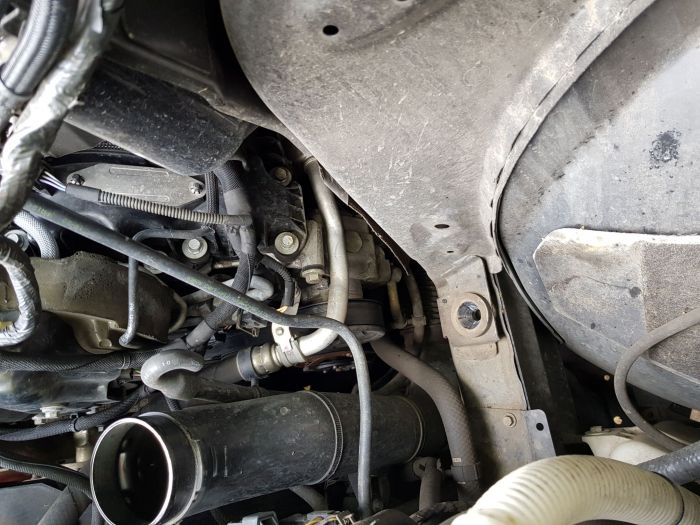
In this pic, you can see the electronics that sit over the airbox sat on the strut. One bolt out (on right of pic where white wax oil is), unplug the connector on the pipe, and undo both clamps of pipe.


next remove the airbox to turbo pipe,which covers the aircon pump.
This is bolted to the rad cowling which needs removing first.
It also has a smaller pipe on the back side of it that needs it's clamp undoing, plus a small pipe clipped to it in 2 places.


It also has a clamp at the other end, that is a bitch to get to. If you zoom in on the pic you can just make it out.


Jobs yet to do:
The ribbed belt will need to come off, though not entirely.
I might have to remove a coolant pipe, we shall see.
Then unbolt the aircon pump. Whether I can actually remove it completely is questionable at the moment.

Jobs being avoided:
To actually replace the belt you need to remove a pipe on the drivers side as it's support bracket is within the belt. Also remove the cooling fan belt, which is a stretchy one, and is usually cut to remove and replaced. That means rad and cooling fan out.
Trying to avoid having to do that Rolling Eyes

Rain has eased, back it Razz Too many toys, not enough time

2011 4.4 TDV8 AB Black

Last edited by John w on 10th Aug 2018 1:41pm. Edited 1 time in total

Post #485628 10th Aug 2018 11:40am
View user's profile Send private message View poster's gallery Reply with quote
GraemeS


Member Since: 06 Mar 2015
Location: Wagga area
Posts: 2475

Australia 2012 Range Rover Autobiography TDV8 Bournville

In this pic, you can see the electronics that sit over the airbox sat on the strut.
These are the glow-plug modules - 4 each.

Post #485629 10th Aug 2018 11:49am
View user's profile Send private message View poster's gallery Reply with quote
John w


Member Since: 14 Jan 2018
Location: Cranleigh, Surrey
Posts: 439

United Kingdom 2011 Range Rover Autobiography Black TDV8 Barolo Black

Thanks Graeme Thumbs Up

Admins, I get album error trying to upload pics (from Dropbox, same place I uploaded all my ithers), have I exceeded my limit ?

Plastic pipe now removed.
I assume this is the one people say can have oil in it ?
Mine has a trace of oiling, but not much.

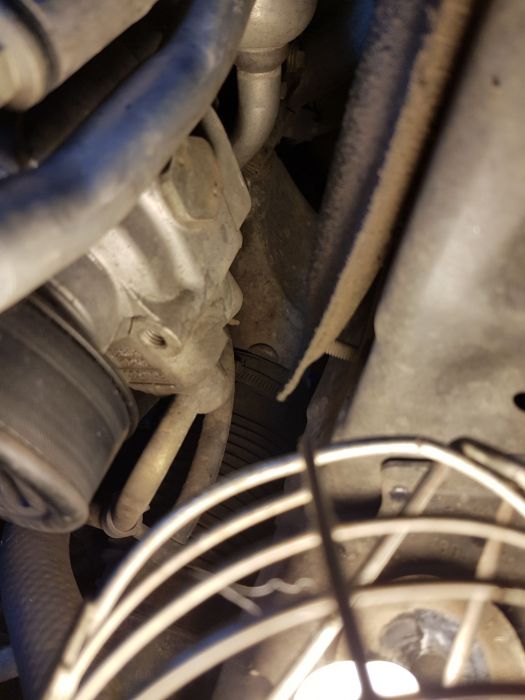
Now this is removed can access all the aircon pump mounting bolts, and the pipes on it.
It's not easy, but can get to them, from both above and below. Too many toys, not enough time

2011 4.4 TDV8 AB Black

Post #485632 10th Aug 2018 12:45pm
View user's profile Send private message View poster's gallery Reply with quote
John w


Member Since: 14 Jan 2018
Location: Cranleigh, Surrey
Posts: 439

United Kingdom 2011 Range Rover Autobiography Black TDV8 Barolo Black

Job completed.
Can't tell if it's fixed it yet as i have to wait until Monday to recharge the aircon.

I followed the workshop manual instructions,but didn't disconnect or remove anything to do with coolant.

I have more pictures but can't upload them Rolling Eyes

With the plastic inlet pipe removed, I took the ribbed belt off. 1/2 inch drive breaker bar and 22mm socket made light work of it.

Next, the top aircon pipe was unbolted from the pump, and the retaining bolt on the front corner. I just rested the end in the space left by the airbox.

Now the bottom aircon pipe. Undoing the retaining nut from the pump is the easy bit.
The pipe runs across the lower front of the engine, and is held in place by 2 studs.
Before you can do this, you need to remove at least one end of the turbocharger bypass hose by the valve. I just undid the end on the connector to the pipe that goes up to the turbo, and pushed the pipe out of the way.
Now you can get to the retaining studs with a spanner (can't get a socket in there). I used a ratchet spanner.
On top of the pipe is also some wiring, so you have to remove the 10mm nuts for them first, then the 13mm studs.
Now you have the slack to remove the pipe from the pump.

The manual says to remove the long bypass hose. I couldn't get on the clip as it had presumably been done up with the engine out of the car. This was to cause a lot of problems.

So now I could remove the aircon pump.
You can undo and remove the bolts as you go, as the pump sits on bushes to hold it in place.
Top bolt out is easy with a suitable socket extension.
So is the lower bolt.
The rear one however is a nightmare because of that damned hose.
The manual says to swing the plastic inlet hose out of the way, but I couldn't do that.
I therefore had to get creative and used a selection of tools, sockets,spanners,different length extensions etc. It took me over 30 minutes to get this bolt out, and then the same to get it back in afterwards.

Anyway, with the bolt out you can lever the pump off the bushes, andwith a bit of effort rotate it so you can get to the pcv (yay).
I unplugged the connector, and removed the retaining circlip, plus gave it a clean with some brake cleaner.
I then attempted to remove it by levering against the connector. Not enough room.
Got out some special pliers I have and tried a strait pull. Connector head disintegrated. Feck ! Rolling Eyes

So now to remove the pump, I had no choice.
In order to do this you need to remove the connector. You can't see this from underneath, but you can see the cable is secured to the back of the pump with a push in clip. Wiggle that to pull it out.
Now from the top you can rotate the pump to get a clear view of the connector and undo it.

The pump come's out towards the front, and up. Fiddly to do, but not too bad.

To remove the pcv I screwed a wood screw into the end and used a pair of pliers levering against something to pull it out. It came out easy.
There is still a bit of oil in the pump so I used this to coat the o rings before fitting the new one.

Refitting is a reversal, and went pretty easy (aside from the rear bolt as already noted).

Would I do it again ?
Sure,if I had to. No special tools required, just time and patience.
I reckon it took me about 5 to 6 hours. If I didn't have the issues I reckon I could easily knock 90 mins off that.

If I can get the pictures to upload I will put them in my gallery.
I can't figure out how to post a pic from there into here though. Too many toys, not enough time

2011 4.4 TDV8 AB Black


Last edited by John w on 11th Aug 2018 11:12am. Edited 1 time in total

Post #485689 11th Aug 2018 8:46am
View user's profile Send private message View poster's gallery Reply with quote
GraemeS


Member Since: 06 Mar 2015
Location: Wagga area
Posts: 2475

Australia 2012 Range Rover Autobiography TDV8 Bournville

Good job and a good write-up too!

Post #485695 11th Aug 2018 9:53am
View user's profile Send private message View poster's gallery Reply with quote
John w


Member Since: 14 Jan 2018
Location: Cranleigh, Surrey
Posts: 439

United Kingdom 2011 Range Rover Autobiography Black TDV8 Barolo Black

Thanks Graeme.

And the good news is, it's fixed. Just in time for winter weather again Mr. Green Too many toys, not enough time

2011 4.4 TDV8 AB Black


Last edited by John w on 14th Aug 2018 12:59pm. Edited 1 time in total

Post #486048 14th Aug 2018 9:06am
View user's profile Send private message View poster's gallery Reply with quote
nino_nino


Member Since: 29 Mar 2015
Location: pocitelj
Posts: 690

Bosnia Herzegovina 2012 Range Rover Autobiography Black TDV8 Santorini Black

John, can you post link to Dropbox so that we can download the pictures directly?

Nino,

Post #486051 14th Aug 2018 9:37am
View user's profile Send private message View poster's gallery Reply with quote
Post Reply  Back to top
Page 4 of 8 <12345678>
All times are GMT

Jump to  
Previous Topic | Next Topic >
Posting Rules
You cannot post new topics in this forum
You cannot reply to topics in this forum
You cannot edit your posts in this forum
You cannot delete your posts in this forum
You cannot vote in polls in this forum


Site Copyright © 2006-2024 Futuranet Ltd & Martin Lewis
fullfatrr.com RSS Feed - All Forums


Switch to Mobile site