Advertise on fullfatrr.com »

Home > Maintenance & Mods (L322) > Howto: FFRR TD6 '02 Replace Front and Rear Brake Lines
Post Reply  Down to end
Page 4 of 4 <1234
Print this entire topic · 
Bingo_123


Member Since: 19 Sep 2014
Location: Essex
Posts: 172

United Kingdom 2007 Range Rover Vogue SE TDV8 Stornoway Grey

Thanks Joe, thats good to know.
wanted to replace the rear sections only as the front ones arent showing any signs of corrosion.

Post #666696 15th Jun 2023 4:24pm
View user's profile Send private message View poster's gallery Reply with quote
Bingo_123


Member Since: 19 Sep 2014
Location: Essex
Posts: 172

United Kingdom 2007 Range Rover Vogue SE TDV8 Stornoway Grey

Hi Joe,
Can you confirm whether flares on original steel brake pipes are single flare or double. It's a 07 MY tdv8.

Thanks

Post #666797 16th Jun 2023 6:49pm
View user's profile Send private message View poster's gallery Reply with quote
Joe90


Member Since: 29 Apr 2010
Location: Hampshire
Posts: 6409

England 

If memory serves me correctly, the FFRR has DIN flares

These connected up and sealed OK with my bog standard replacement connectors, and I used both single and double flares when connecting up to the FFRR connectors, depending on the fitting. .
Experience is the only genuine knowledge, but as time passes, I have forgotten more than I can remember Wink
Volvo V70 P2 2006 2.4 Petrol 170bhp Estate SE
MG Midget Mk1 1962

Previous: L322 Range Rover TDV8 3.6 2008; L322 Range Rover TD6 3.0 2002; P38A Range Rover V8 1999

Post #666855 17th Jun 2023 3:11pm
View user's profile Send private message View poster's gallery Reply with quote
ptjs1


Member Since: 15 Nov 2016
Location: Kent
Posts: 9

United Kingdom 2006 Range Rover Vogue SE 4.2 SC V8 Java Black

It's unfortunately time for me to do this job with a major leak in one of the two pipes running Front to Rear.

However, I'm struggling to get past the early steps as I can't seem to be able to access the two nuts securing the left hand tank cover. These are the 2 nuts on the inside, up high and obscured by the heatshield. I've got the heatshield unbolted but it really allows very little access to get to those inner 2 nuts. Has anyone got any tips or is it easier to drill out the rivets in the bottom of the tank cover? It seems that those 2 bolts are securing a bracket that then seems to come down to the bottom of the cover and attached via the 2 rivets.

Tks for any thoughts or tips on this.

Paul

Post #686509 26th Feb 2024 6:09pm
View user's profile Send private message View poster's gallery Reply with quote
Joe90


Member Since: 29 Apr 2010
Location: Hampshire
Posts: 6409

England 

You should be able to move/"re-shape" the heatshield out of the way to get to those bolts? .
Experience is the only genuine knowledge, but as time passes, I have forgotten more than I can remember Wink
Volvo V70 P2 2006 2.4 Petrol 170bhp Estate SE
MG Midget Mk1 1962

Previous: L322 Range Rover TDV8 3.6 2008; L322 Range Rover TD6 3.0 2002; P38A Range Rover V8 1999

Post #686545 26th Feb 2024 11:24pm
View user's profile Send private message View poster's gallery Reply with quote
ptjs1


Member Since: 15 Nov 2016
Location: Kent
Posts: 9

United Kingdom 2006 Range Rover Vogue SE 4.2 SC V8 Java Black

Thanks for the suggestion. Maybe the exhaust is very different on a Supercharged Petrol V8? The heatshield can only be moved a max of 1/4", which isn't even giving me direct line of sight to those 2 nuts.

I really don't want to try and disassemble the exhausts. The car is obviously built with the covers first, the heatshields second, then the exhaust.

I'll have another look tomorrow if it's not raining.

Cheers

Paul


Last edited by ptjs1 on 28th Feb 2024 3:01pm. Edited 1 time in total

Post #686548 27th Feb 2024 12:05am
View user's profile Send private message View poster's gallery Reply with quote
PatrickG


Member Since: 27 Aug 2018
Location: Michigan
Posts: 3

United States 2008 Range Rover Supercharged 4.2 SC V8 Buckingham Blue

I removed all of the heat shield screws and used a 24" socket extension to remove those two nuts. My heat shield has a hole in it that seems like it was put there just for accessing them. Still required some forcing and bending to lower the tank cover though. '08 SC here btw.

Some things I learned during my rusty/broken brake line repair project:

Nicopp or similar is the way. A 25' roll is enough to replace from the front fender unions back to the rear hoses if no do-overs are needed. I finished with about 18" left over.

Flares are DIN single/bubble. Capri tools CP21110-SD works well.

Put the fitting on the pipe before you flare it.

The torque to release the fittings was surprisingly low. Tightened new fittings similarly. No leaks.

Big fitting is left. Small fitting is right. (Front unions)

The fuel tank cover does not have to be completely removed.

Split the long line that goes over the fuel tank into two pieces with a union. Shorter line can be done in one piece.

There doesn't seem to be a viable source for the plastic nut things that fasten the plastic cover / line clips. Drilling out the stubborn ones was a bad decision in hindsight. Yay zip-ties.

Gap IID tool gives access to ABS bleed routine. Bring a 12v power source and lots of DOT4. Routine is long. The cycle does all four calipers. Didn't firm up the ever-mushy pedal. YMMV.

Consider engraving "Install Fitting First" on your flaring tool.

Post #686684 28th Feb 2024 2:57pm
View user's profile Send private message View poster's gallery Reply with quote
ptjs1


Member Since: 15 Nov 2016
Location: Kent
Posts: 9

United Kingdom 2006 Range Rover Vogue SE 4.2 SC V8 Java Black

Patrick,

You're absolutely right. I've finally got the tank cover out this morning.

After continually fighting with that heatshield to get access, I realised that the only route on an S/C V8 was to go through that small access hole in the heatshield. The problem, as you will have discovered, is that you're working blind once you've threaded a socket and long extensions through the hole. I used a torch and looked through the hole to orient myself. I then used a 10mm 1/4" drive socket. To this I attached a short 1/4" drive wobble bar extension and then another longer 1/4" wobble bar extension. These were necessary because you're not aligning straight to either of those 2 10mm nuts.

Eventually I extracted them. Although I have no idea how I'm going to position them on refit! I then struggled on and finally managed to get the tank cover out. Whilst the joints to the flexis (which I'm going to change as well) are soaking in WD40, I've now got a decision to make:

1. Do I purchase the pipes from Land Rover (relatively cheap and will have the new fittings)? Do they come fully shaped, or do I have to bend them? If they are pre-shaped, that could save a lot of hassle for relatively little money. If they are not pre-shaped, I won't go down this route.

2. If I purchase the new pipes, do I then cut the over-axle one and put a join in to ease refitment? Flaring the new join will be a bit more difficult on the steel pipe, but should be manageable. Where exactly is the best place to put that join?

3. Or do I go down the home-made copper pipe route, (which would be cheaper), reinstall the original fittings and also put a join in for the over-axle pipe? More work and the bends will never be as good as the originals, but may be easier to get that over-axle pipe in.

Decisions....

Paul

Post #686685 28th Feb 2024 3:17pm
View user's profile Send private message View poster's gallery Reply with quote
ptjs1


Member Since: 15 Nov 2016
Location: Kent
Posts: 9

United Kingdom 2006 Range Rover Vogue SE 4.2 SC V8 Java Black

OK, confirmed that the genuine pipes come pre-formed which does have some advantages. Although I sense I'll still have to put a join in to fit that over-axle pipe.

So, original pre-formed, or make my own?

Paul

Post #686691 28th Feb 2024 4:13pm
View user's profile Send private message View poster's gallery Reply with quote
PatrickG


Member Since: 27 Aug 2018
Location: Michigan
Posts: 3

United States 2008 Range Rover Supercharged 4.2 SC V8 Buckingham Blue

Paul,

I split the long line in the area between the fuel tank cover and the long side cover. Don't know if that will be the best place but it was practical.

I will probably never use the steel lines again. Even pre-bent. That nicopp changed me. So easy to work with.

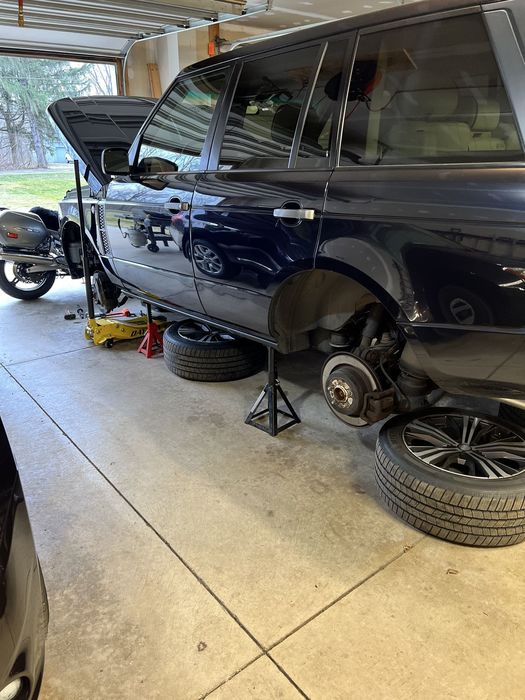
My project at the moment.

Click image to enlarge

Post #686695 28th Feb 2024 4:32pm
View user's profile Send private message View poster's gallery Reply with quote
ptjs1


Member Since: 15 Nov 2016
Location: Kent
Posts: 9

United Kingdom 2006 Range Rover Vogue SE 4.2 SC V8 Java Black

Thanks Patrick,

Whilst spraying the flexi-hose connections with lubricant, I've realised that the flexi is actually a 3-part pipe with a rigid pipe fixed between 2 flexis. Presumably even more of a pain to fit, especially as I have limited ability to raise the car!

I wonder now whether my best approach is to fit the new pipe and flexi for the left rear wheel (it's this pipe which has rusted); then leave all the covers and wheelarch liners off and drive the car 12 miles to a friends workshop where I have access to a 4-post lift to fit the other over-axle pipe and flexi?


At least I'm starting to understand how to build a S/C Range Rover:

Step 1. Take 2 long brake pipes

Step 2. Build rest of car around those 2 pipes


Cheers

Paul

Post #686697 28th Feb 2024 5:01pm
View user's profile Send private message View poster's gallery Post Reply
Post Reply  Back to top
Page 4 of 4 <1234
All times are GMT

Jump to  
Previous Topic | Next Topic >
Posting Rules
You cannot post new topics in this forum
You cannot reply to topics in this forum
You cannot edit your posts in this forum
You cannot delete your posts in this forum
You cannot vote in polls in this forum


Site Copyright © 2006-2024 Futuranet Ltd & Martin Lewis
fullfatrr.com RSS Feed - All Forums


Switch to Mobile site