Advertise on fullfatrr.com »

Home > Maintenance & Mods (L322) > Reverse lamp upgrade bulbs?
Post Reply  Down to end
Page 9 of 22 <123 ... 8910 ... 202122>
Print this entire topic · 
J90


Member Since: 02 Jul 2013
Location: Somewhere south of Bergerac
Posts: 651

France 2006 Range Rover Vogue Td6 Java Black

Thanks for the further tip Thumbs Up
I'll have a brew and start again. Ta Travelling around in circles again.

Post #308474 27th Jan 2015 12:25pm
View user's profile Send private message View poster's gallery Reply with quote
miggit


Member Since: 12 Jul 2014
Location: Milton Keynes
Posts: 3657

United Kingdom 

Shocked Shocked Naked Flame, Plastic, Your a brave chap Bow down
From my experience, messing about with rear lights, I would imagine that you only have to get them hot, when my led's finally turn up Yawn , I'm going to try some hot water first, before I go to extreme measures. I would imagine that you only really need to soften the plastic, so that it's got a bit of give, before gently cutting / teasing the light apart. Yesterday I couldn't spell Engineer... Today I are one!
Inventor of the 'Guide-o-Matic automatic wheel alignment tool'
Former long term L322 owner, Up/Down graded to a Classic Tractor!

Post #308567 27th Jan 2015 6:51pm
View user's profile Send private message View poster's gallery Reply with quote
stan
Site Moderator


Member Since: 13 Jul 2010
Location: a moderate moderated moderator moderating moderately in moderation
Posts: 35319

United Kingdom 

surely a heat gun would be a better and safer option... ... - .- -.


Y. O. L. O.
.

Post #308568 27th Jan 2015 7:05pm
View user's profile Send private message View poster's gallery Reply with quote
miggit


Member Since: 12 Jul 2014
Location: Milton Keynes
Posts: 3657

United Kingdom 

^^ Wot he said Bow down Bow down
Although by using hot (boiling) water there is no way it will combust Shocked Wink Yesterday I couldn't spell Engineer... Today I are one!
Inventor of the 'Guide-o-Matic automatic wheel alignment tool'
Former long term L322 owner, Up/Down graded to a Classic Tractor!

Post #308573 27th Jan 2015 7:30pm
View user's profile Send private message View poster's gallery Reply with quote
J90


Member Since: 02 Jul 2013
Location: Somewhere south of Bergerac
Posts: 651

France 2006 Range Rover Vogue Td6 Java Black

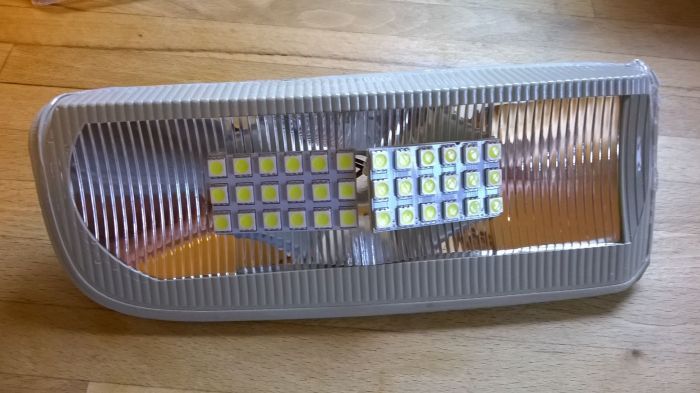
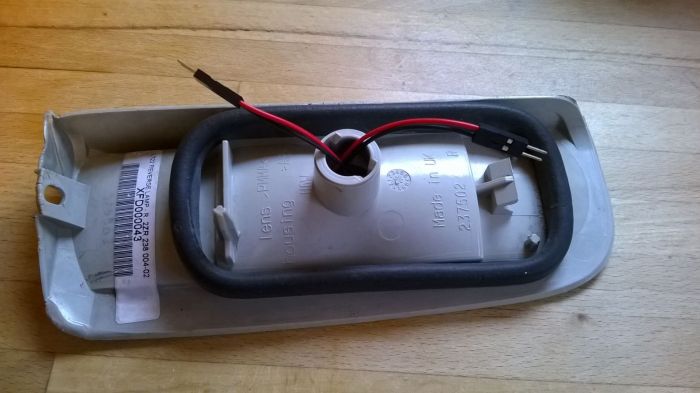
Right! I finally did mine today. I should have placed the lamps in a bowl of hot water as suggested before using the hairdryer to soften the glue. It took me over 40 mins to separate each lamp before checking how the LED's would fit.


I then glued the two LED panels together edge on and then glued a piece of plastic to the rear to make them more rigid before placing them in the lamp and checking that they work.


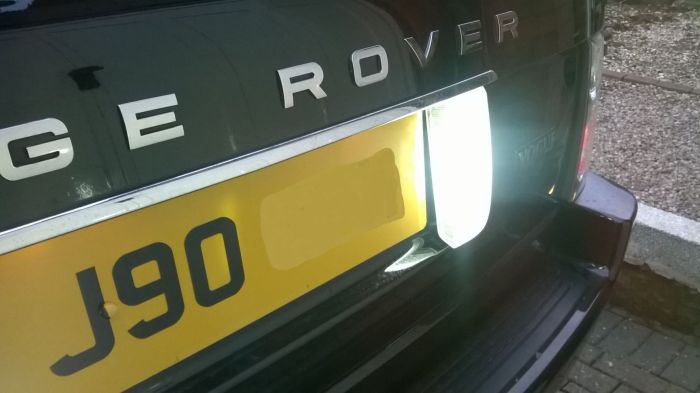
A very practical 'must do' mod for your reversing lamps. Travelling around in circles again.

Post #308616 27th Jan 2015 9:28pm
View user's profile Send private message View poster's gallery Reply with quote
Scottyav


Member Since: 11 Feb 2013
Location: Cannock Staffordshire
Posts: 1204

United Kingdom 2007 Range Rover Autobiography TDV8 Zambezi Silver

Well done that man Thumbs Up Thumbs Up

Post #308630 27th Jan 2015 10:22pm
View user's profile Send private message View poster's gallery Reply with quote
horse86


Member Since: 09 Dec 2014
Location: PA
Posts: 863

United States 2014 Range Rover Autobiography 5.0 SC V8 Causeway Grey

nice job but looks like you could have went with a lot bigger LED board to fill up the area for even more light.

I'm assuming you can see the yellow dots through the filtered plastic? That's one thing that would bug me.

Post #308798 28th Jan 2015 4:43pm
View user's profile Send private message View poster's gallery Reply with quote
stan
Site Moderator


Member Since: 13 Jul 2010
Location: a moderate moderated moderator moderating moderately in moderation
Posts: 35319

United Kingdom 

how was the lens stuck back onto the unit? ... - .- -.


Y. O. L. O.
.

Post #308815 28th Jan 2015 5:44pm
View user's profile Send private message View poster's gallery Reply with quote
miggit


Member Since: 12 Jul 2014
Location: Milton Keynes
Posts: 3657

United Kingdom 

I haven't done it yet, but I think that Scottyav used clear silicone to fix his, I did experiment with solvent weld on a rear light, that sort of worked. But I'm leaning towards some epoxy resin glue to refix mine, I would use polyflex or sikaflex, but they don't do it in clear Sad Yesterday I couldn't spell Engineer... Today I are one!
Inventor of the 'Guide-o-Matic automatic wheel alignment tool'
Former long term L322 owner, Up/Down graded to a Classic Tractor!

Post #308823 28th Jan 2015 6:24pm
View user's profile Send private message View poster's gallery Reply with quote
J90


Member Since: 02 Jul 2013
Location: Somewhere south of Bergerac
Posts: 651

France 2006 Range Rover Vogue Td6 Java Black

I fixed my LED's to the reflector using superglue and a couple of dabs of sealant.
Yes I could have fitted more LED's in but it would have been very noticeable. I can assure you that the ones I have fitted are very bright, far brighter than I hoped. They are not very noticeable to the casual observer.
I used the same ones as Scottyav by the way. Thumbs Up Travelling around in circles again.

Post #308853 28th Jan 2015 9:07pm
View user's profile Send private message View poster's gallery Reply with quote
miggit


Member Since: 12 Jul 2014
Location: Milton Keynes
Posts: 3657

United Kingdom 

Just done mine over the last 24 hours, and have just used them in anger Shocked Shocked It's like day light in my mirrors now, and as for the reversing camera Mr. Green . This is the best and 3rd cheapest mod that I have done to the FFRR, and would strongly recommend it to any one.

I didn't take any pictures, as there are dozens in this thread already, but this is how I did mine.......

I used 4 x 36 led 6W COB lights, some rapid epoxy resin glue and some sticky tape!

First, splitting the lights, I put them in some boiling water for a few minutes to soften up the plastic, and to stop it from cracking. I then ran around the join with a craft knife , with about 20 mm of blade sticking out, a Stanley will do. Don't try and cut all the way in one, just keep on working at the join and after a few goes it will start to come apart, in fact I'd say that a third of mine was already split from being badly made in the factory Evil or Very Mad Not good for a stupidly high priced car, but a big help to those to us that like to tinker Wink
Eventually all but the top was split with the knife, (pig to get at), so I bravely grabbed the 2 parts and just worked them until the last edge gave up Very Happy
I then stuck 2 of the led's in the light using some sticky tape, and put 6 blobs of epoxy resin on the edges to hold them in, after half a cup of coffee and a fag later, are we there yet??, the glue had set and I carefully removed the tape. I then mixed some more resin and put a bead the whole way around the join on the reflector and stuck the lens on, and then tried to put it down, D'OH! After I'd unglued me from light one I did the other, and left them over night to harden.
I then used the bayonet adapter for the connection. I had to file one of the pins off the bayonet, and I cut the end off. I then took the festoon connector leads and cut the spring bit off. With the aid of a soldering iron I mated 1 bayonet to 2 plugs for each light.
This morning I refitted the lights, taping from the lamp holder to the plugs and back, just to make sure that it all stayed in place. And then I just had to wait 9 hours to try them in the dark Mr. Green Yesterday I couldn't spell Engineer... Today I are one!
Inventor of the 'Guide-o-Matic automatic wheel alignment tool'
Former long term L322 owner, Up/Down graded to a Classic Tractor!

Post #310958 5th Feb 2015 6:53pm
View user's profile Send private message View poster's gallery Reply with quote
stan
Site Moderator


Member Since: 13 Jul 2010
Location: a moderate moderated moderator moderating moderately in moderation
Posts: 35319

United Kingdom 

thanks paul... Thumbs Up ... - .- -.


Y. O. L. O.
.

Post #310971 5th Feb 2015 7:25pm
View user's profile Send private message View poster's gallery Reply with quote
miggit


Member Since: 12 Jul 2014
Location: Milton Keynes
Posts: 3657

United Kingdom 

No problems Stan, as long as you take your time splitting them they will part cleanly, and remember that that Epoxy Resin is a Censored to get off, so be careful Embarassed

Just found these, they are wider than the ones that I fitted but I recon that they should fit. They are a lesser output to mine but very similar to Scottyav's, and they are WHITE Exclamation

http://www.ebay.co.uk/itm/White-48-LED-Pan...53fecbeab3

But they are almost twice the price of mine Sad , but they are UK stock Smile , so they shouldn't take 5 weeks to arrive Yawn Thud

They will certainly fit with in the reflector, but I'm not so sure that you will be able to get them to touch in the middle, which will leave you with the hole for the old bulb showing, Whistle still I reacon that if you rummage around in the kitchen you could fill that hole with a tin foil ball Whistle Just make sure it don't short any connections Shocked Wink Yesterday I couldn't spell Engineer... Today I are one!
Inventor of the 'Guide-o-Matic automatic wheel alignment tool'
Former long term L322 owner, Up/Down graded to a Classic Tractor!

Post #310979 5th Feb 2015 7:43pm
View user's profile Send private message View poster's gallery Reply with quote
stan
Site Moderator


Member Since: 13 Jul 2010
Location: a moderate moderated moderator moderating moderately in moderation
Posts: 35319

United Kingdom 

i think i'm a compulsive led buyer as i have a stash of smd and cob panels bought of ebay Laughing ...

i suppose using a glue to re-attach the lens wont work cos the glue drys to quickly.. ... - .- -.


Y. O. L. O.
.

Post #310980 5th Feb 2015 7:49pm
View user's profile Send private message View poster's gallery Reply with quote
v8rich


Member Since: 28 Dec 2013
Location: Healing, Lincolnshire
Posts: 67

England 2002 Range Rover HSE Td6 Bonatti Grey

Halfway through fitting these ones to mine:

http://www.ebay.co.uk/itm/361087116812

The original bulbs measure 0.5 Amp at 12v, two of these panels pull the same so quite happy with that.

I'll have some pics when they're finished.

Post #310988 5th Feb 2015 8:02pm
View user's profile Send private message View poster's gallery Reply with quote
Post Reply  Back to top
Page 9 of 22 <123 ... 8910 ... 202122>
All times are GMT

Jump to  
Previous Topic | Next Topic >
Posting Rules
You cannot post new topics in this forum
You cannot reply to topics in this forum
You cannot edit your posts in this forum
You cannot delete your posts in this forum
You cannot vote in polls in this forum


Site Copyright © 2006-2024 Futuranet Ltd & Martin Lewis
fullfatrr.com RSS Feed - All Forums


Switch to Mobile site