Advertise on fullfatrr.com »

Home > My Range Rover > My 2005 4.2 Supercharged - here we go....
Post Reply  Down to end
Page 5 of 7 <1234567>
Print this entire topic · 
Superspoons


Member Since: 24 Jun 2010
Location: East Hertfordshire, UK
Posts: 393

England 2006 Range Rover Vogue SE 4.2 SC V8 Zambezi Silver
The refit starts...

Some progress pics over the last few days. Wheel Arches protected, side panels refitted with new clips, Sill protectors fitted, also with new clips. Bumper on too.


Click image to enlarge


Click image to enlarge


 Gavin

2005 Range Rover Vogue SE 4.2 Supercharged V8

Follow my 4.2 Supercharged antics -
https://www.fullfatrr.com/forum/topic63354.html
https://www.instagram.com/l322_supercharged/
https://www.youtube.com/channel/UC8ChHNSdscnJarKjBLd_IAg

Post #638897 7th Aug 2022 8:19am
View user's profile Send private message View poster's gallery Reply with quote
Haylands


Member Since: 04 Mar 2014
Location: East Yorkshire
Posts: 8334

England 2014 Range Rover Autobiography SDV8 Loire Blue

Great to see someone repairing rust properly, the only way is to remove all rusted metal back to good steel and start again, that looks like an excellent job and should last for years...

Top job Thumbs Up Thumbs Up Pete
__________________________________________________
2014 L405 Autobiography SDV8 4.4 Loire Blue Ebony interior
2011 L322 Vogue SE 4.4 TDV8 Baltic Blue. Parchment over Navy Interior. Sold
2012 L322 Autobiography 5.0 Supercharged Ipanema Sand, Jet Interior. Sold
2002 L322 Vogue 4.4 V8 Epson Green, Ivory over Aspen Interior (Fatty Offroader) Sold
-Click for Project Fatty off roader-

Post #638901 7th Aug 2022 9:16am
View user's profile Send private message View poster's gallery Reply with quote
Superspoons


Member Since: 24 Jun 2010
Location: East Hertfordshire, UK
Posts: 393

England 2006 Range Rover Vogue SE 4.2 SC V8 Zambezi Silver
New Parking Sensor - Sprayed and fitted

Before my SC went into the Bodyshop the rear parking sensor buzzer would continually beep. After removing the bumper and the wiring to each sensor, I tested for continuity along each wire - all OK. So, ordered four new sensors from eBay - https://www.ebay.co.uk/itm/353874134007 and sprayed/lacquered them after roughing them up to provide a key.

Once fitted I now have rear PDC's Thumbs Up


Click image to enlarge


Click image to enlarge


Click image to enlarge


Click image to enlarge


Another small annoyance sorted Thumbs Up Gavin

2005 Range Rover Vogue SE 4.2 Supercharged V8

Follow my 4.2 Supercharged antics -
https://www.fullfatrr.com/forum/topic63354.html
https://www.instagram.com/l322_supercharged/
https://www.youtube.com/channel/UC8ChHNSdscnJarKjBLd_IAg

Post #639132 9th Aug 2022 7:48pm
View user's profile Send private message View poster's gallery Reply with quote
dhallworth


Member Since: 10 Oct 2011
Location: Glasgow
Posts: 3131

United Kingdom 2012 Range Rover Autobiography TDV8 Baltic Blue

That’s a nice job!

I’d be lost without sensors now… every car I’ve driven for years has had parking sensors now. When you get in the P38 without them now it really makes you concentrate Laughing

David. 2002 4.6 Vogue SE - Alveston Red with Lightstone Leather
2012 Range Rover 5.0 SC Autobiography in Indus Silver with Jet/Ivory Interior
2012 Range Rover 4.4 TDV8 Autobiography in Baltic Blue with Sand Interior

Post #639239 10th Aug 2022 10:16pm
View user's profile Send private message View poster's gallery Reply with quote
Superspoons


Member Since: 24 Jun 2010
Location: East Hertfordshire, UK
Posts: 393

England 2006 Range Rover Vogue SE 4.2 SC V8 Zambezi Silver
Side Steps ..>Captive nuts AHHHHH

Time to put the Genuine and original side steps back on. I remember that when I removed them one side caused me all sorts of fun with the captive bolts in the side of the sill/ rail turning and snapping off.
It was the drivers side so here are the 'steps' Wink I took to get them back on. Whilst they were off I checked them over and to honest they are knackered - rusted at the front and back/plastic split and missing. I'm looking out for a pair to come up for sale - so if anyone has a pair of Genuine ones please let me know.... Thumbs Up

10mm Side Rivnuts required as existing captive nuts just spun loose. I made up this little tool to insert the Rivnuts and it did a really good job. The Rivnuts are brass and compressed nicely... its really easy to go 'too far' and render them useless though...


Click image to enlarge


I had to file down the bottom of the locating 'slot' of the front bracket as the 10mm bolts were slightly too big to slide down it -

Click image to enlarge


Click image to enlarge


Main securing bolt.

This was a pig. I tried a Rivnut up in the hole but it just wouldn't grip. This was mainly due to the chassis 'rail' ( I know, its not a Defender Wink )not being flat. In the end I superglued a washer to the nut -

Click image to enlarge


Click image to enlarge


Click image to enlarge


..and filed down an old 'Ikea' spanners sides so it would fit up either of the two larger holes either side of the hole that once had the captive nut to secure the side step. I was surprised how small the original bolt was so I replaced it with a slightly bigger one.


As the spanner was -
Click image to enlarge


and after being attacked by the Dremel -

Click image to enlarge


Click image to enlarge


The spanner with its bolt was then inserted into the hole..oh matron Shocked ... and manoeuvred over the hole so I could see it from underneath -


The plan was for it to grip the bolt whilst I threaded the bolt in from underneath... logical you would think... but this is a Range Rover and the inside of the rail must've been full of swarf and general crud, because every time I tried to thread the bolt onto it, the damm thing would tip/move.

After many attempts I did what anyone would do and used my trusty middle finger which. I just about managed to get it to hold the nut in place and with enough down force to allow the bolt to thread up and in -


Click image to enlarge


Viola ! -


And they are on. I will no doubt find the finest pair of Genuine Sides for a L322 on eBay tonight and the steps will be off again...


Next job - Tow Bar fitment. Gavin

2005 Range Rover Vogue SE 4.2 Supercharged V8

Follow my 4.2 Supercharged antics -
https://www.fullfatrr.com/forum/topic63354.html
https://www.instagram.com/l322_supercharged/
https://www.youtube.com/channel/UC8ChHNSdscnJarKjBLd_IAg

Post #639315 11th Aug 2022 4:35pm
View user's profile Send private message View poster's gallery Reply with quote
dhallworth


Member Since: 10 Oct 2011
Location: Glasgow
Posts: 3131

United Kingdom 2012 Range Rover Autobiography TDV8 Baltic Blue

Nice job!

I had to use a rivnut to repair a hole for one of my deployables on the drivers side as it turned through when I was removing the chrome tubes.

David. 2002 4.6 Vogue SE - Alveston Red with Lightstone Leather
2012 Range Rover 5.0 SC Autobiography in Indus Silver with Jet/Ivory Interior
2012 Range Rover 4.4 TDV8 Autobiography in Baltic Blue with Sand Interior

Post #639316 11th Aug 2022 4:48pm
View user's profile Send private message View poster's gallery Reply with quote
Superspoons


Member Since: 24 Jun 2010
Location: East Hertfordshire, UK
Posts: 393

England 2006 Range Rover Vogue SE 4.2 SC V8 Zambezi Silver
Tow bar Electrics

Next job - Towbar.

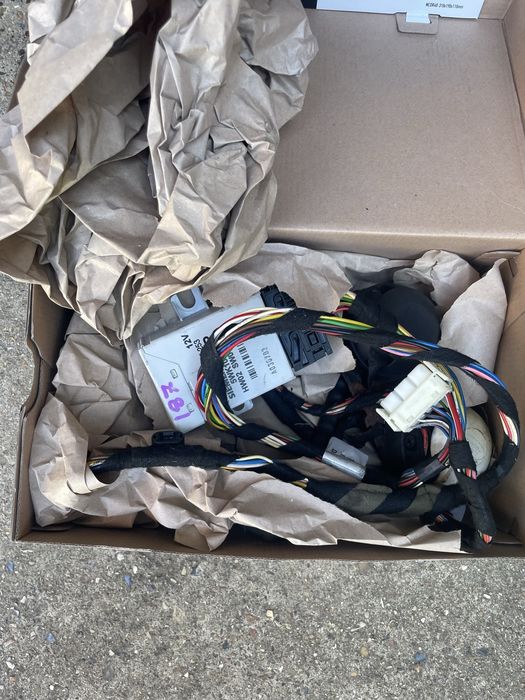
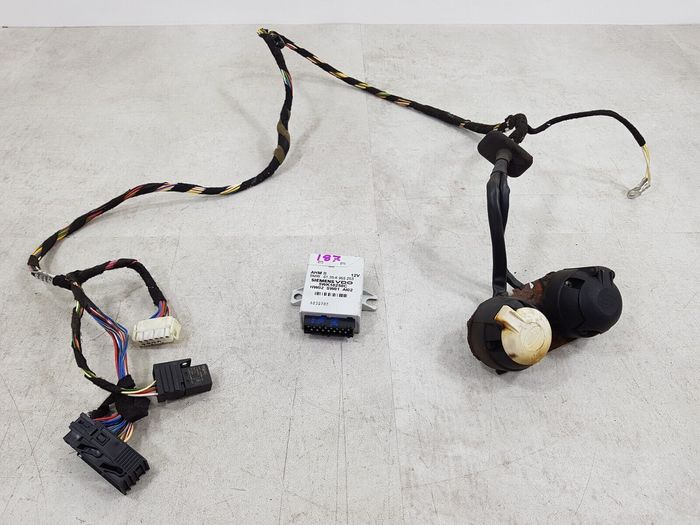
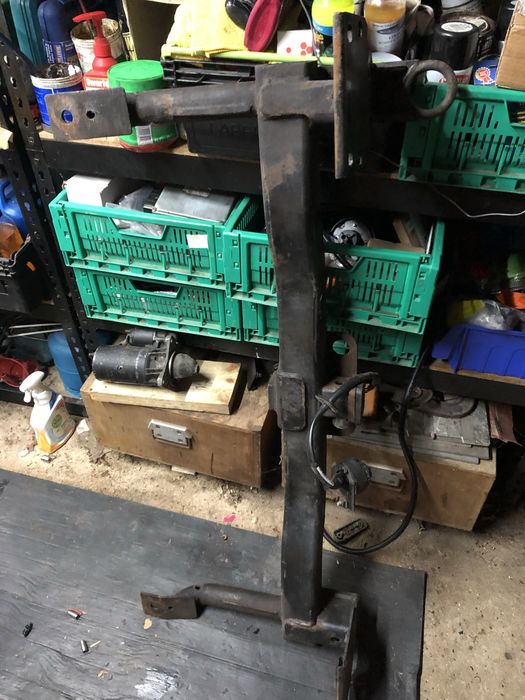
I'm going to be fitting the Towbar which was fitted to my 2010 TDv8 3.6. It should fit with a bit of fettling to the brackets either side. We will see.

The wiring loom arrived yesterday which at £50 I thought was a good buy as its an Land Rover original part.

Click image to enlarge


Thank to David (DHallworth) for checking his wiring loom/boot electrics for me.

Tow Bar -


Click image to enlarge


Click image to enlarge
 Gavin

2005 Range Rover Vogue SE 4.2 Supercharged V8

Follow my 4.2 Supercharged antics -
https://www.fullfatrr.com/forum/topic63354.html
https://www.instagram.com/l322_supercharged/
https://www.youtube.com/channel/UC8ChHNSdscnJarKjBLd_IAg

Post #639395 12th Aug 2022 10:51am
View user's profile Send private message View poster's gallery Reply with quote
dhallworth


Member Since: 10 Oct 2011
Location: Glasgow
Posts: 3131

United Kingdom 2012 Range Rover Autobiography TDV8 Baltic Blue

Just looking at the pictures of your loom.

If the bracket that holds the 2 sockets is corroded, they are available from LR separately from the loom.

David. 2002 4.6 Vogue SE - Alveston Red with Lightstone Leather
2012 Range Rover 5.0 SC Autobiography in Indus Silver with Jet/Ivory Interior
2012 Range Rover 4.4 TDV8 Autobiography in Baltic Blue with Sand Interior

Post #639397 12th Aug 2022 10:58am
View user's profile Send private message View poster's gallery Reply with quote
Superspoons


Member Since: 24 Jun 2010
Location: East Hertfordshire, UK
Posts: 393

England 2006 Range Rover Vogue SE 4.2 SC V8 Zambezi Silver

Its pretty bad David so I'll get one ordered Thumbs Up

Wired it all up yesterday to test and enabled it via the IID tool but could'nt get my trailer plate lights to work. No voltage to the bulbs when the Hazards were on. Relay clicks and power to the white box... I'm thinking corroded pins in the sockets - they are pretty dirty. Gavin

2005 Range Rover Vogue SE 4.2 Supercharged V8

Follow my 4.2 Supercharged antics -
https://www.fullfatrr.com/forum/topic63354.html
https://www.instagram.com/l322_supercharged/
https://www.youtube.com/channel/UC8ChHNSdscnJarKjBLd_IAg

Post #639400 12th Aug 2022 11:12am
View user's profile Send private message View poster's gallery Reply with quote
Superspoons


Member Since: 24 Jun 2010
Location: East Hertfordshire, UK
Posts: 393

England 2006 Range Rover Vogue SE 4.2 SC V8 Zambezi Silver
Tow Bar fitting

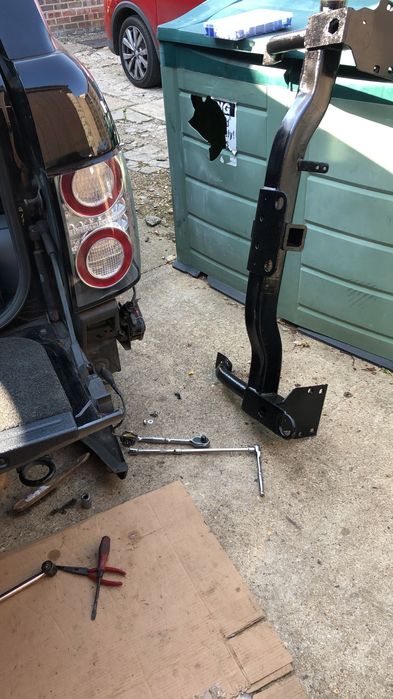
Fitted the Westfalia Towbar last night. I needed to cut off the exhaust hanger brackets from the existing arms which I had to do before, when it was fitted to my TDV8 3.6 (2010). I haven't welding them back on - the bolt the bracket passes through is pretty substantial and I didn't when I fitted it before.


Click image to enlarge


Every job should begin with a couple of bacon and egg baps Very Happy -

Click image to enlarge


Remove the 8 bolts in the boot after removing most of the plastic panels and side -

Click image to enlarge


..and take off the rear mudflaps -

Click image to enlarge


Click image to enlarge


I lifted the whole assembly of bumper and crash bar in one go. Saves removing the little bolts under the plastic cover in the bumper and the ones under neath. It also keeps the Bumper rigid - as I had only just fitted it, it would line it up nicely when refitted (hopefully) -


Click image to enlarge


Click image to enlarge


Took the weight of the Exhaust back box as the support brackets were coming off -


Remove the four bolts, two each side, that hold up the support arms -


Click image to enlarge


Click image to enlarge


Grind off the brackets as they are needed on the towbar -

Click image to enlarge


Click image to enlarge


Fitted up and all done -


New backplate needed for the towing electrics... which upon testing ... don't work. It is all enabled in the IID ( Dashboard and Tow bar settings enabled). I'm getting power from the SC to the control box/relay but nothing from the little Siemans box. I've taken it up with the supplier of the loom but also bought one from eBay as I need the tow bar working for next week.


Click image to enlarge


 Gavin

2005 Range Rover Vogue SE 4.2 Supercharged V8

Follow my 4.2 Supercharged antics -
https://www.fullfatrr.com/forum/topic63354.html
https://www.instagram.com/l322_supercharged/
https://www.youtube.com/channel/UC8ChHNSdscnJarKjBLd_IAg

Post #639787 16th Aug 2022 10:38am
View user's profile Send private message View poster's gallery Reply with quote
dhallworth


Member Since: 10 Oct 2011
Location: Glasgow
Posts: 3131

United Kingdom 2012 Range Rover Autobiography TDV8 Baltic Blue

Nicely done.

Hopefully it's a quick fix with the wiring loom. 2002 4.6 Vogue SE - Alveston Red with Lightstone Leather
2012 Range Rover 5.0 SC Autobiography in Indus Silver with Jet/Ivory Interior
2012 Range Rover 4.4 TDV8 Autobiography in Baltic Blue with Sand Interior

Post #639790 16th Aug 2022 10:53am
View user's profile Send private message View poster's gallery Reply with quote
Superspoons


Member Since: 24 Jun 2010
Location: East Hertfordshire, UK
Posts: 393

England 2006 Range Rover Vogue SE 4.2 SC V8 Zambezi Silver

Thanks David. Took a few hours.

Yes - I'm hoping its just the Siemens box. I've checked the fuse in the boot beforehand and as I said, there is power to it, just nothing at the Towing plugs. Censored

New box ordered - should be here by the weekend.... Gavin

2005 Range Rover Vogue SE 4.2 Supercharged V8

Follow my 4.2 Supercharged antics -
https://www.fullfatrr.com/forum/topic63354.html
https://www.instagram.com/l322_supercharged/
https://www.youtube.com/channel/UC8ChHNSdscnJarKjBLd_IAg

Post #639795 16th Aug 2022 11:10am
View user's profile Send private message View poster's gallery Reply with quote
Superspoons


Member Since: 24 Jun 2010
Location: East Hertfordshire, UK
Posts: 393

England 2006 Range Rover Vogue SE 4.2 SC V8 Zambezi Silver
Air Con Condenser

So after a proper diagnosis by my Air Con specialist who found a leak in the condensor courtesy of the dye, I ordered a new one from site sponsor Advanced Factors. Ordered it at 9:30 yesterday and it arrived at 11:00 today via DHL. Its not a brand I recognise but looks well made. I'll fit it after work tonight, Regas tomorrow.


Click image to enlarge


Click image to enlarge


Click image to enlarge
 Gavin

2005 Range Rover Vogue SE 4.2 Supercharged V8

Follow my 4.2 Supercharged antics -
https://www.fullfatrr.com/forum/topic63354.html
https://www.instagram.com/l322_supercharged/
https://www.youtube.com/channel/UC8ChHNSdscnJarKjBLd_IAg

Post #640080 18th Aug 2022 3:24pm
View user's profile Send private message View poster's gallery Reply with quote
Superspoons


Member Since: 24 Jun 2010
Location: East Hertfordshire, UK
Posts: 393

England 2006 Range Rover Vogue SE 4.2 SC V8 Zambezi Silver

Time to replace the old leaking Air Con Condenser... and what a struggle I had. Sad

Various US forums stated I just needed to remove the Viscous fan, free the rad pack, push back and slide out the condenser after unbolting the air con pipes... Reality was very different. I decided that rather than remove the Viscous fan I would just whip off the slam panel and lights/grill and slide it up...More bolts etc but seemed easier to work at the front and save my back Smile

All went well, slam panel off, lights out, radiator pack plastic bolts/clips removed along with the grill. Undid the air con bolts/pipes with no issues which I was surprised about as the Air Condenser was the original part..

I then spent 2 hours trying to slide the old one up and out. It would rise about 1cm and then hit something on the right hand side which stopped it lifting up. The plastic tube it slides down was inspected with my camera and I couldn't see any obvious clips that needed pushing or pulling. I could get my hand all the way along the condenser underneath so it wasn't something on the bottom holding it in place.

Anyway...all of sudden it came free when I gave it a bit of a heavy 'snap' lift... I looked at it and couldn't see any visible marks where it could've been held in place. I looked down the rad pack 'tube' and nothing in there either - smooth down both sides - one little lug but didn't look like it was the cause.

Anyway, the new one slipped in with no problem so I connected it up with new 'O' rings for air con connections and put everything back together. Its currently at the air con garage who diagnosed the leak for a test and refill.

You might be able to see a sight green haze on the old one where it leaked out - very feint.


Click image to enlarge


Click image to enlarge


Click image to enlarge


Click image to enlarge


Click image to enlarge


Click image to enlarge


Click image to enlarge


Click image to enlarge


Click image to enlarge


Click image to enlarge


Click image to enlarge


Click image to enlarge


Click image to enlarge


Click image to enlarge


Click image to enlarge
 Gavin

2005 Range Rover Vogue SE 4.2 Supercharged V8

Follow my 4.2 Supercharged antics -
https://www.fullfatrr.com/forum/topic63354.html
https://www.instagram.com/l322_supercharged/
https://www.youtube.com/channel/UC8ChHNSdscnJarKjBLd_IAg

Post #640148 19th Aug 2022 10:04am
View user's profile Send private message View poster's gallery Reply with quote
Haylands


Member Since: 04 Mar 2014
Location: East Yorkshire
Posts: 8334

England 2014 Range Rover Autobiography SDV8 Loire Blue

Cool...... see what I did there.... Whistle Pete
__________________________________________________
2014 L405 Autobiography SDV8 4.4 Loire Blue Ebony interior
2011 L322 Vogue SE 4.4 TDV8 Baltic Blue. Parchment over Navy Interior. Sold
2012 L322 Autobiography 5.0 Supercharged Ipanema Sand, Jet Interior. Sold
2002 L322 Vogue 4.4 V8 Epson Green, Ivory over Aspen Interior (Fatty Offroader) Sold
-Click for Project Fatty off roader-

Post #640152 19th Aug 2022 10:14am
View user's profile Send private message View poster's gallery Reply with quote
Post Reply  Back to top
Page 5 of 7 <1234567>
All times are GMT

Jump to  
Previous Topic | Next Topic >
Posting Rules
You cannot post new topics in this forum
You cannot reply to topics in this forum
You cannot edit your posts in this forum
You cannot delete your posts in this forum
You cannot vote in polls in this forum


Site Copyright © 2006-2025 Futuranet Ltd & Martin Lewis
fullfatrr.com RSS Feed - All Forums


Switch to Mobile site