Advertise on fullfatrr.com »

Home > In Car Electronics (L322) > '02 HSE ICE Car PC Project (Carx to XBMC to FFRR-PC!)
Post Reply  Down to end
Page 1 of 6 123456>
Print this entire topic · 
Joe90


Member Since: 29 Apr 2010
Location: Hampshire
Posts: 6408

England 
'02 HSE ICE Car PC Project (Carx to XBMC to FFRR-PC!)

Getting this thread going as a work in progress, early stages at present, as will probably only get time at the weekends to move it along.

Currently my "high spec" HSE (satnav Mk3 /analog tv) has an aftermarket RSE system of a DVD player and PS1 installed. Two rear screens with wireless headset (only one) and a remote control unit with receiver fitted in headlining just forward of the rear wiper. I don't have any remote control over the DVD player so have to start it in the boot (rubbish!) The PS1 is located behind the cover in the rear armrest. Both are viewed by switching to the AV input on the main screen. No video output in motion, but sound goes to the speakers.

I don't have / won't have an iPod, never use DVDs as all my videos are converted to avi/mkv/mp4, will need digital TV once analog runs out, but see the cost of a hybrid tv unit prohibitive, and it might be nice to have a rear view camera. I don't want to hack the car about, or fit a touch screen, so have opted at this stage to fit a carpc running carx over the ibus. I want to try to keep as stock as possible, but to bring things up to date without shelling out shed loads of cash!

I have been busy buying all the bits I need and am ready to make a start.

Task List (think I have this right):

1. Investigate current ICE and RSE setup
2. Remove the DVD player, Remote/Receiver and PS1 (these are redundant) but retain connections if useful
3. Tap into iBus
4. Tap into Tape Wires for iBus switch
5. Connect up video interface
6. Connect up carpc
7. Configure and enjoy!
8. Get digital TV working (using USB DVB stick on pc)
additional - look at smartphone integration

Nos 1 - 15

~~~~~~~~~~~~~~~~~~~~~~~~~~~~~~~~~~~~~~~~~~~~~

Have a gallery setup for photos, but will cross post them here as I document progress.


Many thanks to daveo for his help and advice so far Smile

Useful links for ibus info and setting up carx .
Experience is the only genuine knowledge, but as time passes, I have forgotten more than I can remember Wink
Volvo V70 P2 2006 2.4 Petrol 170bhp Estate SE
MG Midget Mk1 1962

Previous: L322 Range Rover TDV8 3.6 2008; L322 Range Rover TD6 3.0 2002; P38A Range Rover V8 1999


Last edited by Joe90 on 1st Mar 2012 5:48pm. Edited 13 times in total

Post #95427 1st Dec 2011 6:39am
View user's profile Send private message View poster's gallery Reply with quote
Joe90


Member Since: 29 Apr 2010
Location: Hampshire
Posts: 6408

England 
Investigate current ICE and RSE setup

Was a nice day, so set about figuring out how the existing setup was wired in and how it all was supposed to work.

First job was to remind myself how it all worked.

1. PS1

Fold down rear seat arm rest and get PS1 out.
Insert PS1 game and close lid
Game starts to load of rear screens (after selecting AV2 on each screen)
No sound
Searched through channels on Television on front screen but no picture, not even on the "AV" channel
Gameplay with attached controller fine

2. DVD

Power on DVD player in boot and insert DVD
DVD Video splash screen appears on both screens without intervention
Reaches the "Play" screen, and have to press "Play" on the DVD player to get it going
Tuned Television to AV Channel to get DVD on front screen (this goes off when in motion)
Volume needed turning up quite high to be audible


3. General

There is a Wireless Audio Transmitter installed in the roof lining by the tailgate for PS1/DVD audio to a pair of wireless headphones. Couldn't test as headphones needed new batteries.

A Remote Control did come with the car but I couldn't get it to work

4. Investigation

Removed the side cover in the boot, the load shelf, the spare wheel, the spare wheel strap, the two side covers fixed in by luggage hooks, and the black plastic tray below the lift out panel. This provided me with the access I needed.

First job was to unravel all the wiring which had been bundled up. Had about 30 - 40 feet of "extra" wiring.

Then removed the DVD Player to reveal the connections at the rear:

a) Video Out
b) Audio Out (L/R)
c) Remote Idea
d) Power

The remote wire headed off towards the front of the car, so I guess this relates to a Receiver blob I have on the passenger side of the windscreen. Must have another go with the remote I have.

Tracing all the cabling took a couple of hours:

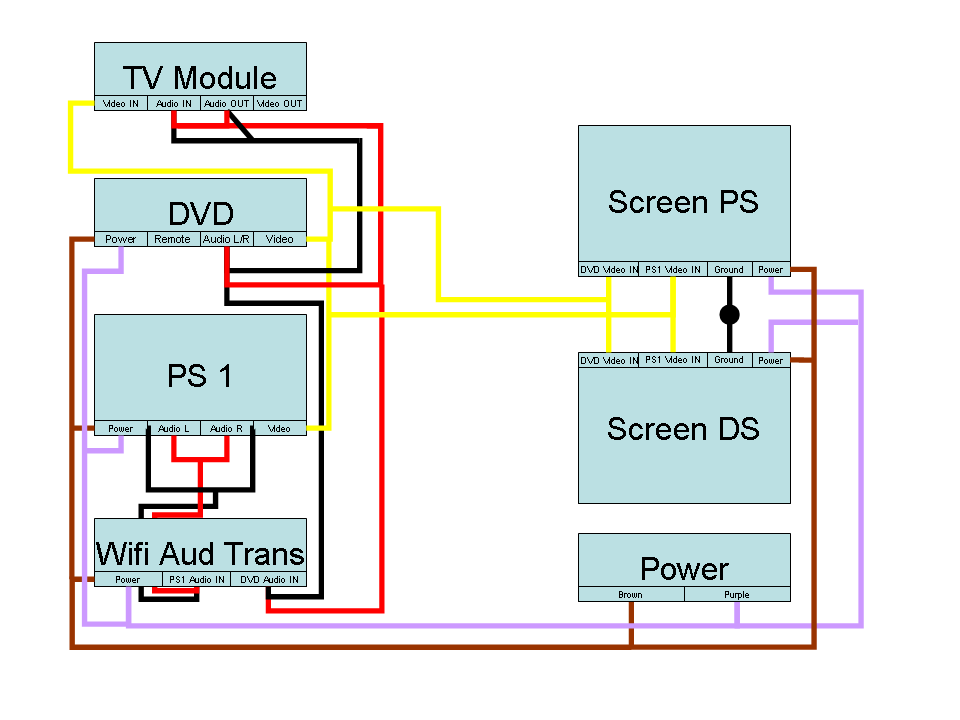
a) Power for the DVD player, the PS1, the Wireless transmitter and the two screens all tracked back to a brown and purple wire off the main loom very close to the TV and Radio modules. The power cable from the PS1 runs to a small power supply mounted in the corner of the wheel wheel by the jack. The DVD player is 12v, as is the audio transmitter.

b) Looks like there is no stereo sound as the cabling is setup in such a ways as to only send one channel (albeit both at the same time)

c) PS1 sound only appears to go to the wireless transmitter, which is probably a good thing for the driver and FS passenger!

d) The PS1 video output does appear to be wired into the front screen, the same way as the DVD player, but I couldn't get a picture

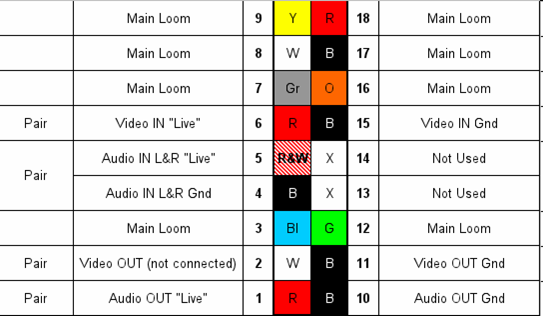
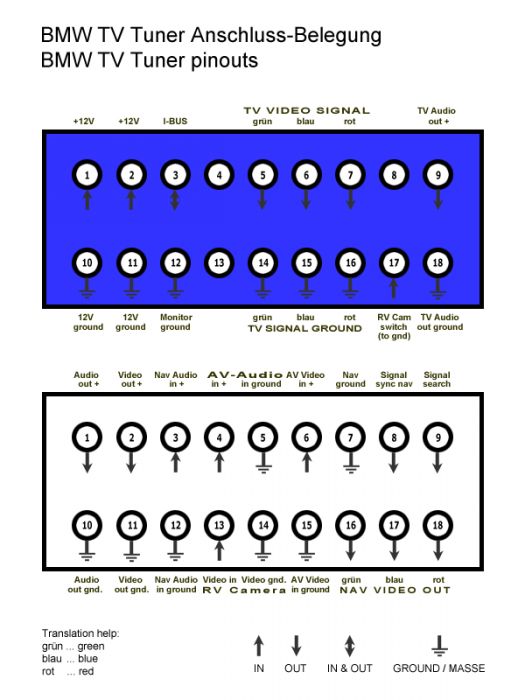
e) The "WHITE" connector block on the TV module was the connection point for the video and audio inputs - A five wire cable with one connection unused (each wire contained "live and ground"). I had this out and did some resistance testing to figure out which wires were going to which pins.

White Connector Pin Assignments


White & Blue Connector Pin Assignments

Click image to enlarge


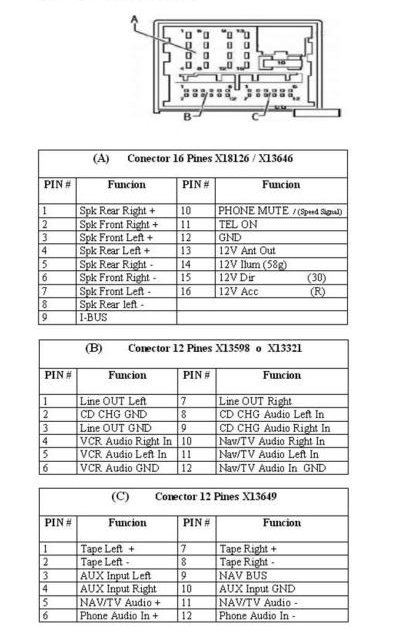
BM54 Radio Pin Assignments
Click image to enlarge


f) Am surprised that with there being phono connections everywhere, the installers still carried out a great deal of simply twisting wires together and taping them to make connections

g) The screens are connected to a small box of tricks under the seat which take the two video inputs (DVD and PS1), the Power and an additional Ground.

h) Image quality is remarkable good on the rear screens a bit dim on the front screen though

So it seems the whole setup can operate standalone if need be - the connections to the care are only for the front screen and dvd audio (which is no good for FS users when in motion).Not sure how any of this stuff will be of any use (apart from the rear screens) with my carx project Wink

Wiring diagram (not perfect)
Click image to enlarge


The good thing is that this previous work has provided me with the extra loom cabling required for connecting up the carpc. Whilst not essential as if you get hold of some spare pins you can make up the lead yourself, it has saved a bit of effort. Something like this:
http://www.toysinyourcar.com/acatalog/bmw_av_cam.html#a16

Nos 16 - 23

http://www.fullfatrr.com/gallery/displayim...amp;pos=16
~~~~~~~~~~~~~~~~~~~~~~~~~~~~~~~~~~~~~~~~

Oh, I found one of those Connect2 boxes down at the bottom of the inner wing. Seems I have lots of stuff/wiring for phones in there. .
Experience is the only genuine knowledge, but as time passes, I have forgotten more than I can remember Wink
Volvo V70 P2 2006 2.4 Petrol 170bhp Estate SE
MG Midget Mk1 1962

Previous: L322 Range Rover TDV8 3.6 2008; L322 Range Rover TD6 3.0 2002; P38A Range Rover V8 1999

Last edited by Joe90 on 22nd Jan 2013 7:31pm. Edited 9 times in total

Post #95917 3rd Dec 2011 5:58pm
View user's profile Send private message View poster's gallery Reply with quote
Joe90


Member Since: 29 Apr 2010
Location: Hampshire
Posts: 6408

England 
Remove the DVD player, Remote/Receiver and PS1

Got stuck in today and removed the PS1 and the Wireless Audio Transmitter. This got rid of a whole pile of cabling and made for a much tidier wheel well and ICE "corner".

Tried to get the remote control to work for the DVD, swapped out batteries etc, but it wasn't having any of it. The cable runs up through the C pillar and along the headlining, and I wasn't about to pull all that down so at the moment I'll have to do without. The DVD player might also be coming out as this is really not needed, but will leave in place for now.

Did a trial fit of the Acer Aspire One, fits in nicely with the screen open at 90 degrees. Made a base up out of a piece of laminate flooring which rests on top of the air outlet and the wheel arch. Will fix this in place with velcro and will do the same with the PC.

Have been thinking about linking in the All Comms to this PC. Would have to change the screen resolution to run it, but with a long enough USB cable, I could have my own on board diagnostic system!

Nos 24 - 26

http://www.fullfatrr.com/gallery/displayim...amp;pos=24
~~~~~~~~~~~~~~~~~~~~~~~~~~~~~~~~~~~~~~~ .
Experience is the only genuine knowledge, but as time passes, I have forgotten more than I can remember Wink
Volvo V70 P2 2006 2.4 Petrol 170bhp Estate SE
MG Midget Mk1 1962

Previous: L322 Range Rover TDV8 3.6 2008; L322 Range Rover TD6 3.0 2002; P38A Range Rover V8 1999


Last edited by Joe90 on 5th Dec 2011 6:00pm. Edited 2 times in total

Post #96102 4th Dec 2011 3:55pm
View user's profile Send private message View poster's gallery Reply with quote
Joe90


Member Since: 29 Apr 2010
Location: Hampshire
Posts: 6408

England 
Tap into Tape Wires

Changed the order of my list, and skipped the iBus connection (need a bit more advice) but tackled instead the connections for sound into the tape audio wires. You need to do this so that you get stereo sound from the carpc. In simple terms: Press the tape button on the OBC (make sure you have a tape in there, any tape will do), then start the audio from your carpc / external audio device. The car thinks the sound is coming from the tape deck so it plays it out through the speaker system.

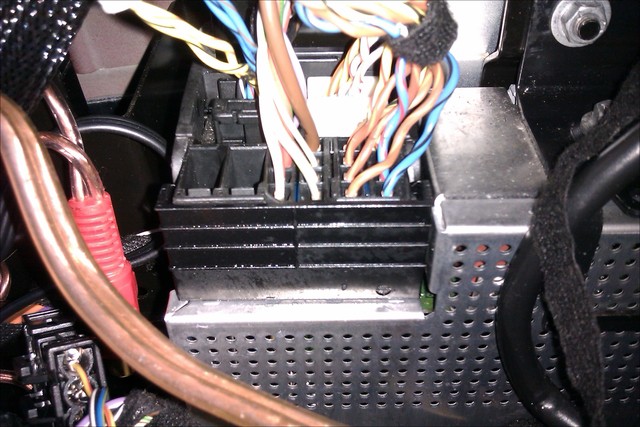
Thanks to the great howto done by Simon Vowles on his X5 I was able to identify the wires on the inner black connection block of the radio module.

Pin 1 Blue and Black +
Pin 2 Blue and Brown -

Pin 7 Yellow and Black +
Pin 8 Yellow and Brown -

Took the plunge and set about soldering phono plugs onto each of these pairs. Moment of truth is always when you get the wire cutters out and cut through the wires! So soldered U&B & U&N onto the red phono and Y&B & Y&N onto the white phono. I put the females on the connector block side to make it easy to plug external sound leads onto them.

Soldering done I then plugged them in and tested with a tape. Sound! (So I hadn't broken it)

Then unplugged and plugged in a 2 x phono to 3.5mm jack lead, plugging the jack into my HTC Legend, set some music going. Sound! (So I had chosen the right wires!). Might need a pre-amp and volume was quite low - but this might have been the quality of the mp3 or the output from the phone.

Anyway, that bit done. All photos up on the gallery nos 27 - 38:

http://www.fullfatrr.com/gallery/displayim...amp;pos=29
~~~~~~~~~~~~~~~~~~~~~~~~~~~~~~~~~~~~~~ .
Experience is the only genuine knowledge, but as time passes, I have forgotten more than I can remember Wink
Volvo V70 P2 2006 2.4 Petrol 170bhp Estate SE
MG Midget Mk1 1962

Previous: L322 Range Rover TDV8 3.6 2008; L322 Range Rover TD6 3.0 2002; P38A Range Rover V8 1999


Last edited by Joe90 on 5th Dec 2011 5:57pm. Edited 2 times in total

Post #96334 5th Dec 2011 4:42pm
View user's profile Send private message View poster's gallery Reply with quote
Joe90


Member Since: 29 Apr 2010
Location: Hampshire
Posts: 6408

England 
IBus and Video Connections

A light came on today (in my head). I realised I could completely remove the cable connecting to the TV module and work on it in the warmth of my kitchen.

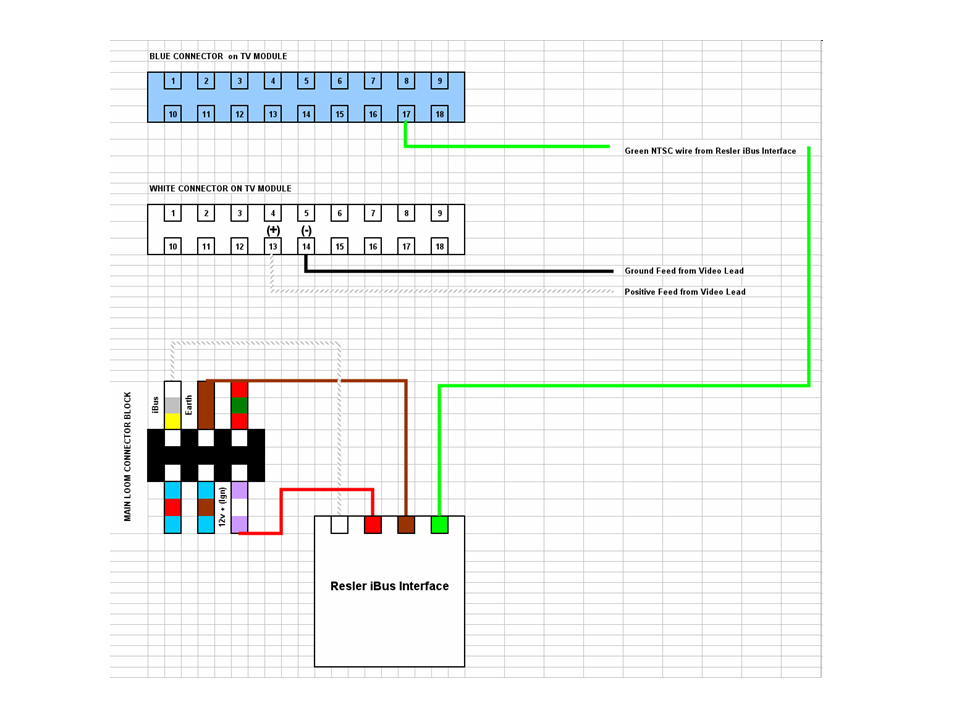
Another light that came on reminded me that I had a spare RCA connection on the AV loom labelled "Video IN", currently assigned to pins 2 & 11. I realised I could move these pins to 13 & 14 the reverse camera (+) and (-), and then connect my video feed from the PC to there.


Now confident that all I needed to do was to connect the GREEN wire (NTSC) from the Resler iBus interface to pin 17 of the BLUE connector on the TV module, I got into crouch/squat/grovel position in the boot and set about attaching it. I had to "steal" a pin connector from a spare connector in the boot then grabbed the GREEN wire from the Resler and soldered it onto the pin. With a push and shove pin back in assignment 17. Test connectivity with circuit tester.

Then to connect the other three wires coming out of the Resler iBus interface:

RED +12v - Ignition Feed
BROWN -12v - Earth
WHITE - iBus

You can pick almost anywhere to connect these up if you know which wires you are looking for, but on daveo's advice I used the big black connector that can be found dangling in front of the radio module. On the male side of the connection you will find a PURPLE wire (Ignition Live), a BROWN wire (Earth) and a WHITE & GREY with YELLOW bands wire (iBus). I couldn't get the connectors out of the block on this one, so did a simple cut and shut with butt connectors.

Now for the connections to the WHITE connector I removed the cable and setup in the kitchen with a bright light, some tiny screwdrivers, a circuit tester and my soldering iron. Much better than crouching in the boot! Then pulled pins from 2 & 11 and pushed them into 13 & 14. Tested circuit.

Removing the pins from the connector is a two stage process. If you look closely you can see there is a clip on the pin connector holding it in place. Using a tiny screwdriver or pointy thing depress this clip and pull up on the wire. The pin connector should move out a bit then stop again. This is because the pin connector is catching on the block again. Reapply pressure in the second hole and pull on the wire again. The pin connector should now come out of the block.

Refitted cable back into car.

A simplified wiring diagram:

Click image to enlarge


See gallery Nos 39 - 52
http://www.fullfatrr.com/gallery/displayim...amp;pos=41
~~~~~~~~~~~~~~~~~~~~~~~~~~~~~~~~~~~~~~~~~~~~~ .
Experience is the only genuine knowledge, but as time passes, I have forgotten more than I can remember Wink
Volvo V70 P2 2006 2.4 Petrol 170bhp Estate SE
MG Midget Mk1 1962

Previous: L322 Range Rover TDV8 3.6 2008; L322 Range Rover TD6 3.0 2002; P38A Range Rover V8 1999

Last edited by Joe90 on 8th Dec 2011 6:49pm. Edited 10 times in total

Post #96346 5th Dec 2011 5:50pm
View user's profile Send private message View poster's gallery Reply with quote
Joe90


Member Since: 29 Apr 2010
Location: Hampshire
Posts: 6408

England 

Did it work?

Yes. (although I have to confess to making some wiring errors along the way which slowed me down a bit)


I connected everything up:

1. Plug in Resler IBus Interface to USB port (stick to the same port for COM assignment in XP)
2. Connect up the VGA cable to the Video Converter, and then connect a single video phono to the Video Out connector that goes to Pins 13&14, and plug the video convertor USB into the PC for power. If you have one, there is a dipswitch on the convertor to output to NTSC - put this to ON.
(Subsequently split the video lead and connect up the rear screens)
3. Take PC 12v adapter and connect to Ignition Live and Earth ( I had a couple of ready made connections left over from ripping out the PS1
4. Plug two phonos <> 3.5mm jack lead into headphone socket of PC and the other end to the two phonos soldered onto the tape audio outputs
5. Make sure you have some media available to test. My AAO has two SD slots so I filled one with mp3 and the other with avis.
6. You may have to install a codec pack - I found K-Lite to be the most useful
7. Set screen resolution to 800x600 on the PC
8. Start Car or go to Ignition 1
9. Start PC
10. Do the Fn+F5 or whatever it is you have to do to select output to both screens on the PC (On a laptop this is fairly straightforward)
11. Start Carx (if not autostarted) and you get to a "Press Mode or Click" screen on the PC - this means its ready
12. Now go to the front screen and press the mode button until you get Tape, and the screen should auto-magically switch over to the carx main screen. If it doesn't and you just get a black screen, at least this shows that the NTSC switch has worked. (blank screen means there is something wrong somewhere with your video connections so work your way back through your installation and test your video output with a separate monitor). Or if you get no activity at all, it could be that the iBus code being sent is not recognised by carx (see the pdf by Simon Vowles on how he resolved this on his X5)
13. Assuming you have the Carx screen test out the right rotary knob. Does it move you between menu selections. Can you press the knob and be taken to that menu selections screen? If you are lucky the default iBus codes will work for you, if not you may have to do a bit of investigative work using Navcoder or iBus Explorer to discover what the codes are for specific actions ( I'll cover this later/separately). I found a bit of a mixed bunch. Turning the knob clockwise and anti-clockwise did move me around but not everytime, sometimes I had to turn back to go forward, sometimes I had to keep on turning to eventually get a move. If a short press doesn't work try a long press. It may take a bit of time to track down the consistent codes needed for fluid use of carx. Initial analysis shows that subsequent right hand knob turns can generate different codes, and cause stuff to happen on the menu in the background.
14. Test video and sound. It may be easier to do this from the PC if you have a screen there, using the mouse etc. You may need to tell carx where your mp3s and avis are in Settings first. With any luck you'll get music playing with the MP3 Player and video playing with the Video Player. My mp3 volume is actually quite good, and I have the Realtek Sound Manager as well which has an equaliser (I put this on the "Powerful" setting!). Video audio volume can vary depending on the encoding.

So it works, but there is much work to do to get it how I want it, be nice to have the whole kit on a bench inside (like MattStevenson2005 does Smile) but I can't run to all that right now.

Nos 53 - 58
http://www.fullfatrr.com/gallery/displayim...amp;pos=55
~~~~~~~~~~~~~~~~~~~~~~~~~~~~~~~~~~~~~~~~~~~~~ .
Experience is the only genuine knowledge, but as time passes, I have forgotten more than I can remember Wink
Volvo V70 P2 2006 2.4 Petrol 170bhp Estate SE
MG Midget Mk1 1962

Previous: L322 Range Rover TDV8 3.6 2008; L322 Range Rover TD6 3.0 2002; P38A Range Rover V8 1999


Last edited by Joe90 on 8th Dec 2011 6:51pm. Edited 2 times in total

Post #96347 5th Dec 2011 5:50pm
View user's profile Send private message View poster's gallery Reply with quote
Joe90


Member Since: 29 Apr 2010
Location: Hampshire
Posts: 6408

England 
PC configuration

I've been having fun with this! and sorry in advance it's all gone a bit geeky Rolling Eyes

The Acer Aspire One won't, of course restart on a power failure, being a laptop/netbook, so I had to find a way of managing the starts and stops of a car. I lost several days trying to find and create a solution with Windows power saving and task scheduler, but finally realised I had to come up with a hardware solution coupled with some scripting.

So I dismantled the netbook and set about installing a wired momentary switch, in order that I could have a button to press from the drivers seat to switch on the netbook.

Finding the power button is easy as its the only one, you then need to figure out which of the contacts to the button start the PC. This is easily done with a piece of wire, trying each couplet of contacts at a time with the battery reconnected to the half dismantled PC. If the PC starts up, you've found them! Turns out it was pins 3 & 4.

I then soldered a wire onto each of these pins (bloody difficult given the existing solder points were only @ 1/16th of an inch), tested I had contact, poked the wires out of the conveniently located Kensington lock socket and rebuilt the netbook. Attached a momentary switch to the wires and hey presto. I might move these wires back inside the PC and fit a jack socket next to the audio sockets to tidy this all up.

This will start the laptop from cold, or wake it from hybrid sleep, and bring the screen back up. In a sense this is the best way to do things; no battery drain and you only switch on the car-pc when you want it.

I then borrowed / wrote a vbscript which is placed in the startup folder along with carx.exe which monitors the battery state and reacts when it changes. So when the power goes off, the PC turns off carx, drops to hybrid sleep, when AC (ignition power) comes on (button pressed) it can restart carx.

Scripts posted below (yawn)

VBScript that monitors battery state and then takes actions:

'this bit for running programs

sub shell(cmd)

dim objShell

Set objShell = WScript.CreateObject( "WScript.Shell" )

objShell.Run(cmd)

Set objShell = Nothing

end sub


'this bit tests battery status

Function CheckBattery

    Dim oWMI, items, item

    Set oWMI = GetObject("winmgmts:\\.\root\cimv2")

    Set items = oWMI.ExecQuery("Select * from Win32_Battery",,48)

    For Each item in items

        If item.BatteryStatus = 1 Then

            CheckBattery = 1

            Exit Function

        ElseIf item.BatteryStatus = 2 then

            CheckBattery = 2

            Exit Function

        End If

    Next

End Function


'This bit closes carx on battery power

sub closecarx()


      Dim objWMIService, objProcess, colProcess

      Dim strComputer, strProcessKill

      strComputer = "FFRR-Car-PC"

      strProcessKill = "'carx.exe'"

      Set objWMIService = GetObject("winmgmts:" & "{impersonationLevel=impersonate}!\\" & strComputer & "\root\cimv2")

      Set colProcess = objWMIService.ExecQuery("Select * from Win32_Process Where Name = " & strProcessKill)

      For Each objProcess in colProcess

      objProcess.Terminate()

      Next

end sub


'this bit queries battery status and takes actions accordingly

Dim battery_status, prev_status

prev_status = CheckBattery

Set colMonitoredEvents = GetObject("winmgmts:\\.\root\cimv2")._

    ExecNotificationQuery("Select * from Win32_PowerManagementEvent")

Do

    Set strLatestEvent = colMonitoredEvents.NextEvent

    If strLatestEvent.EventType = 10 Then

        battery_status = CheckBattery

        If battery_status <> prev_status Then

            If battery_status = 1 Then

                'Wscript.Echo "DC power"

      WScript.Sleep 60000

      closecarx

       ElseIf battery_status = 2 Then

                'Wscript.Echo "AC power"

      shell """C:\Program Files\carxbexe\carx.exe"""

            End If

        End If

    End If

    prev_status = battery_status

Loop


I found another useful little program whilst trying to figure all this out - hdmiOn.exe. This will bring the display back on once the PC is programmatically brought out of sleep (i.e. if you don't touch any buttons but wakeup the PC on a timed schedule with a script). Here's the link: http://thydzik.com/hdmion-a-solution-to-lo...on-hd-tvs/

I still need to gather some solid iBus data on all the buttons.....

Gallery Nos 59 - 63
http://www.fullfatrr.com/gallery/displayim...amp;pos=61
~~~~~~~~~~~~~~~~~~~~~~~~~~~~~~~~~~~~~~~~~~~~~ .
Experience is the only genuine knowledge, but as time passes, I have forgotten more than I can remember Wink
Volvo V70 P2 2006 2.4 Petrol 170bhp Estate SE
MG Midget Mk1 1962

Previous: L322 Range Rover TDV8 3.6 2008; L322 Range Rover TD6 3.0 2002; P38A Range Rover V8 1999

Last edited by Joe90 on 19th Dec 2011 11:14pm. Edited 4 times in total

Post #96349 5th Dec 2011 5:50pm
View user's profile Send private message View poster's gallery Reply with quote
Joe90


Member Since: 29 Apr 2010
Location: Hampshire
Posts: 6408

England 
iBus Codes

Some (but not all) codes from the MFP to the ibus, pulled from Navcoder using the BMBT/80 filter. On the whole, these match up with the E39 codes from baso.no and from the separate carx.ini provided.

F0 04 68 48 23 F7   BMBT --> RAD : BM Button: MODE_pressed
F0 04 68 48 A3 77   BMBT --> RAD : BM Button: MODE_released

F0 04 68 48 30 E4   BMBT --> RAD : BM Button: RADIO-BM_pressed
F0 04 68 48 B0 64   BMBT --> RAD : BM Button: RADIO-BM_released

F0 04 68 48 11 C5   BMBT --> RAD : BM Button: Preset_1_pressed
F0 04 68 48 91 45   BMBT --> RAD : BM Button: Preset_1_released

F0 04 68 48 01 D5   BMBT --> RAD : BM Button: Preset_2_pressed
F0 04 68 48 81 55   BMBT --> RAD : BM Button: Preset_2_released

F0 04 68 48 12 C6   BMBT --> RAD : BM Button: Preset_3_pressed
F0 04 68 48 92 46   BMBT --> RAD : BM Button: Preset_3_released

F0 04 68 48 02 D6   BMBT --> RAD : BM Button: Preset_4_pressed
F0 04 68 48 82 56   BMBT --> RAD : BM Button: Preset_4_released

F0 04 68 48 13 C7   BMBT --> RAD : BM Button: Preset_5_pressed
F0 04 68 48 93 47   BMBT --> RAD : BM Button: Preset_5_released

F0 04 68 48 03 D7   BMBT --> RAD : BM Button: Preset_6_pressed
F0 04 68 48 83 57   BMBT --> RAD : BM Button: Preset_6_released

F0 04 68 48 06 D2   BMBT --> RAD : BM Button: Radio_on/off_pressed
F0 04 68 48 86 52   BMBT --> RAD : BM Button: Radio_on/off_released
F0 04 68 32 10 BE   BMBT --> RAD : Volume Control: Decrease 1 step
F0 04 68 32 11 BF   BMBT --> RAD : Volume Control: Increase 1 step

F0 04 3B 48 05 82   BMBT --> GT  : BM Button: BM_Knob_pressed
F0 04 3B 48 85 02   BMBT --> GT  : BM Button: BM_Knob_released
F0 04 3B 48 45 C2   BMBT --> GT  : BM Button: BM_Knob_long
F0 04 3B 48 85 02   BMBT --> GT  : BM Button: BM_Knob_released

F0 04 3B 49 01 87   BMBT --> GT  : BM_Knob: Left 1 step

F0 04 3B 49 81 07   BMBT --> GT  : BM_Knob: Right 1 step

F0 04 FF 48 34 77   BMBT --> LOC : BM Button: MENU_pressed
F0 04 FF 48 B4 F7   BMBT --> LOC : BM Button: MENU_released
   
F0 04 68 48 04 D0   BMBT --> RAD : BM Button: TONE_pressed
F0 04 68 48 84 50   BMBT --> RAD : BM Button: TONE_released

F0 05 FF 47 00 0F 42   BMBT --> LOC : BM Status: SELECT_pressed
F0 05 FF 47 00 8F C2   BMBT --> LOC : BM Status: SELECT_released

F0 04 68 48 14 C0   BMBT --> RAD : BM Button: Tape_Direction_pressed
F0 04 68 48 94 40   BMBT --> RAD : BM Button: Tape_Direction_released

F0 04 FF 48 07 44   BMBT --> LOC : BM Button: CLOCK_pressed
F0 04 FF 48 87 C4   BMBT --> LOC : BM Button: CLOCK_released
   
F0 04 FF 48 08 4B   BMBT --> LOC : BM Button: TELEPHONE_pressed
F0 04 FF 48 88 CB   BMBT --> LOC : BM Button: TELEPHONE_released
   
F0 04 68 48 24 F0   BMBT --> RAD : BM Button: EJECT_pressed
F0 04 68 48 A4 70   BMBT --> RAD : BM Button: EJECT_released

50 04 68 32 11 1F   MFL  --> RAD : Volume Control: Increase 1 step
50 04 68 32 10 1E   MFL  --> RAD : Volume Control: Decrease 1 step

50 04 68 3B 01 06   MFL  --> RAD : Radio/Telephone control: Search_Up_pressed
50 04 68 3B 21 26   MFL  --> RAD : Radio/Telephone control: Search_Up_released
50 04 68 3B 08 0F   MFL  --> RAD : Radio/Telephone control: Search_Down_pressed
50 04 68 3B 28 2F   MFL  --> RAD : Radio/Telephone control: Search_Down_released
   
80 0C BF 13 01 11 00 00 00 00 12 00 00 22   
IKE  --> GLO : IKE sensor status: Handbrake_On  Motor_Running  Gear_R
   
80 0C BF 13 01 81 00 00 00 00 12 00 00 B2
   IKE  --> GLO : IKE sensor status: Handbrake_On  Motor_Running  Gear_D
   
80 0C BF 13 01 B1 00 00 00 00 12 00 00 82
   IKE  --> GLO : IKE sensor status: Handbrake_On  Motor_Running  Gear_P
   
80 0C BF 13 01 71 00 00 00 00 12 00 00 42   
IKE  --> GLO : IKE sensor status: Handbrake_On  Motor_Running

80 0C BF 13 00 B1 00 00 00 00 12 00 00 83
   IKE  --> GLO : IKE sensor status: Motor_Running  Gear_P
 .
Experience is the only genuine knowledge, but as time passes, I have forgotten more than I can remember Wink
Volvo V70 P2 2006 2.4 Petrol 170bhp Estate SE
MG Midget Mk1 1962

Previous: L322 Range Rover TDV8 3.6 2008; L322 Range Rover TD6 3.0 2002; P38A Range Rover V8 1999

Last edited by Joe90 on 24th Mar 2012 5:49pm. Edited 9 times in total

Post #96350 5th Dec 2011 5:50pm
View user's profile Send private message View poster's gallery Reply with quote
Joe90


Member Since: 29 Apr 2010
Location: Hampshire
Posts: 6408

England 
Switch to Linux

Why switch to linux for my car pc?

1. Carx not communicating button presses properly
2. Carx not configurable ( In the way I mean configurable)
3. I found Art Tevs (more on this later)
4. I know linux, can program/script it.

So I installed a copy of Xubuntu 11.10 alongside my windows installation and got to work. Whilst researching the iBus I found Art Tevs, who had a BMW non touch screen, which he had created new PCB boards for and found 7" VGA screens to fit into the existing bord monitor. His approach was to completely replace the OEM car computer with his own setup running on linux. I'll just point you to his project pages: http://projects.tevs.eu/OpenBM.

The key thing is the software Art has written which communicates with the iBus; OpenBM-Gateway, you can then use this to send button presses on the bord-monitor as keystrokes to your car pc application. Art used XBMC Media Center as his base application, and also wrote bespoke plugins to control the Radio / CD player and OBC.

Having installed openbm-gateway and xbmc (yes, I could have run xbmc in Windows, but would have no way of controlling it?), I also needed to setup an events file to transfer the button presses to keystrokes. I use another program called xdotool which converts your "code" to a keystroke in your chosen application. By default this is xbmc because it runs fullscreen and has the focus. It looks something like this, but I have added the definition of the keystrokes so you can see what is supposed to happen:


Left             Knob Left           "F0 04 3B 49 01 87" = xdotool key Left
Up             Knob Right           "F0 04 3B 49 81 07" = xdotool key Up
Enter             Knob Press         "F0 04 3B 48 05 82" = xdotool key Return
Esc             Knob Long Press    "F0 04 3B 48 45 C2" = xdotool key Escape
Tab             Tape Direction           "F0 04 68 48 14 C0" = xdotool key Tab
Context     Select              "F0 05 FF 47 00 0F 42" = xdotool key c
Shutdown   Preset 1                   "F0 04 68 48 11 C5" = xdotool key s


This all works well and is much more competent than the carx approach. The whole thing is let down by the car's front screen which just doesn't have a high enough resolution for viewing xbmc in detail (remember xbmc is intended for large screen tvs). Also the front screen is very dim, so you need to boost this up using the "secret codes" in the Settings menu, (see http://www.fullfatrr.com/wiki/Secret_codes_2002_to_2005). There problems go further than that in that its just too fiddly, even with a different skin (Slik). You'll know what I mean if you have tried to set the SatNav destination whilst driving!!

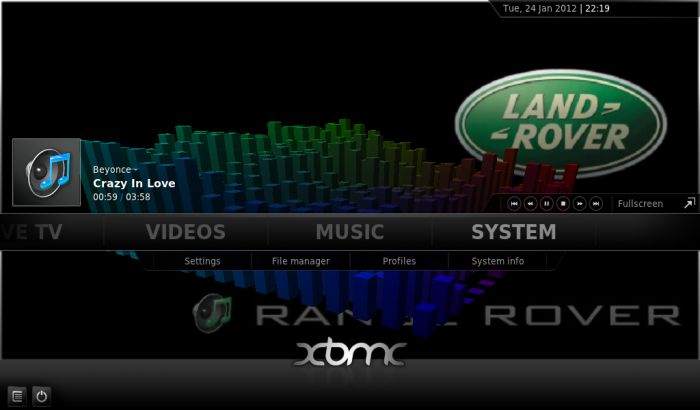
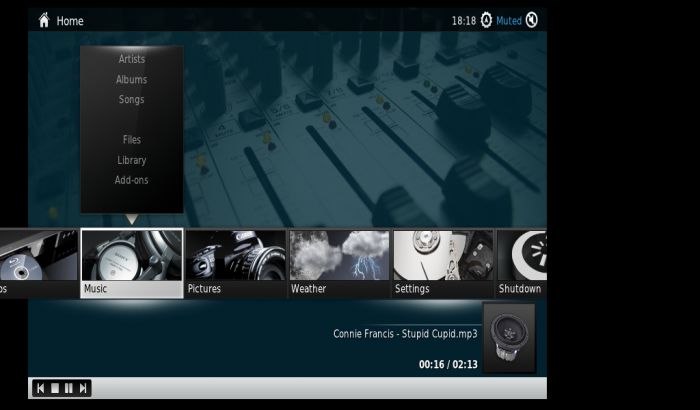
Standard XBMC


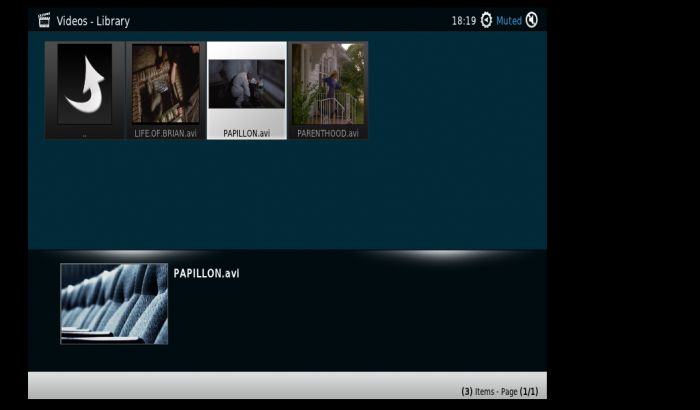
Slik XBMC


Nevertheless, I persevered, given there were all sorts of options available to me within XBMC, and the knowledge that I could use XBMC Remote on my Android phone to control things via wireless. (This is quite cool; you set up the phone as a wireless hotspot, then the PC can connect to the phone and have internet too, and you can then control the PC from the phone with a simple remote app).

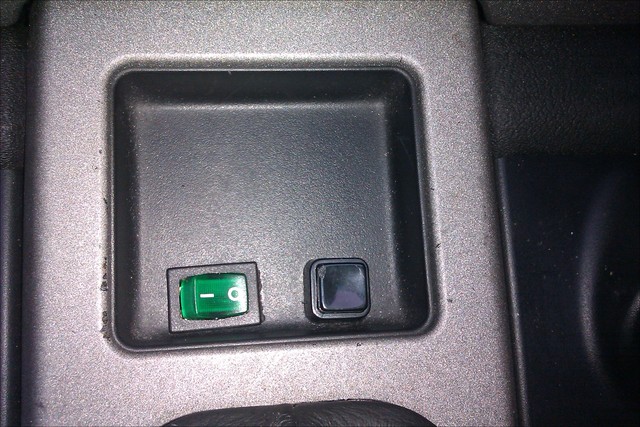
I did some scripting as well to take care of startup and shutdown. The DC adapter for my netbook kicks out some serious RF interference when switched on and makes listening to the radio impossible, so I fitted a switch up front to turn the power on and off. I also fitted a momentary switch up front to turn the PC on and off.


Here is the script:

#!/bin/bash

### powerwatch.sh
### created by Joe90
### for carpc
### run this script on start up of laptop
### will start all required programs
### shuts down laptop if ignition switched off
### should keep working after a sleep or hibernate too?

while :

do
        #checks for mains power, then acts
   if on_ac_power; then
      sleep 2
      ### starts openbm-gateway
      if [ -z  $(pgrep openbm-gateway) ]; then
      openbm-gateway -d /dev/ttyUSB0 -e /usr/share/openbm/keys-xbmc.event &
      fi
      sleep 2
      ### starts xbmc
      if [ -z  $(pgrep xbmc.bin) ]; then
      xbmc &
      fi
      sleep 2
      ### blanks laptop screen (its in the boot!)
      if [[ $(xrandr -q | grep "current 1024 x 600") ]]; then
      sleep 1; xrandr --output LVDS1 --off &
      fi
   else
      ### dialog popup to allow user to cancel shutdown
      ### for whatever reason. Defaults to YES after timeout!
      #turn netbook screen back on
      xrandr --output LVDS1 --auto
      xdotool key backslash backslash
      zenity --question --text='Do you want to Shutdown (Yes) \
      or continue working on battery power? (No)' --title='Shutdown ?' \
      --width=400 --height=100 --timeout=25
      if [ $? = 5 ]; then
      ### shuts down xbmc gracefully (?)
      wmctrl -c "XBMC Media Center"
      ### shuts down openbm-gateway
      killall openbm-gateway
      ### shuts down laptop, assumes script not run as root
      ### resolves ttyUSB0 assignment, only takes 30 seconds to boot
      ### turn laptop screen back on
      #xrandr --output LVDS1 --auto
      echo "ffrr" | sudo -S shutdown -h now
      else
      ### turn laptop screen back on
      #xrandr --output LVDS1 --auto
      exit
      fi
   fi
done


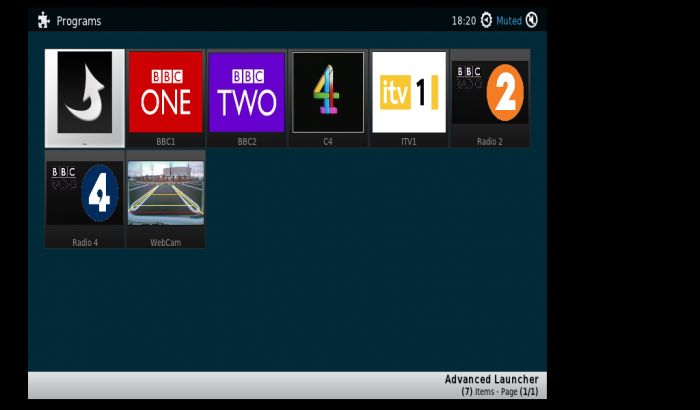
I also used a plugin/add-on for XBMC called Advanced Launcher, which allowed me to start up other programs from within XBMC. This was useful for directly using mplayer to watch Digital Television and the Reverse Camera

See http://www.fullfatrr.com/forum/post104239.html#104239 for reverse cam and buttons install.

XBMC Slik Advanced Launcher Screen


Took a fair bit of figuring out to the the reverse camera to work properly and in colour (I think using the Easycap video converter was causing the problems with format), but eventually got there, using this script to run it in mplayer:

#!/bin/bash
mplayer \
tv:// -tv driver=v4l2:norm=NTSC_M_JP:input=0:device=/dev/video1 \
-aspect 16:9 \
-fs \
-zoom \
-vo xv \
-fps 15


to view digital tv is simples:
mplayer dvb:// -fs

or
mplayer dvb://BBC1  -fs


This just puts up the video in fullscreen, and one presses the relevant button that equals ESCAPE on the keyboard to close it and return to XBMC.

So, everything working, can control the PC OK, but not very accessible or usable. What I needed was something like carx but on linux. You know what is coming next.............Joe90's homebrew FFRR-PC application! .
Experience is the only genuine knowledge, but as time passes, I have forgotten more than I can remember Wink
Volvo V70 P2 2006 2.4 Petrol 170bhp Estate SE
MG Midget Mk1 1962

Previous: L322 Range Rover TDV8 3.6 2008; L322 Range Rover TD6 3.0 2002; P38A Range Rover V8 1999

Last edited by Joe90 on 1st Mar 2012 8:26pm. Edited 10 times in total

Post #96351 5th Dec 2011 5:51pm
View user's profile Send private message View poster's gallery Reply with quote
Joe90


Member Since: 29 Apr 2010
Location: Hampshire
Posts: 6408

England 
FFRR-PC

Video of early efforts, only got a working audio player at present


Everything controlled just using the right knob
(replicating TAB (right turn) / SHIFT+TAB (left turn) / ENTER (press))

Improved demo of FFRR-PC


Hardware "Up front"


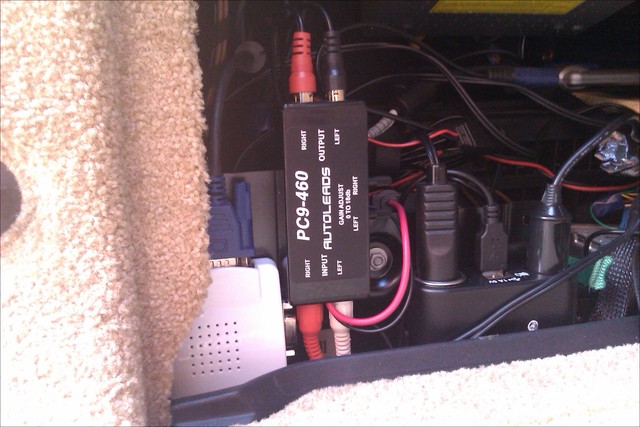
Hardware "Out back"


A quick picture of the last bit of hardware added, an audio booster (thanks Simes)


Right time to bore you with the details of the installation that is now working. I'll cover the hardware first, then spend some time on the software solution:

Hardware Requirements:
1 x PC (I used an Acer Aspire One netbook with 120gb HDD)
1 x Resler iBus Interface for connecting to the iBus
1 x BMW reversing camera with composite output
1 x Easycap DC60 Capture device (converts Composite to USB)
1 x DCB-T USB stick
1 x Accessory Adapter (2 x accessory slots and 2 x USB power, from Maplins)
1 x Audio Booster
1 x VGA Convertor (converts VGA output to Composite/S-Video input)
2 x Rear screens with composite input
Various cables, connectors and switches (read full thread)

Software Requirements:
Xubuntu 11.10 operating system (allows bash scripting for the writing of all the scripts)
openbm-gateway (communicates with iBus and converts button events to actions)
xdotool (converts button events to actions)
mplayer (video and audio player)
audacious (audio player - like winamp)
feh (image slideshows)
yad (a gui front end for commands - creates the interface you see)
tree (generates file listings)

Also needed:
A windows installation to run Navcoder (can be on same PC if one dual-boots)

[tbc] .
Experience is the only genuine knowledge, but as time passes, I have forgotten more than I can remember Wink
Volvo V70 P2 2006 2.4 Petrol 170bhp Estate SE
MG Midget Mk1 1962

Previous: L322 Range Rover TDV8 3.6 2008; L322 Range Rover TD6 3.0 2002; P38A Range Rover V8 1999


Last edited by Joe90 on 1st Apr 2012 6:10pm. Edited 10 times in total

Post #96353 5th Dec 2011 5:51pm
View user's profile Send private message View poster's gallery Reply with quote
Fr_Raf


Member Since: 20 Nov 2010
Location: Lyon - Paris
Posts: 147

France 2004 Range Rover Vogue 4.4 V8 Java Black

nice project...
I'd like to replace the aftermarket head unit I installed by a CarPC;

Will you use the laptop on on pic for CarPC unit ??

Post #95444 5th Dec 2011 6:30pm
View user's profile Send private message View poster's gallery Reply with quote
Joe90


Member Since: 29 Apr 2010
Location: Hampshire
Posts: 6408

England 

Yes, I found another one with a broken screen on the bay, so hopefully I can remove the screen and just use the pc unit. .
Experience is the only genuine knowledge, but as time passes, I have forgotten more than I can remember Wink
Volvo V70 P2 2006 2.4 Petrol 170bhp Estate SE
MG Midget Mk1 1962

Previous: L322 Range Rover TDV8 3.6 2008; L322 Range Rover TD6 3.0 2002; P38A Range Rover V8 1999

Post #95463 5th Dec 2011 6:33pm
View user's profile Send private message View poster's gallery Reply with quote
daveo


Member Since: 21 Oct 2009
Location: london
Posts: 2307

United Kingdom 2004 Range Rover Autobiography 4.4 V8 Java Black

its the blue and red and the blue and brown, i cut back the insulation so i could get enough cable to solder the connect in line.

Click image to enlarge

Click image to enlarge

Click image to enlarge


Admin note: this post has had its images recovered from a money grabbing photo hosting site and reinstated Mr. Green  V8 facelift Range Rover Autobiography 22" wheels.
1976 Harley Davidson Iron Head Sportster

Post #96394 5th Dec 2011 9:18pm
View user's profile Send private message View poster's gallery Reply with quote
Joe90


Member Since: 29 Apr 2010
Location: Hampshire
Posts: 6408

England 
Tape Audio Feeds

Well I seem to have connected to a set of completely different wires? (See two pairs at top left of connector block)


Anyhow as you will see from above I have achieved stereo sound Very Happy .
Experience is the only genuine knowledge, but as time passes, I have forgotten more than I can remember Wink
Volvo V70 P2 2006 2.4 Petrol 170bhp Estate SE
MG Midget Mk1 1962

Previous: L322 Range Rover TDV8 3.6 2008; L322 Range Rover TD6 3.0 2002; P38A Range Rover V8 1999


Last edited by Joe90 on 5th Dec 2011 9:54pm. Edited 2 times in total

Post #96401 5th Dec 2011 9:41pm
View user's profile Send private message View poster's gallery Reply with quote
Joe90


Member Since: 29 Apr 2010
Location: Hampshire
Posts: 6408

England 
iBus Interface :?:

I am still confused about this (having carried out extensive searches!)

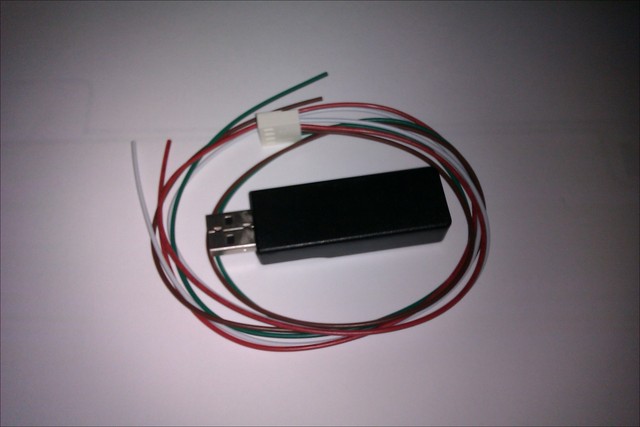
Here is my Resler USB iBus Interface:


The four wires are as follows:

RED: 12V+
WHITE: iBus
GREEN: NTSC
BROWN: Screen (GND)

I understand that the GREEN wire needs to be connected to Pin 17 of the white connector on the TV module, because this grounds the reverse camera (which is where the video goes into) {thanks daveo} but is that it? Or do I need to connect other wires to other places? I am hoping for send and receive even if I don't end up using it straight away. There is very scant information out there and would be grateful for someone who can help. Question .
Experience is the only genuine knowledge, but as time passes, I have forgotten more than I can remember Wink
Volvo V70 P2 2006 2.4 Petrol 170bhp Estate SE
MG Midget Mk1 1962

Previous: L322 Range Rover TDV8 3.6 2008; L322 Range Rover TD6 3.0 2002; P38A Range Rover V8 1999

Post #96405 5th Dec 2011 9:49pm
View user's profile Send private message View poster's gallery Reply with quote
Post Reply  Back to top
Page 1 of 6 123456>
All times are GMT

Jump to  
Previous Topic | Next Topic >
Posting Rules
You cannot post new topics in this forum
You cannot reply to topics in this forum
You cannot edit your posts in this forum
You cannot delete your posts in this forum
You cannot vote in polls in this forum


Site Copyright © 2006-2024 Futuranet Ltd & Martin Lewis
fullfatrr.com RSS Feed - All Forums


Switch to Mobile site