![]() | Home > Maintenance & Mods (L322) > Correct procedure when installing new struts |
![]() ![]() |
|
|
dingg1 Member Since: 29 Jun 2013 Location: PORTUGAL Posts: 1354 ![]() ![]() |
Just leave the wheels off and jack the hubs up to normal road height, tighten as required. Job done.
|
||
![]() |
|
JayGee Member Since: 27 Jul 2021 Location: London Posts: 3283 ![]() ![]() ![]() |
That seems to refer to installing new bags to an existing strut. When I did mine the only things of note were to lift the whole car at the front to eqalise the tension on the ARB, mark the strut top nuts with some felt tip as they are in slots to trim camber, note the way the ABS wire goes as it's easy to get it on wrong. I torqued everything with the wheels off as there are no bushings under tension so didn't see the point. I also released the air from each bag by carefully loosening the connector on the strut ( which I reused). It's all pretty simple realy. 2012 TDV8 Vogue (L322) |
||
![]() |
|
dingg1 Member Since: 29 Jun 2013 Location: PORTUGAL Posts: 1354 ![]() ![]() |
Jay is correct
|
||
![]() |
|
Scouse Exile Member Since: 09 Dec 2022 Location: East Midlands Posts: 402 ![]() ![]() ![]() |
No it’s ok. The procedure described is for replacing the whole strut.
|
||
![]() |
|
Scouse Exile Member Since: 09 Dec 2022 Location: East Midlands Posts: 402 ![]() ![]() ![]() |
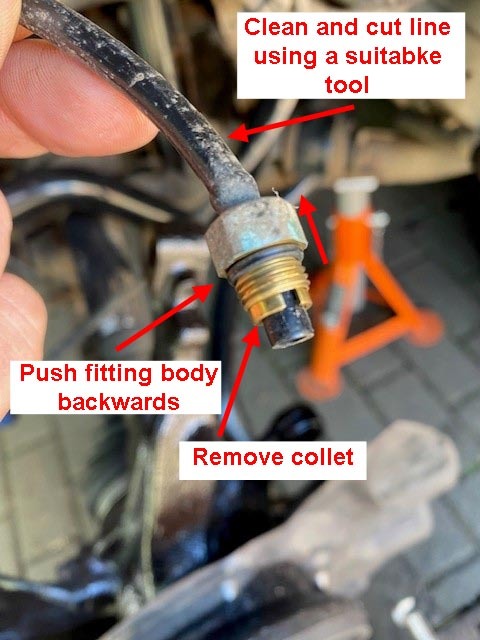
Its also worth noting that for the parts that I sourced through Island 4x4 at least (could be different for other suppliers), that the air fitting on the new parts is PUSH FIT ONLY and the connector should not be removed from the strut or it could invalidate your warranty.
|
||
![]() |
|
JayGee Member Since: 27 Jul 2021 Location: London Posts: 3283 ![]() ![]() ![]() |
You push the hose in and tighten it down with the brass fitting if you are trimming the hose. Or as I did I just removed the whole fitting from the old strut and screwed it in to the new one. Can't remember encountering any washers on the ARB drop links. 2012 TDV8 Vogue (L322) |
||
![]() |
|
dingg1 Member Since: 29 Jun 2013 Location: PORTUGAL Posts: 1354 ![]() ![]() |
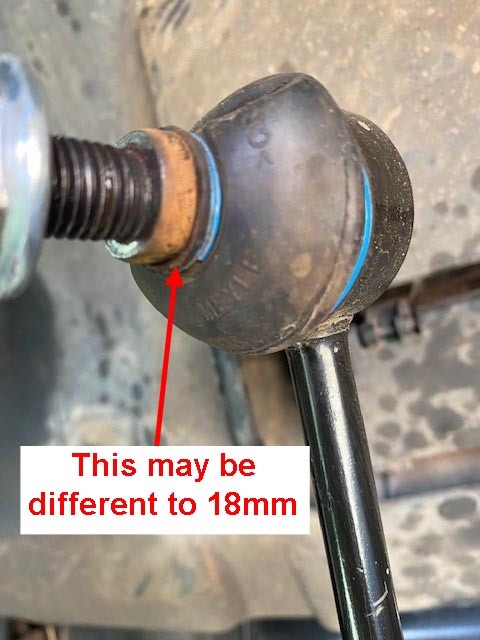
Drop links are meant to have a washer 👍 |
||
![]() |
|
Weegie Member Since: 09 Jun 2014 Location: East Sussex Posts: 3246 ![]() ![]() ![]() |
According to RAVE the washer is a hardened one:
|
||
![]() |
|
JayGee Member Since: 27 Jul 2021 Location: London Posts: 3283 ![]() ![]() ![]() |
Can't remember how I did it when I changed the struts but the ARB and droplinks were replaced last summer by a well known Hampshire specialist so I assume they did it correctly. 2012 TDV8 Vogue (L322) |
||
![]() |
|
Scouse Exile Member Since: 09 Dec 2022 Location: East Midlands Posts: 402 ![]() ![]() ![]() |
Yea that’s the problem, I also used a reputable Land Rover specialist and the washer is absent. It may be the case that the washers were missing when they changed the NS drop link and therefore didn’t fit one as the new drop links do not come with one.
|
||
![]() |
|
Scouse Exile Member Since: 09 Dec 2022 Location: East Midlands Posts: 402 ![]() ![]() ![]() |
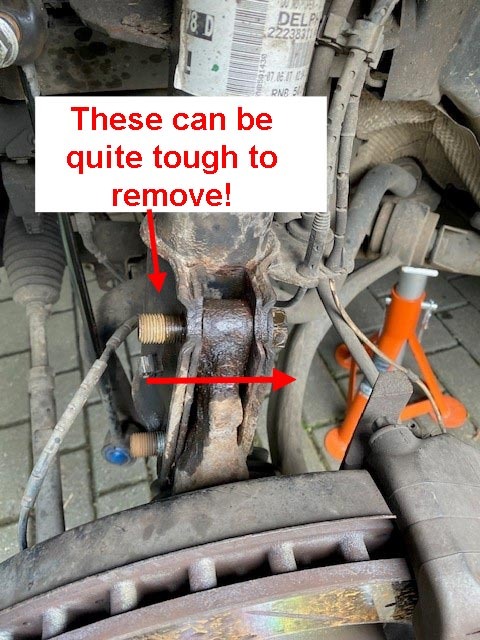
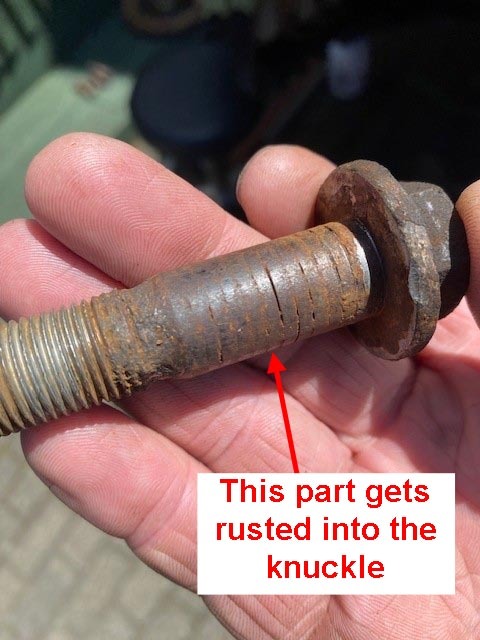
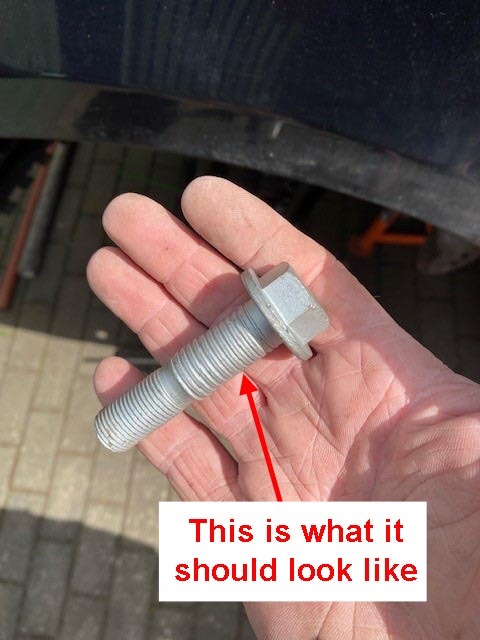
Just an update to close this one off.
- due to the above, new bolts and nuts are a must I would suggest unless you're one of the lucky ones.
- The top bolt of the drop link can be a little tricky, mainly because people will suggest that the back side of the ball joint needs to be held with an 18mm open ended spanner to help prevent it spinning whilst removing the nut however, if like on my car they have been replaced then the 18mm is the wrong size and I ended up using a 5/8 spanner (best I could find) on the Merle replacement I had on one side. Unless you have replaced these recently I would highly recommend replacing them on both sides as they are quite cheaper (under £20 per side for decent ones) and will only need doing at some point so its a bit of a "while you're in" there thing.
- The top mount nuts are not very tight compared to the lower ones, I removed the nuts and marked the position with a line on the centre point of the stud on the body just as a reference for the new one. - For my car with Brembo brakes the vibration damper came off quite easily - I left it on the strut and removed it off the car which for me worked easily. Installation - Refitting is quite simple compared to removal, I used a new gasket on the top of the strut. - For me, the air line needed to have the old fitting removed and the line cut clean ready to be push fitted into the new strut (supplied by Island 4x4 BWI type) It pushes in about 2cm give or take but you'll know when its home with a firm/progressive push.
- When lifting the strut back into the arch its probably easier to have a spare pair of hands just to get the first nut or two finger tight in the top mount and after that its pretty simple as a one man job. - New bolts (if necessary) in the bottom mount with plenty of copper grease around the middle part, I fitted new drop links (including the missing washers on the top fixing). - Torqued everything up with the car still in the air, I did strut to knuckle bolts first (wow 250nm is tighter than I remember!), then the drop link, then the top mount nuts trying to align with the marks from the old strut as best as possible. I should have probably fitted the vibration damper with the strut off the car as it tends to want to twist the bag when trying to tighten it but its only done do about 25nm so its not that bad. - I fitted the road wheels and dropped the car onto the ground but supported it slightly with jacks so the full weight of the car was not on the deflated bags. The above was possibly a mistake as when I started the car and pressurised the system it was telling me that the vehicle was "raising slowly" even after then removing the jacks and trying to go between access height and off road settings. The car knows if something is underneath it so I think I confused it totally. With the benefit of hindsight this was probably due to the system having a lack of supply, either the reservoir was not full or some other issue but having left the car overnight its now all fine and operating as it should. I've invested in a GAP tool so next job is to calibrate the height on all corners. Hopefully the rear bags will hold up a bit longer as could do with a few weeks without crawling round on the floor. In summary in terms of ease of doing on the drive, I'd mark it as; Removal: 6 out of 10 (only because if the bolts are rusted solid its a bit of a **** to do without a substantial bar to come to the rescue and its one of those jobs where you have to walk away and come back to it) Installation: 3 out of 10 (its really quite easy but patience is your friend) Now the fun starts again, just like painting the firth road bridge, as the blower is not working. Hopefully its just me not having connected something fully as I removed the HVAC panel whilst waiting for parts on the above so that I could clean the fan vent which was clogged. Fingers crossed its not actually the fan motor and I've just disturbed something. Hey ho ............. Jon |
||||||||||||
![]() |
|
Ian Donkin Member Since: 17 Aug 2010 Location: A Yorkshireman in Surrey Posts: 107 ![]() ![]() |
Excellent tips and write up - in case anyone needs additional collets, I believe they are called Voss connectors (or certainly Voss fittings); I broke one on a former Mercedes I owned with air suspension and they use the same system.
|
||
![]() |
|
Scouse Exile Member Since: 09 Dec 2022 Location: East Midlands Posts: 402 ![]() ![]() ![]() |
Absolutely correct Ian, thank you. Couldn't think of the term. Hopefully helps someone. J |
||
![]() |
|
JayGee Member Since: 27 Jul 2021 Location: London Posts: 3283 ![]() ![]() ![]() |
|
||
![]() |
|
![]() ![]() |
|
All times are GMT |
< Previous Topic | Next Topic > |
Posting Rules
|
Site Copyright © 2006-2025 Futuranet Ltd & Martin Lewis
