Frans
Member Since: 07 Jan 2024
Location: Amsterdam
Posts: 6

 
|
| Re: Retrofit Deployable towbar - how to | |
Hi,
I am Happy to see your info about the towing bar.
i nearly bought a spair from a RR Sport, they told me it should fit?
My 405 has one, but the electric and the gearbox are done.
I am looking for the replaceable parts for the gearbox and the electric motor?
I have find the electric part on Powerful....but that alone does not work.
The spindel is also a bit damaged
Or maybe you know the part number of part A so i can replace the whole bar.
Thanks for the info and i am sorry for my english
Iam dutch 
nicksaab wrote:To retrofit a deployable towbar to an L405 here is what you need
Parts List - this covers the MY13-16 although later models have just some minor tweaks to the parts list
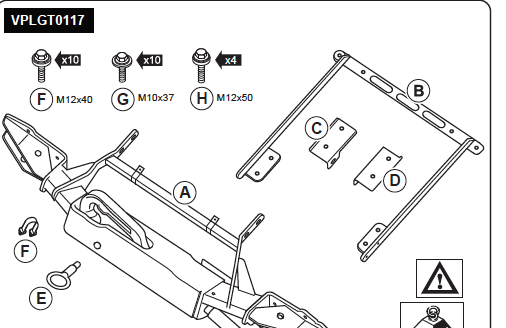
Towbar Set - - VPLGT0117
Includes
Towbar bar (A)
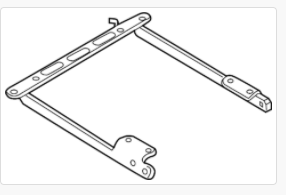
Towbar reinforcement frame (B)
Towbar reinforement L shaped brackets (C & D)
Bolts M10x37. (10) (G)
Bolts M12x40 (4) (F)
Bolts M12x50 (10) (H)

Now if you are buying off ebay make sure you get the frame (B) and the brackets (C&D)
B can be bought seperately (part number LR036694) but I haven't yet found C&D as seperate parts. They could be fabricated seperately but hold out for a second hand bar with all those bits. On the usual auction sites there plenty for sale without the reinforcement and the brackets but unless you are confident finding B,C & D I wouldn't bother. Also there are a few for sale which are listed as for the L405 but are actually L494 Sport versions. The L494 version of the actual towbar looks very similiar but has two small exhaust mounts on the front and the reinforcement frame is flared at the end - the 405 verstion is straight so it won't fit.
The frame - Part B seems to have been updated recently to remove the need for C&D but I don't know exact fit as I haven;'t seen one in the flesh so you may get lucky and not need C&D
If you want the bolts seperately then the part numbers are:-
LR034249 (M10x37) x 10
LR047359 (M12x40) x 10
LR046235 (M12x50) x 4
The rest of the parts:-
Towbar light electics (13pin) - often included on the second hand frames but if buying new you will need to buy this - VPLGT0073 - this has two connectors which connect directly to the connections behind the rear bumper which are fitted in the factory on all models
Towbar deployment module - CPLA 19H397-AF also known as VPLGT0215
Towbar deployment wiring loom - CPLA 140A01-AF also known as VPLGT0216 but includes the module
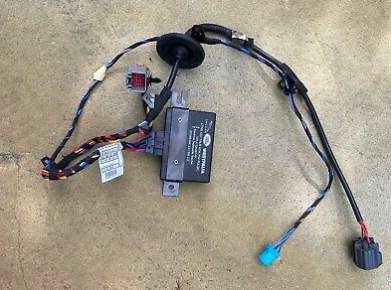
Plenty of modules on ebay but you'll need to hunt for the loom and may have to buy new. I got lucky and found a module with the loom included.
Module year MY17 and the MY18 onwards have a different module and loom
The loom has 3 connections - one to connect to the loom which the connector is behind the carpet in the spare wheel well below the tailgate. The 2nd large connector connects to the main connector on the towbar and the smaller connector connects to the buttons.
Towbar deployment buttons - CPLA 18X10 AB / VPLWT0123 - very expensive new but if you search the auction sites for the rear seat buttons you may find a complete button set - search for CPLA 14D340 AC and you might get lucky and find a set with the towbar buttons included.
MY17 onwards has a different set of buttons
Towbar bumper trim LR056299 - you can just cut your existing one if you have a steady hand. MY18 onwards may be slightly different.
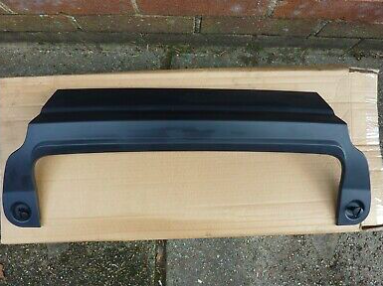
To install there are detailed guides on topix - search for instal guide VPLGT0117 but here is a quick guide.
1. Disconnect the battery and install the buttons, module and loom. You;ll need to remove the flap which covers the gap between the boot and the lower tailgate which is three bolts. The module mounts on two bolt studs on the right hand side of the wheel well behind the carpet. The loom for the bar goes through the blanked off hole below the tailgate above the electrical connector. Remove the blank grommet, push the loom through and reseal with the grommet on the loom.
2. Raise the rear of the car and secure with axle stands or equivalent
3. Remove the rear bumper. This is relatively straight forward and takes about 10 minutes. Remove the screws on the trim panels under the bumper. Then remove the small plastic mount which is visible behind the trim panel that the trim panel screws into (you won't need this afterwards as the towbar replaces this part). Then prise off the two chrome side trims on top of the bumper and remove the bolts and screws at the end, on the corner and underneath.
With the lower tailgate lowered you'll see three plastic trim clips which need prised off. Then pull the bumper free, starting from just behind the wheel- it will pop off but take care to disconnect the rear parking sensor connector. As you do this you will notice the two other connectors for the trailer light socket are already there. The bumper is very light but ideally a 2 man job to remove safely to prevent potential scratches. Topix has very detailed instructions on how to remove the bumper and there is also a Powerful video too.
4. Examine the 2 connectors for the towbar lighting socket that are clipped to the rear of the car next to the rear parking sensor connector you've just disconnected and remove the plastic inserts
5. Undo the 10 bolts (5 each side) on the reinforced bumper bar and remove
6. Install the towbar unit in place of the reinforced bumper bar and bolt up with 10 M10x37. The landrover parts have flanged heads and washers installed on them.
7) Install parts B,C & D under the car - the bolt holes are already there and bolt into the towbar. 4 M12x50 at the rear of part B and 10 x M12x40 to connect parts B,C&D to the underbody and the towbar. Again the landrover bolts have flanged heads and washers
8 ) Connect the towbar deploy loom to the connector on the bar and then connect the 2 light socket connectors, and add the electric socket to the bar if its not already installed
9) Torque up all the bolts to the correct torque settings which are detailed in the install instructions which can be freely downloaded from google - just search VPLGT0117 instal guide
10) Reconnect the battery and test the system. You may find you need to follow the reset process which is detailed in your owners manual but I've put it here
Start the engine and run for longer than 2 seconds. Stop the engine and switch the ignition off.
Switch the ignition on, and then off.
Press and hold the on-off button for approximately 2 seconds, until the LED indicator lamp illuminates on the deploy-
stow button.
Press and hold the deploy-stow button for approximately 10 seconds, until the electrically deployable tow ball has
reached the fully deployed position. A double warning tone sounds to confirm.
Release the deploy-stow button. The electrically deployable tow ball is now reset.
11) Reinstall the rear bumper, rear parking sensor connector and the underneath panels and install your new bumper cut out.
12) If you have an IID tool you can go into the CCF and switch on the towbar electrics and module - this will programme the trailer indicator on the instrument panel to show the lights are working as well as turn on the tow hitch assistance view on the rear camera
You are done! You'll be left with the bumper reinforcement bar, the 10 bolts that held the bar, a small under bumper plastic frame and a solid bumper cover if you have replaced with the bumper cutout and a fancy electric deployable towbar!
I'll post up some more photos of the instal process on my own car in this post shortly.
Hope you find this useful
|
 7th Jan 2024 11:14pm
 |
|


![]()

