 | Home > Maintenance & Mods (L322) > Rear sub frame removal |
 
|
|
|
| dexion7 Member Since: 06 Jun 2013 Location: Tynemouth Posts: 291 
|
where abouts on the subframe is it rusty, they're made of pretty thick steel? |
||
|
| joeypineapplez Member Since: 27 May 2015 Location: Waterford Posts: 68  
|
It has rust all over which looks terrible but Im confident a session with the wire wheel will clean this up nicely before painting. Its very weak around where the height sensors mount and where the toe arm mounts. The height sensor bracket turned to dust in my hand when I poked it. Obviously its very confined area around the subframe so I figured to to it all properly it would be best to removed it in one piece. There is zero chance of opening the bolts on the suspension arms. The nuts and bolts are rounded off with rust.
|
||
|
| Joe90 Member Since: 29 Apr 2010 Location: Hampshire Posts: 6419 
|
EAS deflated and off Battery disconnect Exhaust off Propshaft off Shock Absorbers off Brakes off (pipework) FBH pump released or disconnected EAS pipework unclipped from body/disconnected from valveblock Electrics disconnected - height sensors/FBH/Diff? Anything else I have missed Undo four bolts holding subframe to body Then a couple of seriously good jacks to lower the thing down. You should have it out in an hour It is all in RAVE (see the wiki) . Experience is the only genuine knowledge, but as time passes, I have forgotten more than I can remember Volvo V70 P2 2006 2.4 Petrol 170bhp Estate SE MG Midget Mk1 1962 Previous: L322 Range Rover TDV8 3.6 2008; L322 Range Rover TD6 3.0 2002; P38A Range Rover V8 1999 |
||
|
| doclees Member Since: 25 Jun 2015 Location: PA Posts: 672  
|
OK I'll bite. 1hour? Kidding right.
|
||
|
| RichM63 Member Since: 10 Jul 2019 Location: Brittany Posts: 249  
|
Nah, Gas Axe can work wonders!! Already, the exhaust is not designed to be removed, and following the procedure needs to be "cut off" at a certain point. Just more 'daftness' on a Friday afternoon in the design dep't. All brake lines would be replaced anyhow, so no real bother. Me thinks "wire brush" and "black paint" is a most commendable idea. Best Rich |
||
|
| Baltic Blue Member Since: 13 Aug 2015 Location: North Wales Posts: 3823  
|
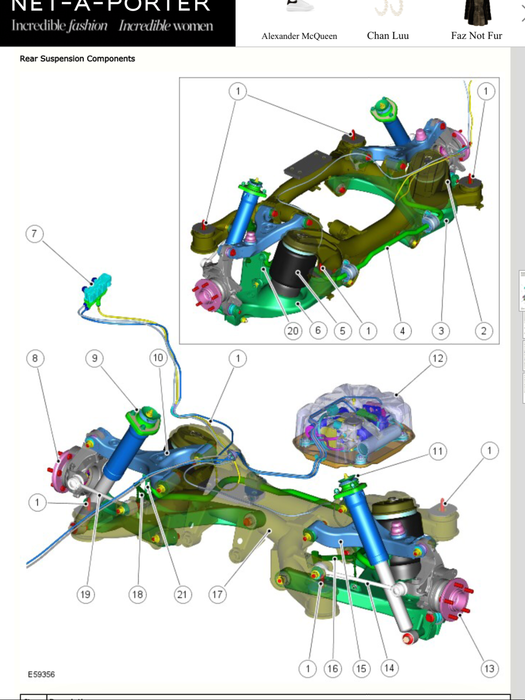
I really like this picture from the 2010-12 workshop Manual., but it looks like a good days work to me.
|
||||
|
| joeypineapplez Member Since: 27 May 2015 Location: Waterford Posts: 68  
|
Yeah it looks simple when you see it like that alright. I spent all day under neath it today grinding/wire brushing/air hammering/swearing and it looks much better than I first thought. It is a tad ropey around the toe arm mounts as I said. I also made new height sensor brackets which turned out quite well. Tomorrow I will be removing the heatshields, arch liners and possibly the fuel tank covers to see how things look under there and make my painting look a bit tidier. I will be using Dinitrol products. I figured Id have a go at sorting it out on the car as its a daily driver (school runs etc) so I cant have it on jack stands for too long.
|
||
|
| Joe90 Member Since: 29 Apr 2010 Location: Hampshire Posts: 6419 
|
Off course it is. On a TD6 this is straight forward (if a little tight for space by the manifold, and don't do it when hot Had mine on and off a few times when doing stuff at the rear end (ooer! Experience is the only genuine knowledge, but as time passes, I have forgotten more than I can remember Volvo V70 P2 2006 2.4 Petrol 170bhp Estate SE MG Midget Mk1 1962 Previous: L322 Range Rover TDV8 3.6 2008; L322 Range Rover TD6 3.0 2002; P38A Range Rover V8 1999 |
||
|
| Joe90 Member Since: 29 Apr 2010 Location: Hampshire Posts: 6419 
|
You will need plenty of height to get the tank covers out, a good 2 1/2 ft
|
||
|
| joeypineapplez Member Since: 27 May 2015 Location: Waterford Posts: 68  
|
Thanks Joe90. I built my own pit when I bought the house. Garage was there already. Previous owner used to hire and work on mini diggers in the garage so floors were reinforced and over 6 inches thick. It was hard work digging it out but it was well worth the effort. 2002 TD6 Epsom Green |
||
|
| joeypineapplez Member Since: 27 May 2015 Location: Waterford Posts: 68  
|
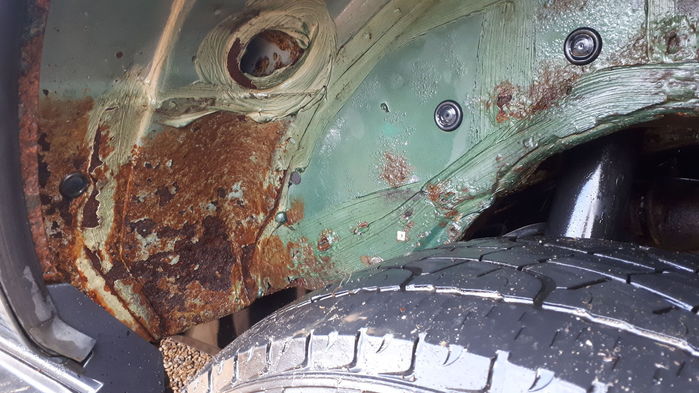
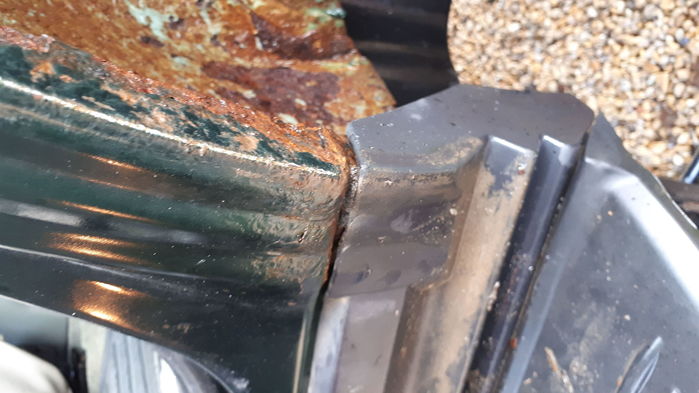
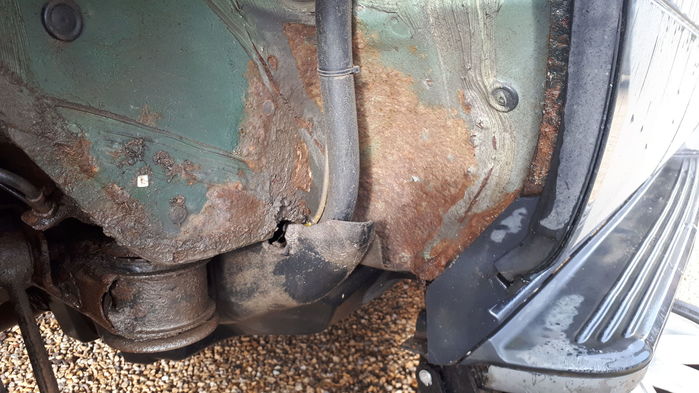
So a little update on this. Turns out after a bit of stripping my subframe isnt as bad as first thought. However after removing my arch liners I was greeted with this beautiful sight.
|
||
|
| RichM63 Member Since: 10 Jul 2019 Location: Brittany Posts: 249  
|
Owch ! |
||
|
| kbald Member Since: 17 Aug 2015 Location: Leeds Posts: 491  
|
You'd be best to get the side steps off and plastic will covers off too and see how bad it is under there and decide then. There aren't any repair panels I believe so it's cut back to good and then weld in new metal. If you can diy it may be ok but a pro job could be uneconomical Current 2007 TDV8 Vogue Buckingham Blue |
||
|
| kooky_guy Member Since: 25 Nov 2011 Location: Sandhurst, Berkshire Posts: 386  
|
I did read somewhere that someone was going to start making repair panels but I can't remember who so not very helpful... 2010 4.4 TDV8 Vogue SE |
||
|
 
|
|
| All times are GMT + 1 Hour |
< Previous Topic | Next Topic > |
Posting Rules
|
Site Copyright © 2006-2025 Futuranet Ltd & Martin Lewis
![]()


