Advertise on fullfatrr.com »

Home > In Car Electronics (L322) > rear camera
Post Reply  Down to end
Page 1 of 2 12>
Print this entire topic · 
Balloonengineer


Member Since: 03 Sep 2017
Location: Kent
Posts: 173

United Kingdom 2012 Range Rover Vogue 4.4 V8 Orkney Grey
rear camera


Hi All

Just in the process of fitting a rear view camera, and its going well, and will do a write up when its done. So far its cost less than £20.

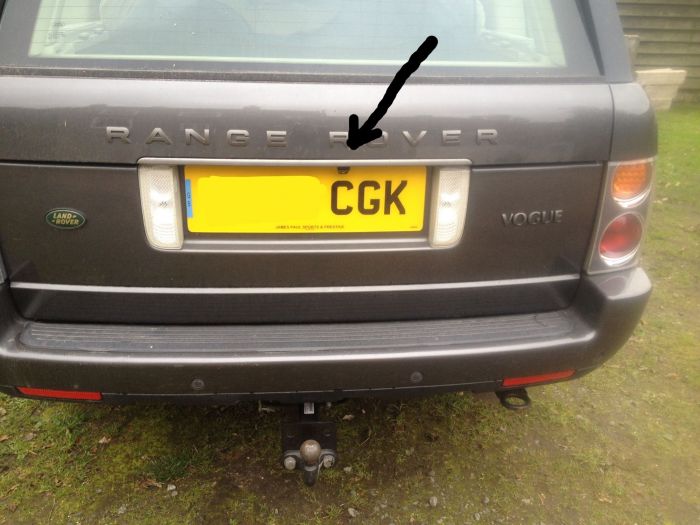
Found a quality cheap camera that works well and fitted it in the torx screw hole next to the upper tailgate handle, so its almost on the centreline. wire and mounting stud goes through the hole where the torx screw was, so about as neat as you can get. It has a square aluminium body, on an angle and it points in the right direction. About 10 minutes work.

At the head end, the Disco 3 coax adapter lead plugged into the brown socket on the back of the head unit, and can be fairly easily done with a mirror through the centre speaker hole. Prob took no more than 5 minutes, so no dashboard to remove. There appears to be a rod-able path through to the passenger footwell.

tested it works very well.

So the last bit is to connect the two together and would appreciate some advice.

A) Is there an existing permanent live in the Upper tailgate? (to save me running an extra feed cable to the boot area)

B) Is there a good/easy wiring routing path from the boot area to the front footwell for the coax lead.

Thanks in advance

Glen

Post #454451 18th Oct 2017 6:00pm
View user's profile Send private message View poster's gallery Reply with quote
NVB


Member Since: 14 May 2017
Location: Essex
Posts: 103

United Kingdom 2004 Range Rover Vogue Td6 Cairns Blue

Can't help you with your questions, but hope you get it sorted. I will be watching with interest, as I would love to do this uograde. Thumbs Up RR History
1988 2.4td Classic 1999 to 2020
1992 3.9efi Westminster Classic 2004-2005
2005MY L322 3.0TD6 Vogue 2016 to current

Post #454460 18th Oct 2017 6:37pm
View user's profile Send private message View poster's gallery Reply with quote
Jamiehol


Member Since: 26 Sep 2014
Location: Ipswich
Posts: 226

United Kingdom 2007 Range Rover Vogue TDV8 Stornoway Grey

Does it have to be a permanent live or can you not tap into the reverse lights.

In terms of cable routing you could come down the D or C post and get into the tray that runs along the sill and come up behind the glovebox and into the headunit.

Post #454469 18th Oct 2017 7:29pm
View user's profile Send private message View poster's gallery Reply with quote
Balloonengineer


Member Since: 03 Sep 2017
Location: Kent
Posts: 173

United Kingdom 2012 Range Rover Vogue 4.4 V8 Orkney Grey

Thanks
I have plenty of power options in the boot, including reverse light feed and trailer module as well as the rear fusebox, but the problem is there is very little room in the rubber cable conduit between the upper tailgate lid and the body for another cable, so if I can find a switched live feed in the upper tailgate, I only have to get the coax into the body, down the D post and into the boot,

Can you tell me more about the cable tray front to rear? How do I access it?

Cheers
Glen

Post #454471 18th Oct 2017 7:49pm
View user's profile Send private message View poster's gallery Reply with quote
Jamiehol


Member Since: 26 Sep 2014
Location: Ipswich
Posts: 226

United Kingdom 2007 Range Rover Vogue TDV8 Stornoway Grey

When I fitted my reverse camera I managed to get a power cable up the rubber boot as well.

On the cable tray if you take off the sill trims you should be able to lift the carpet and see the tray the loom rubs in, you may need to loosen the seat to get the cable around it.

Post #454475 18th Oct 2017 8:08pm
View user's profile Send private message View poster's gallery Reply with quote
Paul thornton


Member Since: 23 Sep 2017
Location: Lancashire
Posts: 545

United Kingdom 

Cool. Look forward to updates.

Someone was showing me their l322 the other day and the camera was below the rear spoiler.

Is that factory fitted?

Post #454809 21st Oct 2017 1:38pm
View user's profile Send private message View poster's gallery Reply with quote
Balloonengineer


Member Since: 03 Sep 2017
Location: Kent
Posts: 173

United Kingdom 2012 Range Rover Vogue 4.4 V8 Orkney Grey

Well finally got it hooked up today, and it works!

Total cost about £15 and the only thing removed was the speaker grille and speaker underneath, and the left hand end cover to pull the wire through to get it to the sill covers.
Ill do a basic write up of how it went later. Probably just 1-2 hours work now I know how its done!

Here is something puzzling though. The picture is a bit zoomed in.

If you go to the diagnostic screen and check the video inputs, the correct picture works through scrolling all the widescreen options, and perfect for reversing as can see the edge of the bumper, but when you select reverse, it zooms in a bit and offsets a bit.

Now it would be really 100% perfect if it wasn't for this annoying anomaly. Is there anyway of adjusting or keeping the picture as it defaults back to zoom when you go out of the diagnostic page. Is there a software update for the module?

Its useable for parking reversing as is, and could go to the diagnostic page for easier hooking up to a trailer
I have read on another forum of this happening to a factory camera, but no solution apart from live with it.

Ideas gratefully received!
Best wishes
Glen

Post #455210 24th Oct 2017 8:42pm
View user's profile Send private message View poster's gallery Reply with quote
TerryT-J


Member Since: 02 Sep 2013
Location: Johnston, Pembrokeshire
Posts: 86

Wales 2005 Range Rover Vogue Td6 Java Black

I think I'll try this as well. Where did you get the camera from?

Post #455250 25th Oct 2017 11:45am
View user's profile Send private message View poster's gallery Reply with quote
Balloonengineer


Member Since: 03 Sep 2017
Location: Kent
Posts: 173

United Kingdom 2012 Range Rover Vogue 4.4 V8 Orkney Grey

Ebay item number eBay Item No. 142285392981
£8.99
plus the lead for the back of the denso unit from the disco3 forum shop £7.95
That's all I spent.

You will need extra (although I had one knocking about) about 1 to 1.5m long singe phono lead as the lead with the camera is long, its not quite long enough, and also you need to rod it through the speaker hole to the passenger end panel which means putting a join in the passenger kick panel, which worked out perfect.

Also required, a bent end tack lifter or flat blade screwdriver for prising, and 1/16 aluminium tig rod for rodding the upper boot lid conduit, the rear and by the front seat. It has to be thin aluminium, anything else is too stiff. This is probably the difference between being a pig of a job or just a fiddle. I wouldn't attempt it without a piece of this unless you have a lot of patience.
Also some stiff non conductive rod for rodding the dash. I used a bit of plastic pneumatic tube over the tig rod, but bendy curtain rod (end insulated) or similar would work up to about 5mm dia. as would want to short anything conductive unseen.

Best wishes
Glen

Post #455251 25th Oct 2017 12:28pm
View user's profile Send private message View poster's gallery Reply with quote
Weegie


Member Since: 09 Jun 2014
Location: East Sussex
Posts: 3233

Scotland 2008 Range Rover Vogue TDV8 Stornoway Grey

Balloonengineer wrote:

Here is something puzzling though. The picture is a bit zoomed in.

If you go to the diagnostic screen and check the video inputs, the correct picture works through scrolling all the widescreen options, and perfect for reversing as can see the edge of the bumper, but when you select reverse, it zooms in a bit and offsets a bit.


The offset bit seems to be regular occurrence. Regarding the zoom, what angle camera did you use? They can be either 120* or 170* (probably others as well). When I fitted one to my TD6 I used a 170* angle one which was fine. If you have used a 120* one then the angle will be much narrower.

Just a thought. John
2008 Stornoway Grey 3.6 Tdv8 Vogue
2005 TD6 Java Black Vogue - Written off!!
GAP iiD BT
2003 Discovery TD5 Auto, Nanocom Evolution - gone to a new home!
MasseyFerguson 152 - No electronics!! - Sold

Post #455255 25th Oct 2017 2:27pm
View user's profile Send private message View poster's gallery Reply with quote
Balloonengineer


Member Since: 03 Sep 2017
Location: Kent
Posts: 173

United Kingdom 2012 Range Rover Vogue 4.4 V8 Orkney Grey

Hi
Its a 170 when viewed through the 753 method although 120 ish when viewed through reverse!
Will post piccys later. It could be an automatic NTSC/pal unit, although doesn't say it on the box.
Best wishes
Glen

Post #455256 25th Oct 2017 2:54pm
View user's profile Send private message View poster's gallery Reply with quote
Weegie


Member Since: 09 Jun 2014
Location: East Sussex
Posts: 3233

Scotland 2008 Range Rover Vogue TDV8 Stornoway Grey

I found that a pal/ntsc didn't work. I had to get an ntsc only camera. It showed on the 753 screen but not when I went to normal. John
2008 Stornoway Grey 3.6 Tdv8 Vogue
2005 TD6 Java Black Vogue - Written off!!
GAP iiD BT
2003 Discovery TD5 Auto, Nanocom Evolution - gone to a new home!
MasseyFerguson 152 - No electronics!! - Sold

Post #455261 25th Oct 2017 4:32pm
View user's profile Send private message View poster's gallery Reply with quote
Balloonengineer


Member Since: 03 Sep 2017
Location: Kent
Posts: 173

United Kingdom 2012 Range Rover Vogue 4.4 V8 Orkney Grey

Right then!
Fit the camera in the RH torx hole for the upper tailgate latch. Wiring can be tucked under the bottom and RH plastic window trim, no need to remove. might need use of wire hook to get the cable to the RH edge trim

Remove top wiper trim, fit earth somewhere convenient. I fitted a rivnut for a proper job.

Pull out the RH rubber conduit from the upper tailgate. ease the edge of the top rubber boot lid seal to gain 10mm of gap use a wedge or a spare pair of fingers so you can peer through. Pull the cable through the tailgate and out of the hole where the rubber conduit was.

Rod just the rubber conduit into the roof with the 1/16 Ali tig rod, see the bottom of the tig rod appearing in the gap between the roof lining and hook it through to the outside with another bit of bent rod. That's why you need it to be thin aluminium rod. Pull in a single wire to get +12v camera power from somewhere convenient like the reversing lights. very simple if you have a 12S caravan socket. I think its the blue yellow. The wire can be tucked between the rubber and trim without removing anything.

Cut off the phono connector from the end of the camera lead.

Do the LH (viewed form the rear) rubber conduit with the camera feed lead and feed round the edge. Route in the LH cavity with all the module near the top.

Refit the rubber conduits making sure they are watertight in their grooves.

fold down the nearside rear seats, partially pull off the plastic side trim where it meets sidewall carpet and rod through just below the metal seat catch. tuck wiring under the edge of the LH sill protectors, no need to remove. A tack lifter is invaluable here. Its like a flat blade screwdriver with a bent end.

Rod the plastic moulding near the front passenger seat as per the photo from the front towards the back. The ali rod will follow the internal rear curve of the plastic, so use another piece of wire to hook it out, or prise it up a bit to get your fingers underneath. reverse pull the wire back through here and under the front passenger sill. Round the front seat be careful the ali trim doesn't cut into the wire where it goes round the corner with some careful easing with your flat blade tool.

Partially pull off the front passenger kick panel and pull wire through to here.

(I actually did this next bit first as I thought this was the more difficult bit. Actually it was easier than the routing!)
Pull off and remove passenger dash end panel. be very careful not to damage the edge of your veneer. It will just pull off but shame they didn't build the rest of the electric bits to the same standard as the trim clips, its reluctant, but does come off undamaged if you don't value your fingernails and have a high pain threshold. Start near the bottom.

Remove the centre speaker grill by lifting the front edge only with a protected screwdriver. Remove centre speaker with torx screws.

Using a mirror, spot the brown plug. Get the Denso co-ax adapter lead and place it into the centre of the brown socket. you wont be able to push it in as the lead is to flexible. Use a mini flat screw driver about 4 inches long which fits into the speaker void and use the end to give it a gentle push home. actually very easy if you can get the hang of working backwards with an inspection mirror and a torch.

Rod the speaker void very flat to the left (with an insulated rod I mentioned in an earlier post) and it will appear within reach of the LH dash end panel you removed earlier. it might take a few attempts to find the route. Make sure your rod can be pulled all the way through.

Get your phono extension lead and cut off one end. You will need to attach this cut end to your rod sticking out of the speaker void and pull it all the way through leaving the phono end in the speaker void to attach to your Denso adapter lead.
There are too many things in the way to catch on if you leave the connector on the rod end, and you don't need it anyway.
Refit the speaker and grille.

Route down to the kick panel and connect up. My camera lead wasn't coax, and my phono was, so twist the outer coax into a wire braid and stagger the joints to give insulation spacing, solder them up with a bit of heatshrink

Job done once you have activated the rear camera with your favourite diagnostic tool

Best wishes
Glen

Post #455267 25th Oct 2017 6:12pm
View user's profile Send private message View poster's gallery Reply with quote
Balloonengineer


Member Since: 03 Sep 2017
Location: Kent
Posts: 173

United Kingdom 2012 Range Rover Vogue 4.4 V8 Orkney Grey

Here are some of the rodding places,
The camera in torx socket hole on upper tailgate.
Here are the views from the reverse (zooms in automatically with a small offset for some reason, no red guides) and the images (with the red guides) when viewed via the 753 diagnostic test.
With the zoom in, the bumper is about 1/2 inch from being visible. With the 753 view you can clearly see the bumper, so should be easy to do this for accurate hitching of the trailer.

Last pic is a PAL picture

It is possible its a 120 degree camera wrongly labelled, or maybe a NTSC only camera world work better, although its not bad. I will experiment with a different camera if I can get a recommendation, although stuff made in China even if bought in the uk can be a bit unreliable on what you actually get delivered
This camera fits so neatly, however other camera suggestions welcome

Best wishes
Glen


Post #455270 25th Oct 2017 6:26pm
View user's profile Send private message View poster's gallery Reply with quote
NVB


Member Since: 14 May 2017
Location: Essex
Posts: 103

United Kingdom 2004 Range Rover Vogue Td6 Cairns Blue

Nice work. Does the screen automatically go to camera view when you select reverse? RR History
1988 2.4td Classic 1999 to 2020
1992 3.9efi Westminster Classic 2004-2005
2005MY L322 3.0TD6 Vogue 2016 to current

Post #455310 25th Oct 2017 9:50pm
View user's profile Send private message View poster's gallery Reply with quote
Post Reply  Back to top
Page 1 of 2 12>
All times are GMT

Jump to  
Previous Topic | Next Topic >
Posting Rules
You cannot post new topics in this forum
You cannot reply to topics in this forum
You cannot edit your posts in this forum
You cannot delete your posts in this forum
You cannot vote in polls in this forum


Site Copyright © 2006-2024 Futuranet Ltd & Martin Lewis
fullfatrr.com RSS Feed - All Forums


Switch to Mobile site