 | Home > Technical (L322) > Front Seat Removal, Dissassembly and Heated Seat Repair |
 
|
|
|
| Stacker Member Since: 04 May 2016 Location: Theale, Reading Posts: 479  
|
Tried this today, probably just made it worse!
|
||
|

| mm289 Member Since: 11 Mar 2016 Location: Hampshire Posts: 207 
|
Cool, glad it was useful |
||
|
| Andy Member Since: 24 Feb 2009 Location: Shropshire Posts: 2944 
|
Im just tackling this job now and I’ve found a broken pair of wires. I can’t see the rest of them as they disappear into the seat squab.
|
||||
|
| mm289 Member Since: 11 Mar 2016 Location: Hampshire Posts: 207
|
Only thing I can suggest is removing the seat cover from the squab to see if you can find the other end of the wires. This is assuming the part that is cut is the part that connects to the heater element.
|
||
|
| Andy Member Since: 24 Feb 2009 Location: Shropshire Posts: 2944
|
They haven’t been cut. I think they have been severed inside the seat, possibly wear or caught on the metal frame.
|
||
|
| JohnJ Member Since: 22 Apr 2016 Location: Varese Posts: 41  
|
Hi, thanks for the write up
|
||
|
| JohnJ Member Since: 22 Apr 2016 Location: Varese Posts: 41
|
no! impossible, i tried. 2011 Vogue 4.4 Santorini black
|
||
|
| JohnJ Member Since: 22 Apr 2016 Location: Varese Posts: 41
|
I managed to remove the seat, change the seat cover that was ripped. Replug all connectors, refit the seat, and connect the battery.
|
||
|
| mm289 Member Since: 11 Mar 2016 Location: Hampshire Posts: 207
|
The most likely place for an electrical failure will be the switches or the connectors I would have thought. Can you pull the switch panel with the seat in place and go through the cables with a meter checking for continuity? Also do the same with the connectors you can access?
|
||
|
| JohnJ Member Since: 22 Apr 2016 Location: Varese Posts: 41
|
thanks, in the tight space under the seat i tried poking all cables but no results,
|
||
|
| JohnJ Member Since: 22 Apr 2016 Location: Varese Posts: 41
|
magically when i went to start up the car to drive to the indie, the seat would move. Now i dont know if it was the sun and the temperature helped because this morning it was -5 and it was not working and now is +5, maybe the plastic cables got more flexibility and made better contact. In any case I took the opportunity to slide the seat back and forth to remove the bolts to remove the seat and then check the cables.
|
||
|
| Thxxx Member Since: 09 Nov 2021 Location: Truro Posts: 7 
|
Resurrection of the praise for this post, thank you so much for detailing it out so well, and providing a solution. Mine was exactly the same, the grey wire had come off the element, so some solder, shrink wrap and putting back together has done the trick. For anyone else trying this if it seems like there is no element, keep digging on the right hand side (at least mine was) of where the wire ends, it will be there somewhere.
|
||
|
| knares Member Since: 22 Jun 2017 Location: Perth WA Posts: 784  
|
|
||
|
| andyrosehome Member Since: 06 Jan 2018 Location: South Wales Posts: 14 
|
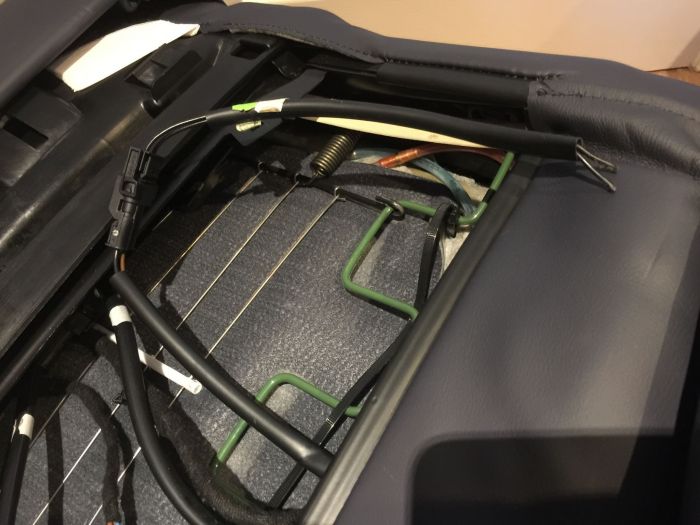
Hi folks. I know this is a fairly old string but it is so useful that I felt I should add an update to my addition back in 2018 whilst still paying homage to mm289 who created the original how to in the first place. I used this brilliant write up again yesterday on my driver’s seat after the heated seat stopped working, indicated by my heater lights coming on for a few seconds when selected but then going out again. I would add a note of caution that removing the seat leather and foam is not to be under estimated but if you are reasonably handy then you can save yourself a lot of money especially if you want to get your heated seat element fixed for very little outlay. This is a long, labour-intensive job which took me 9 hours in total so be warned, but there is nothing particularly difficult.
Mine had failed on the outer edge where it gets the most wear from getting in and out of the car but the process of finding the break is the same for all 3 elements and for the seat back if that is faulty on yours. No need to remove the hog rings just yet. First of all, separate each of the elements by unplugging the 2 pin connectors at the back of the squab. Connect a meter set to continuity and test each individual element for continuity. 2 of mine were intact and reading 0.5ohms and the 3rd was open circuit. At this point it is worth following the insulated wires from the connector plug of the failed element into the backing fabric and foam that is bonded to the leather and carefully trimming the fabric with a sharp blade for 20mm or so at a time until you come to the point where the un-insulated silver wire element is joined to the insulated wire. This is protected by a blob of hard adhesive stuck between the leather and the foam backing. 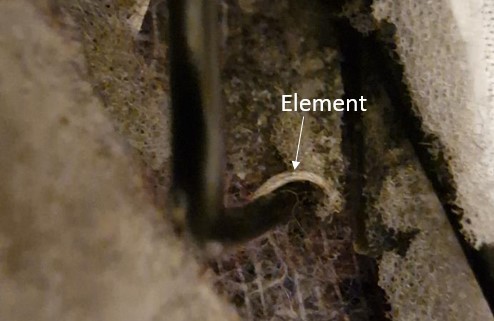
This seems to be a common point for failure and is well worth testing before removing the hog rings to remove the main seat foam from the leather assembly. To test the joint simply connect the same continuity tester, one probe to the plug and the other to the bare silver element wire. Do this where both wires connect to the bare element and if both joints are ok, confirm the element has failed by connecting both probes to the silver element wire at both wire connections. If the result from measuring both silver wires is open circuit then you now have confirmed that your element has failed. This means that it is time to remove the foam support by cutting the hog rings. Once the thick seat foam is out of the way, lay the leather out on a flat surface leather side down so you can see the fabric backing like in my first image above. Connect one meter probe to one of the 2 pin connectors of the failed element (or the silver element wire if that is easier). connect the other probe to a sharp sewing needle either with tape or a croc clip etc. Now you need go to the furthest part of the element you are working on and draw a line (1) with a pen/pencil on the backing fabric that crosses where the element will be.
(The yellow squiggly line shows roughly where the element wires run to the best of my knowledge) Then start at one edge of the fabric using your drawn line as a guide and gently insert the needle into the foam backing repeatedly moving 0.5mm at a time along the drawn line until you make contact with the wire element indicated by continuity on your meter. Yes, this is a labour-intensive task so you may need several hours to find the break. I found that placing my finger under the leather at the point where I was inserting the needle allowed me to feel when it touched the leather so I could avoid spiking through the leather itself as that would be visible once you rebuild the seat. Once you have made contact with the element using the needle probe, you will know which half of the element has the break but of course you may have to do this with both ends of the element. You could use a jumper wire to connect both element ends to one probe to test both halves at once until you make contact with the needle and then separate the element ends to find out which half of the element has the break. Then you divide the broken side in half with another pen line (2 above) and repeat the probing process until you establish which quarter of the element has the break, then again (3 above) with another line to find which eighth and so on (4 above) until you feel comfortable cutting the fabric to expose the remaining element to find the break. Once you find the break, you can pull a small amount of element to enable the ends to be soldered together. Then re-test the element for continuity and you should have around 0.5ohms resistance after repair. After I had fixed one break in my element, I still had 1.8ohms resistance so I repeated the procedure and found another partial break which was causing a hot spot and would have broken soon if I had left it. The repair can be buried under the foam and the cut fabric repaired with duct tape. Reassembly is just the revers although the hog rings are a nightmare even with the right tools so I did wonder if zip ties could be used as an easier alternative although I did persevere with the hog rings. I also wondered if connecting 12v to the broken element and use an induction sensor pen to search for the break might work but I may have just exposed how limited my electrical knowledge really is so I welcome any thoughts on an easier way. Hope this helps someone. My heated seat works perfectly again so the long task was worth the effort especially when new seat leather with element are heading up towards £2000 just for 1 seat squab if you can find one! |
||||||
|


|
|
| All times are GMT + 1 Hour |
< Previous Topic | Next Topic > |
Posting Rules
|
Site Copyright © 2006-2025 Futuranet Ltd & Martin Lewis
![]()
