RobWCanada
Member Since: 24 Mar 2025
Location: Ontario
Posts: 4

 
|
| L322 Wiper Motor Park Switch Replacement | |
Hey,
So I had progressively worse wiper issues. Meaning, wipers would wipe, then stop in the random places, I'd wipe once to clear some rain can they wouldn't shut off. So I'd try again, then they'd stop on the middle of the windshield. It got so bad that, the wiper wouldn't wipe anymore and I had to cycle the stop/start of my Range Rover for them to wipe.
For those troubleshooting, codes, GAP IID would show me this:
B1C45-67 (6 Front windshield wiper park position switch - Algorithm based failure - signal is incorrect after the event Front windshield wiper park position switch - Algorithm based failure - signal is incorrect after the event
( on 14-03-2025 16:02:21 at 133834 km )
I knew either the relay (which is quite abundant on the interwebs as a solution) or it was the suggestion to get a new "wiper motor", or in Land Rover case an ENTIRE WIPER MOTOR ASSEMBLY, requiring major dismantling of the front windshield cowl, etc...which can break clips, removal of wiper arms, etc...so that's crazy.
If anyone WANTS to replace the motor, it's BMW part number: 67638360603
Or what I was going to buy, if the following solution hadn't worked, was to buy a remanufactured BMW wiper motor for about 1/3 the cost.
https://partsavatar.ca/cardone-industries-...or-43-2103 (Cardone Industries, Rock-Auto in the USA also sells them).
Anyway, to my solution and recommended sparsely on here is to remove just the wiper motor, 3 retainer 10mm bolts, and the main 13mm wiper motor to arm retainer nut.
I can tell you the removal was a piece of cake. Getting the motor back in there took me a while as it has to be at the perfect angle to not interfere with this group of wires just below it.
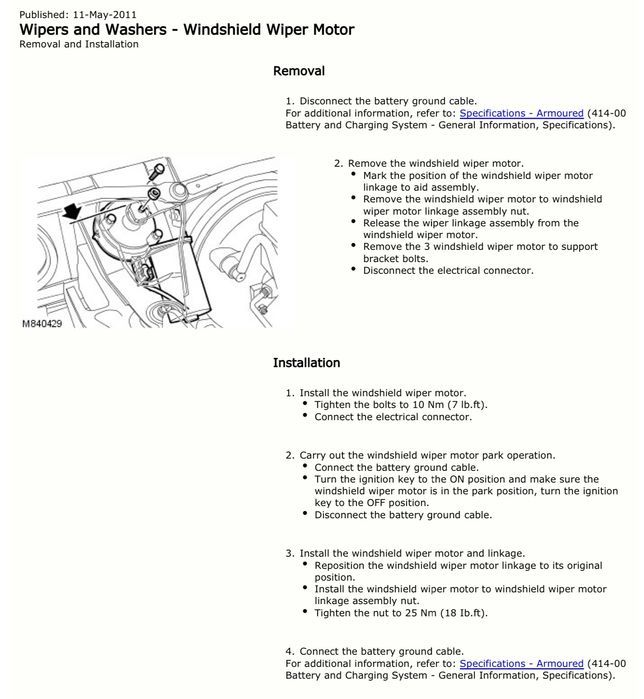
Sadly, I don't have a step by step, as I was skeptical I'd get it to work, but it did...so I can only provide a few pics. Removal and installation you'll have to figure out. I do however, have a diagram I found (I believe on here, which I used for installation).
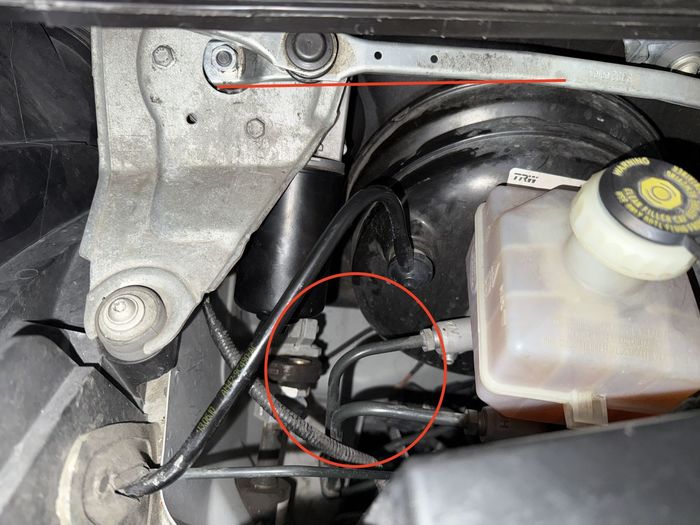
The motor must come out and back in by going under the brake vent line (or whatever the pic type thing coming out of the brake cylinder is).
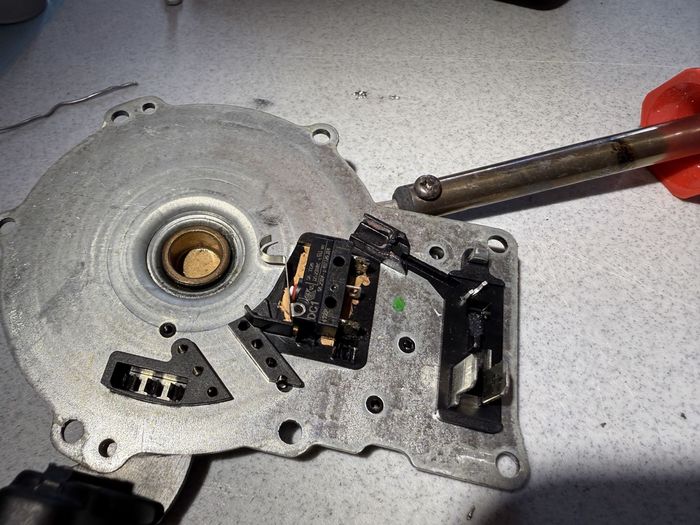
My fix, replacing just the park switch itself. It was relatively easy, however, the challenges which I came across were these
- the switch seemed to be soldered to the pins, however, no amount of heat would break this solder joint. I put new solder on, removed it, still they would not separate, so I'm not sure if these are soldered or like super heated and bonded together...I dunno.
- to remove the old switch I wound up cutting the pins off the old switch, CUT THE PINS OFF THE SWITCH NOT THE PINS ON COMING FROM THE MOTOR BOARD!!!! ...as I was concerned with the heat destroying the pins in the motor. with KIMPEX 78 03 125, best snips ever
- to further that, I used the KIMPEX snips to kinda chew off the old terminal pins from the old switch. Like shave them off...it worked quite well. If you don't do this it doesn't really align right.
- alignment of the motor...off 1mm or so, I'm not sure would matter anyway...considering the design..but I dunno, as I made mine pretty exact IMHO.
- the switch in the motor is held in place by two plastic dowel things coming up from the base. These dowels are melted on the top to form a mushroom. If you want to retain these you gotta figure out how to shave the top (maybe dremel it down first?)...mine broke off cause I stupidly didn't notice this til later
- if you do just break the pins off, I CA glued my new switch in...I marked the exact position of the old switch with gold sharpie and scraped some lines with a sharp awl for positioning. CA glue plus the solder on the pins will definitely hold it in place. There's not a whole lot of pressure here. Pins are very strong too.
- Also, before bolting the whole thing in, you may wanna just connect the wire harness and put the motor in a safe spot or have someone hold it. Run through the wiper settings and see that they all work. Auto, Slow, Fast, Wash-wipe 3 - plus extra cleanup wipe, and push down for one clean wipe.
- If it works, mount it up and put the 3 small bolts in. Run the wiper from the steering stalk, and let the wiper motor park. Now you know the gear is in 'park mode'. This is where you position the wiper arms in the park position and tighten down the nut to the motor shaft (notice my horizontal red line in one of the pics). I tightened just enough to hold it so the gear didn't spin in the wiper contraption. tested, it (many times -- this took me a while until I was satisfied) and then torqued it down.
okay...on to the pics at least.
I'm in Canada, I ordered from DIGI-KEY, switch number DC1C-A1AA, this switch has no arm, but the arm pops off and clips right onto the new switch. There is a part with the arm, I can't remember what it is.
https://www.digikey.ca/en/products/detail/...1AA/280836
*NOTE: the pins on this switch have an odd angle to them, I just took some needle nose pliers and made them straight to line up with the wiper motor pins. No big deal here.
Dimensionally the switch is slightly smaller, but It works out fine.
YOU MUST BRING MOTOR OUT THROUGH THIS RED CIRCLE. AND IT GOES BACK IN HERE TOO. As to get it to mount up to the wiper arm plate...Good luck, this required a lot of fiddling and wobbling. I also un-screwed that T25 torx holding the bracket and wedged that up to gain more clearance to get it up on the plate. That horizontal line. I made it there as that that small 2" arm seemed to be inline with the left side wiper arm (UK ones may be opposite for this).
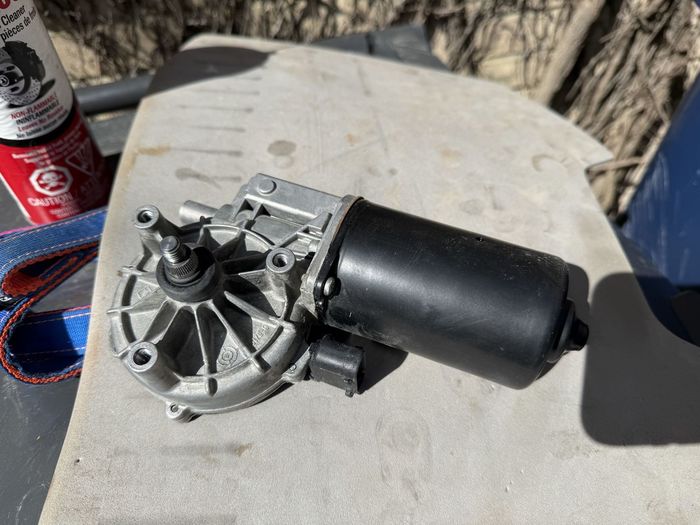
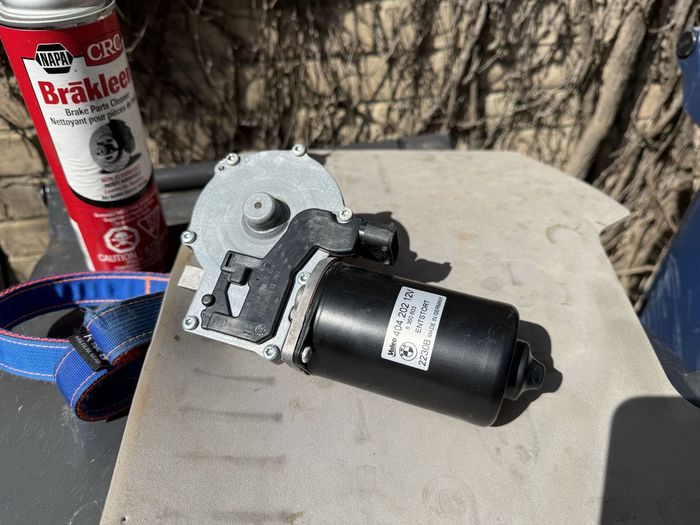
WIPER MOTOR
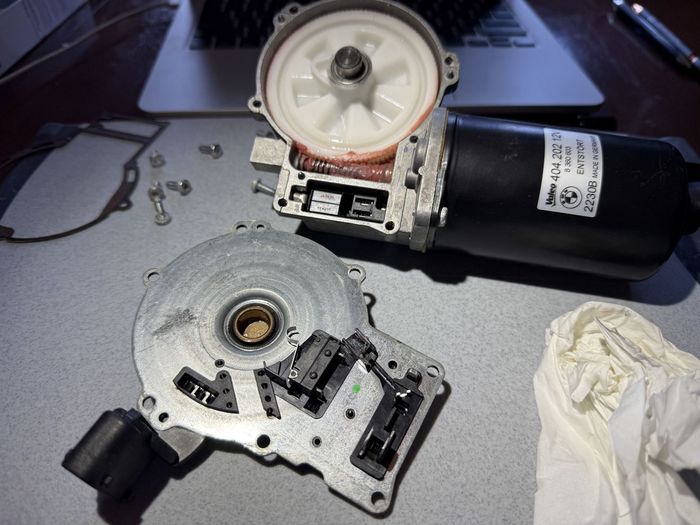
INTERNALS, undo the 7 torx screws holding the gear in. Pull apart...there is some resistance, maybe a suction on the main pin on the gear and the electrics clip in...so just pull evenly and it will come apart.
OLD SWITCH (looks fine...but it's not), SNIP exactly where the two arrows are pointing...unless you're lucky and can desolder those pins.
NEW SWITCHED INSTALLED and SOLDERED
TORQUE SPECS AND INSTRUCTIONS FOR REMOVAL AND INSTALLATION...for anyone that cares to TORQUE it.
 | | Click image to enlarge |
That's it really, it's really not the hard. Hardest part is the install (at least in my 2011 Range Rover L322 - Autobiography)
Rob 2011 Range Rover L322 SC - Autobiography (Ipanema Sand)
Ontario, Canada
Last edited by RobWCanada on 24th Mar 2025 8:56pm. Edited 4 times in total
|