Advertise on fullfatrr.com »

Home > Maintenance & Mods (L322) > Replacing Rear Hub Bushes - How To
Post Reply  Down to end
Page 1 of 3 123>
Print this entire topic · 
fisha


Member Since: 25 Sep 2009
Location: Scotland
Posts: 1350

2015 Range Rover Autobiography SDV8 Aruba
Replacing Rear Hub Bushes - How To

Ok doky. One of the MOT advisories was the rear hub bushes, top and bottom, both sides. I've put it off long enough, but the time came to change them. Over the last wee while, I've been collecting up the parts ... and tools.

So, to do this job, you will need the following ... I work on the assumption that i'll be destroying stuff if needs be to get things off, so always buy the new bolts ( see one of the pictures below to show I gripped a bolt head - the head was trashed )

The rave manual for the instructions ( i may post up a copy later )

top bush RHF000260
top bolt ( eccentric ) RYP000090
top washer (eccentric) RGI000010
top nut RYH000060

bottom bush RBK500220
bottom bush circlip RYV000010
bottom bolt RYP000070
bottom nut KYH000050

2 jacks - its easier with 2
small allen key (3 or 4mm - cant remember)
axle stands
A decent socket set ... preferably 6 sided deep sockets and not 12point ... much better grip on bolt heads
heat gun
WD40 or similar
screwdrivers, hammers, drifts etc etc

oh, and one of these: A universal press and pull kit.


I got mine off ebay, a no name cheapo for £125 here and quite frankly its been the mutts. I wish I had bought one years ago rather than faffing with blow torches on radius arms.

Now for all you US folk ... you will see from the pics that there is a bit of rust here and there. Welcome to Scotland. Theres no skin on my knuckles for a reason Laughing

So, all set? lets get to it ....

UPPER BUSH
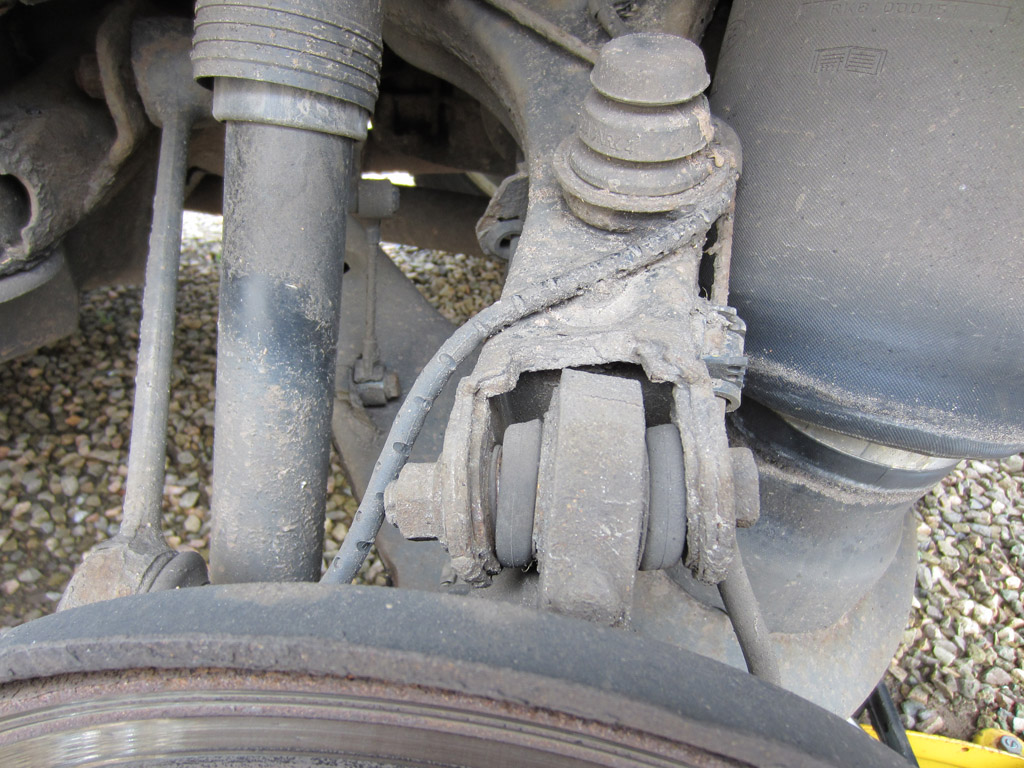
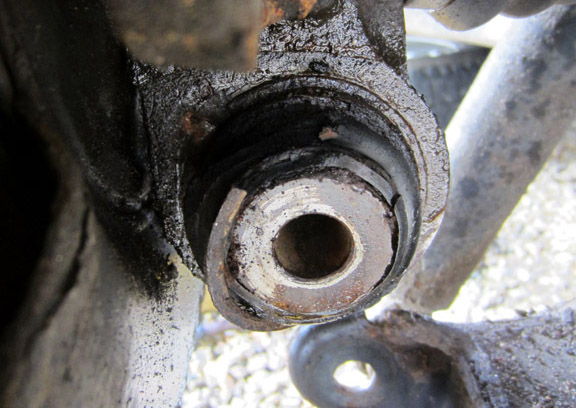
This is my upper bush. It needs replaced:

Click image to enlarge


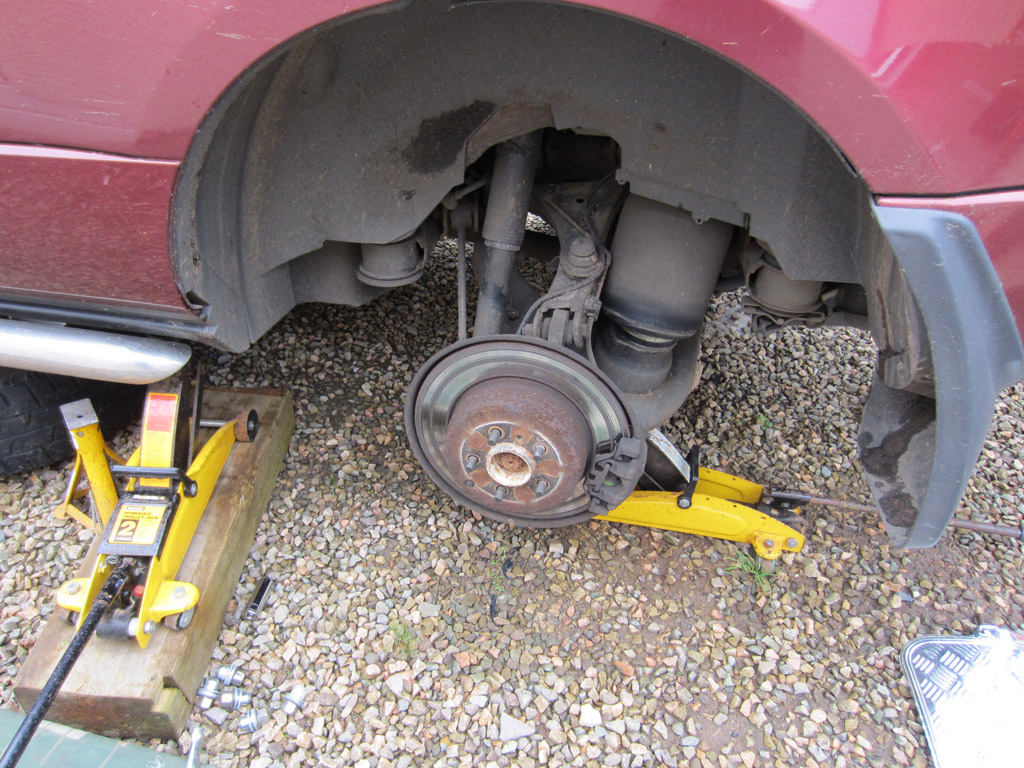
I worked like this: 1 trolley jack under the rear jack point to move the body, one jack under the lower arm, and the spare tyre under the chassis in case things went wrong. I also have out of shot something under the towbar to catch that if things drop.
Click image to enlarge


First and foremost, clean things up a bit: Laughing
Click image to enlarge


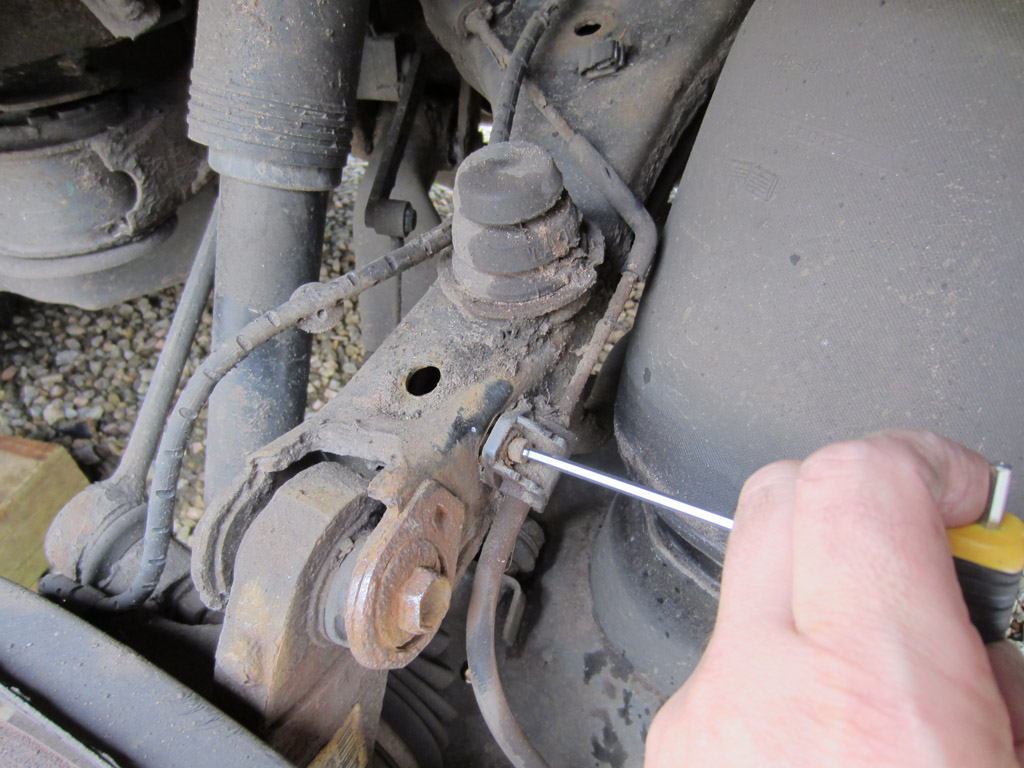
Remove the brake pipe ... again which is rusted ... that needs replaced too ...
Click image to enlarge


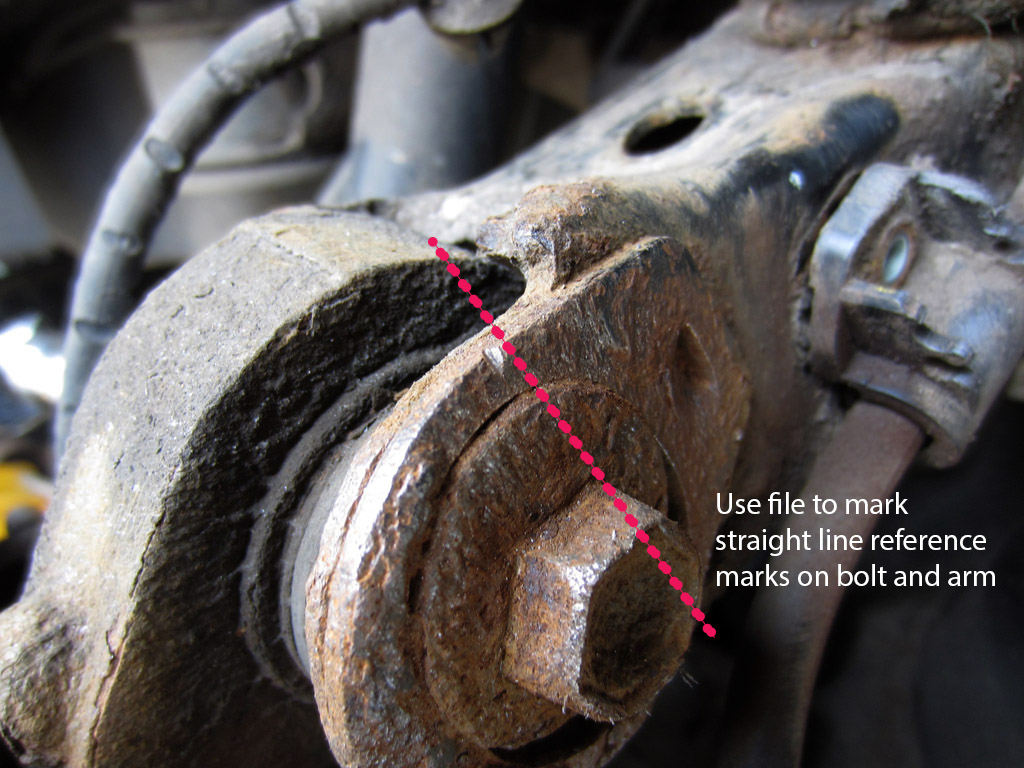
I then used a file to mark the line from the longest part of the eccentric bolt met the arm and which face on the bolt it came from. this was so I could then put the new bolt back in the same alignment:
Click image to enlarge


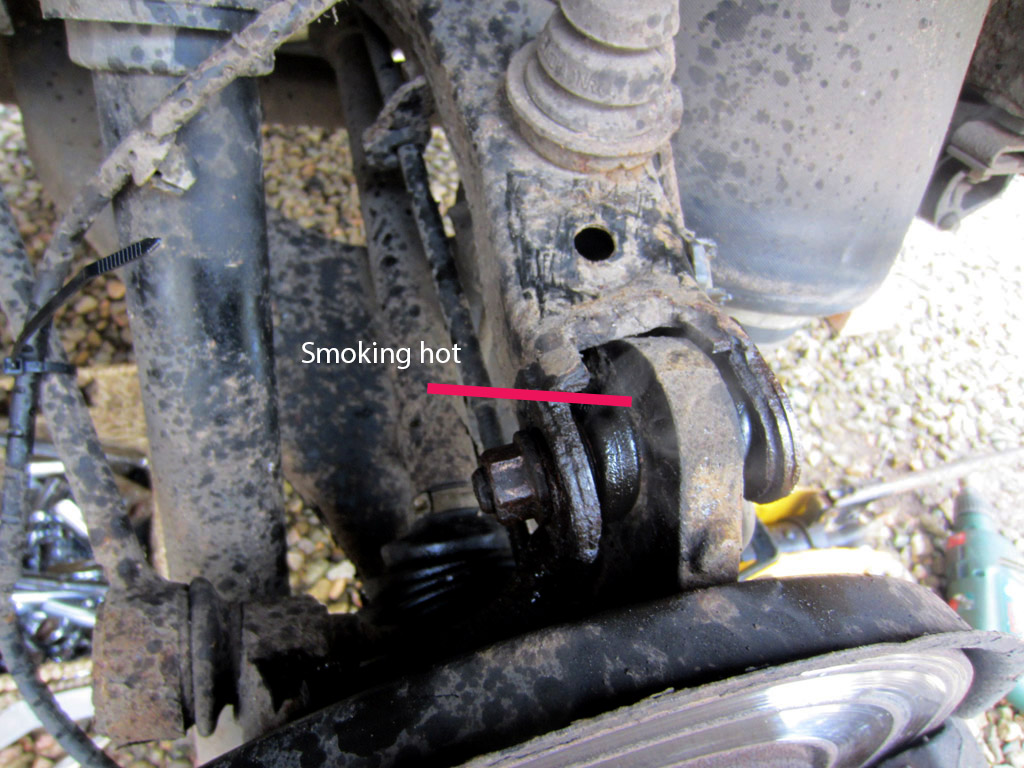
This sod wasn't for shifting ... so heat gun time to thermal shock the parts:
Click image to enlarge


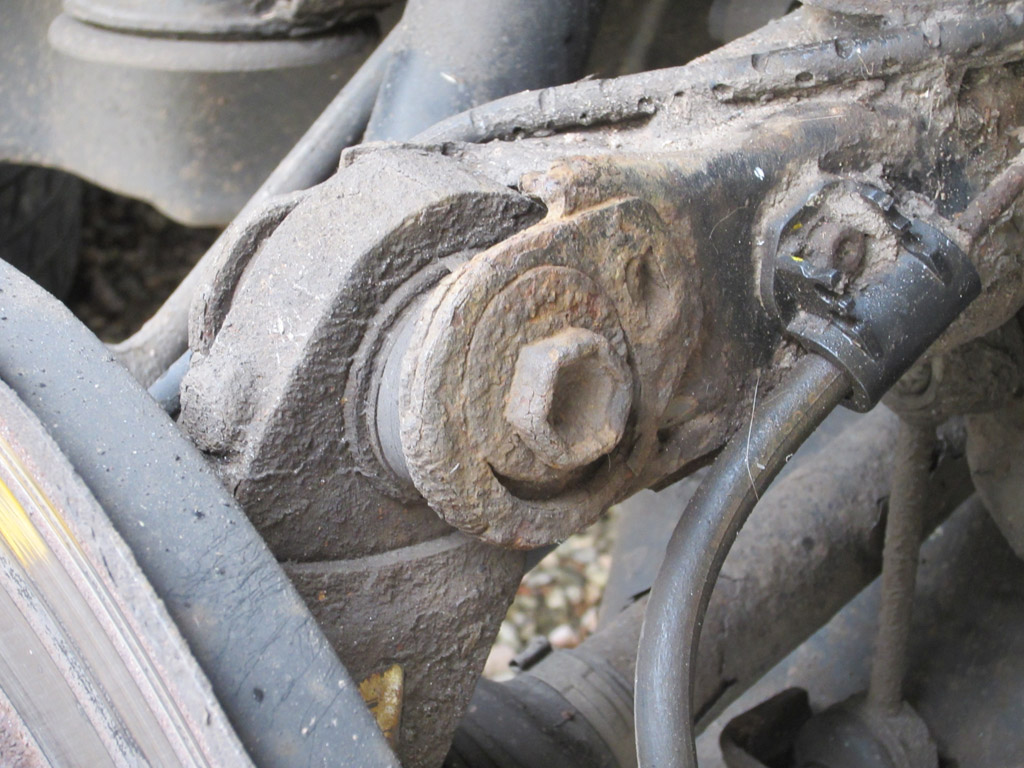
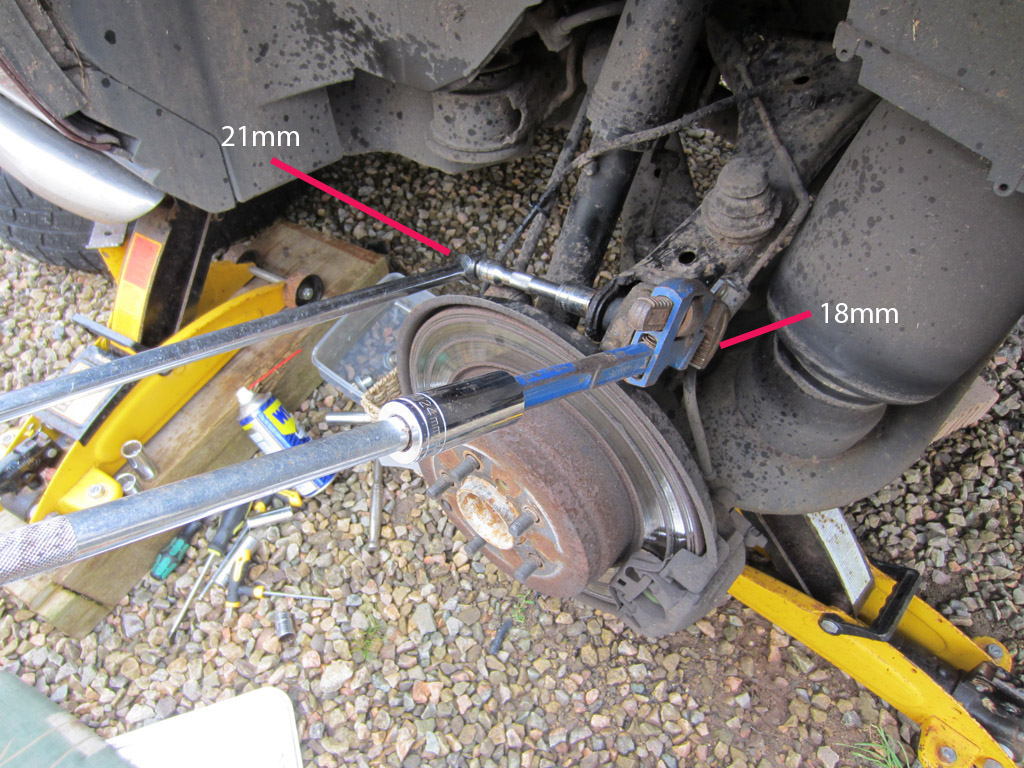
The nut is 21mm, and the bolt head 18mm. I rounded the bolt head off trying to loosen it.
Finally got things moving by using a plumbers wrench. A common tool I've used :
Click image to enlarge


Once loosened off and bolt hammer out, you probably find the upper arm pops upward away from the hub. At this point, the brake pipe will be stretched wuite a lot, which is why you should undo the clip!

Next stage is to setup the press ... at this point its destruction only removal. I can see no way of using a press without damaging the rubber seal AND getting the drift of the press through the hub hole:
Click image to enlarge


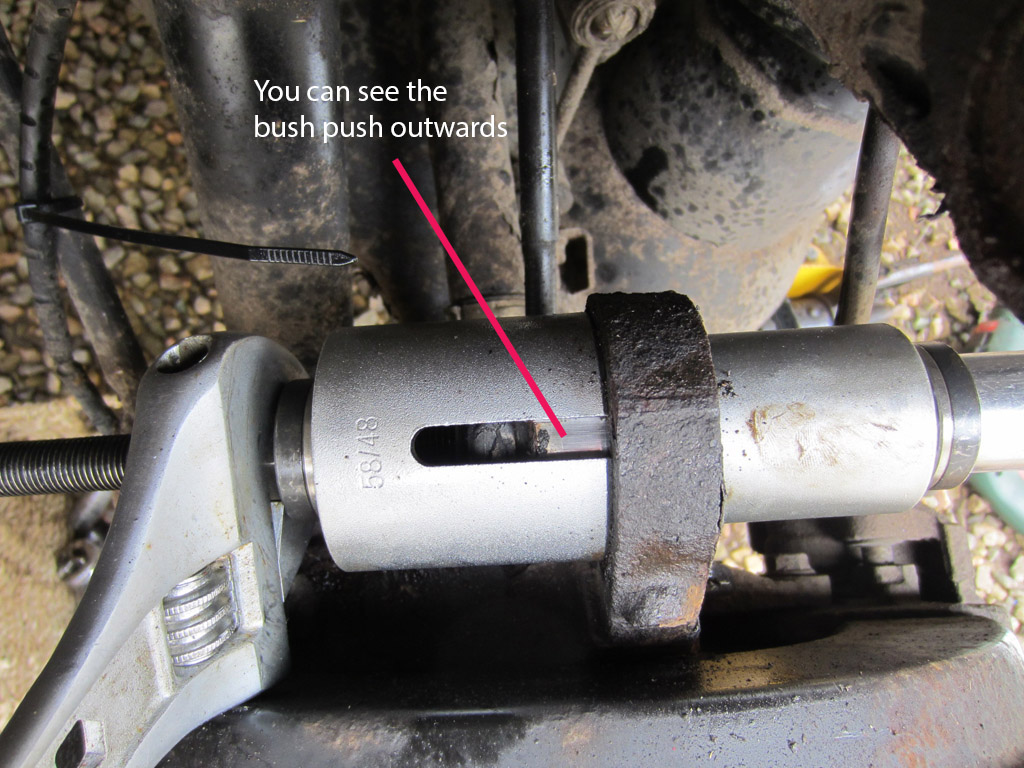
Then just a case of tightening up the nuts of the press. I will say that it took quite a lot of pressure to build up before it started shifting. I also use the heatgun to get the hub really hot so that it expanded a bit to loosen its grip. The bush came out in steps with loud TINK sounds each time it moved.
Click image to enlarge


Sorry, didn't take a pic of the hub without the bush in it ... Embarassed

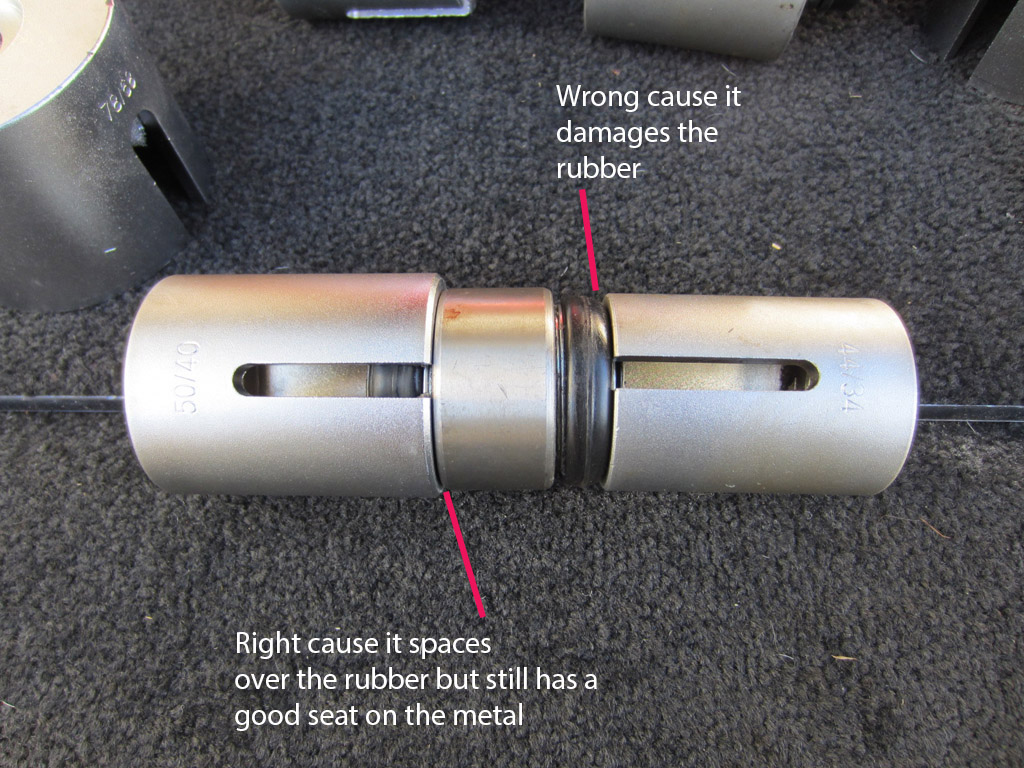
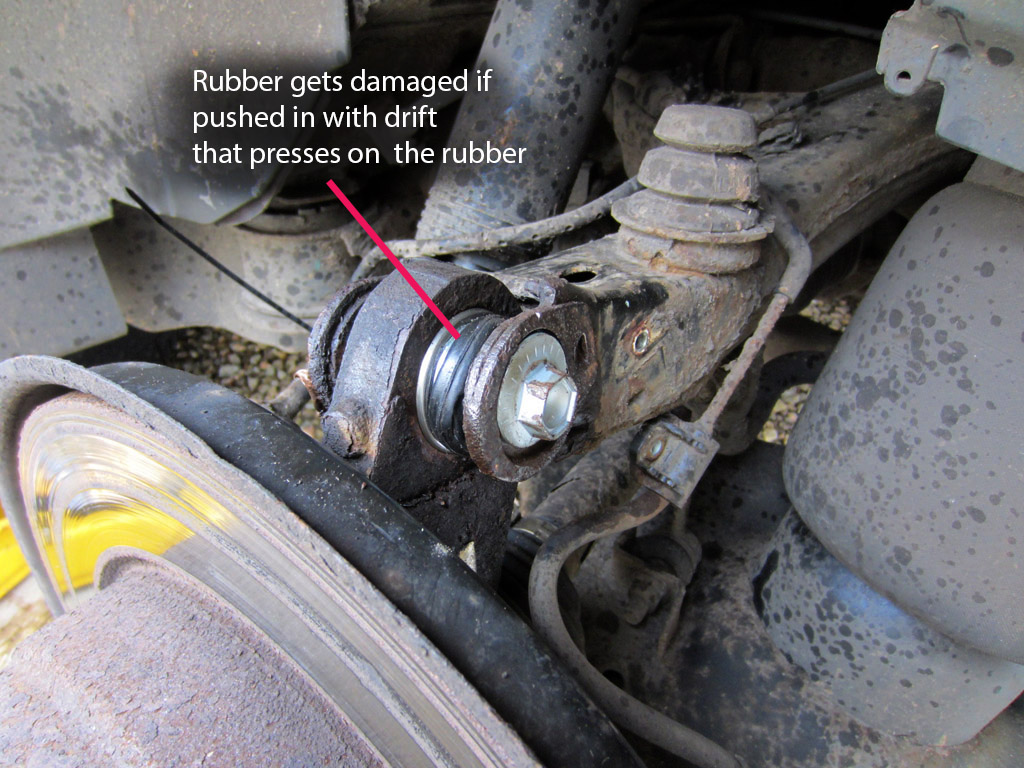
Anways ... pushing in the new bush. ** This bit is important ***. for the side that you'll push the new part in with, you need to get the correct size. The drift should be big enough to cover over the rubber without crushing, but small enough to press properly on the metal outer of the bush. If you use the same drift you pushed the bush out with, you'll damage the rubber ( ask me how I know ! ) See below: the one on the left is the correct size, the one on the right is what I used to push the bush out with.

Click image to enlarge


Then you can push the new bush back in to the correct depth. the RAVE manual mentions put the chamfered edge to the rear ... both sides of mine were chamfered the same amount ... go figure.

If you crush the rubber, you get this:
Click image to enlarge


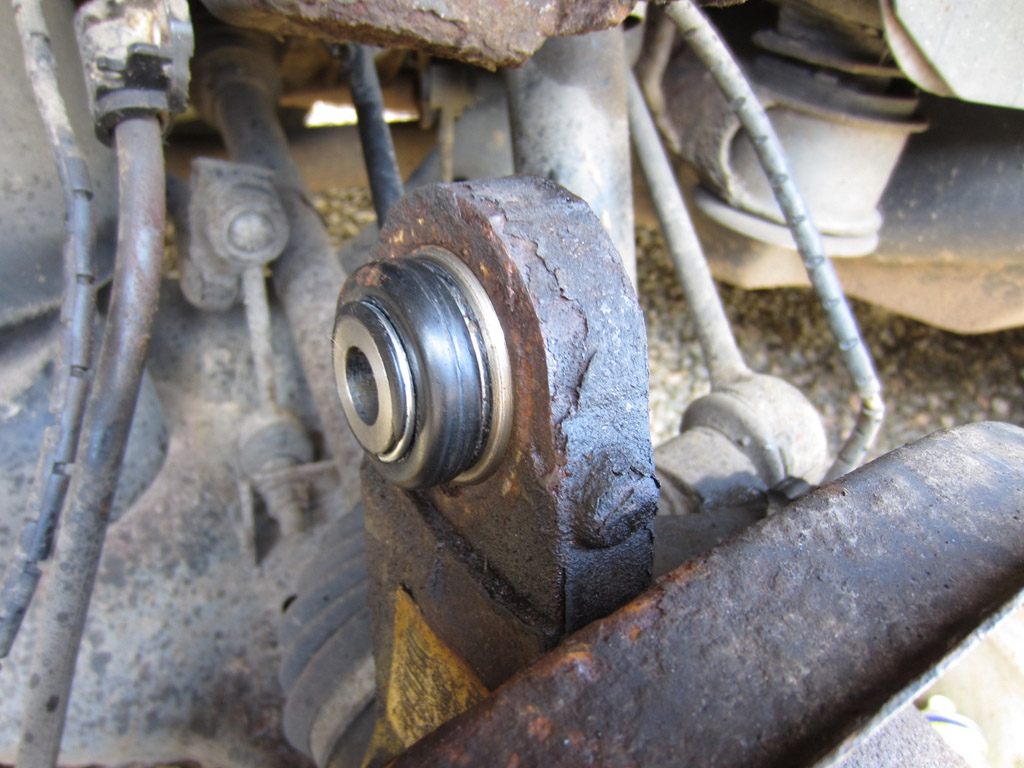
If you dont, you get this:
Click image to enlarge


You can then use the lower arm jack to push the hub back up to meet the upper arm. You may find that you also need to drop the body downwards to meet it as well ( hence 2 jacks ). Put the new eccentric bolt in and washer, and realign with the mark on the arm. then holding the bolt head in the right alignment, tighten up the bolts as per manual.

Jobs a goodun:
Click image to enlarge
 V8 or else ...

Last edited by fisha on 12th Sep 2012 8:56am. Edited 2 times in total

Post #140661 11th Sep 2012 7:10pm
View user's profile Send private message View poster's gallery Reply with quote
fisha


Member Since: 25 Sep 2009
Location: Scotland
Posts: 1350

2015 Range Rover Autobiography SDV8 Aruba

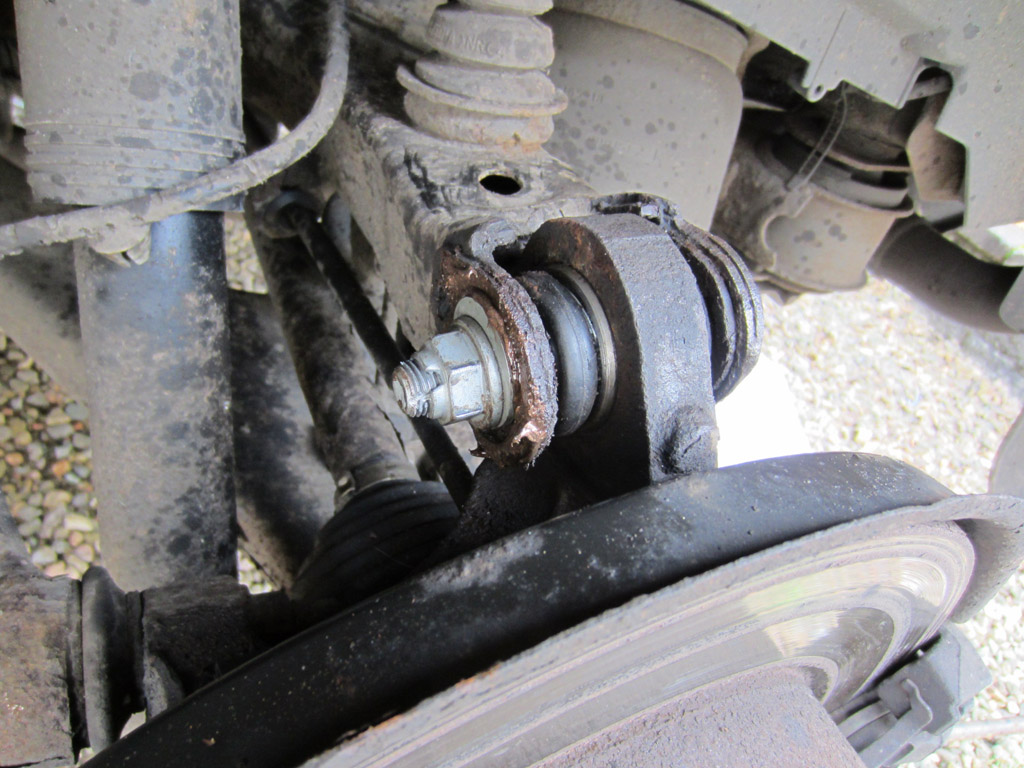
LOWER BUSH ...

With the upper done, time to move to the lower. The bolt is a 22mm on each side:
mmmmm.... rusty Very Happy

Click image to enlarge


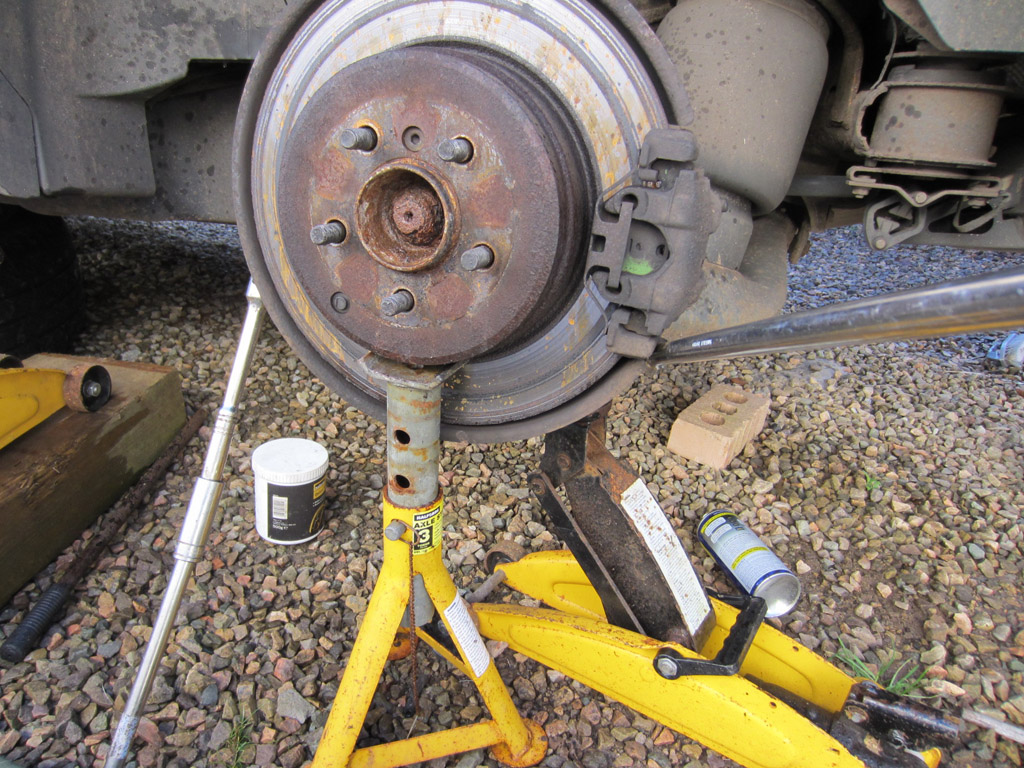
In terms of jacks, similar setup to before, one on the body, one on the lower arm. However, this time, I supported the hub with a stand. This helped put leverage on the bolts and kept it in place when useing the press:
Click image to enlarge


the manual states that the tie-rod arm needed to be undone for the lower bush ... I didn't need to undo it. I left it in place.
Click image to enlarge


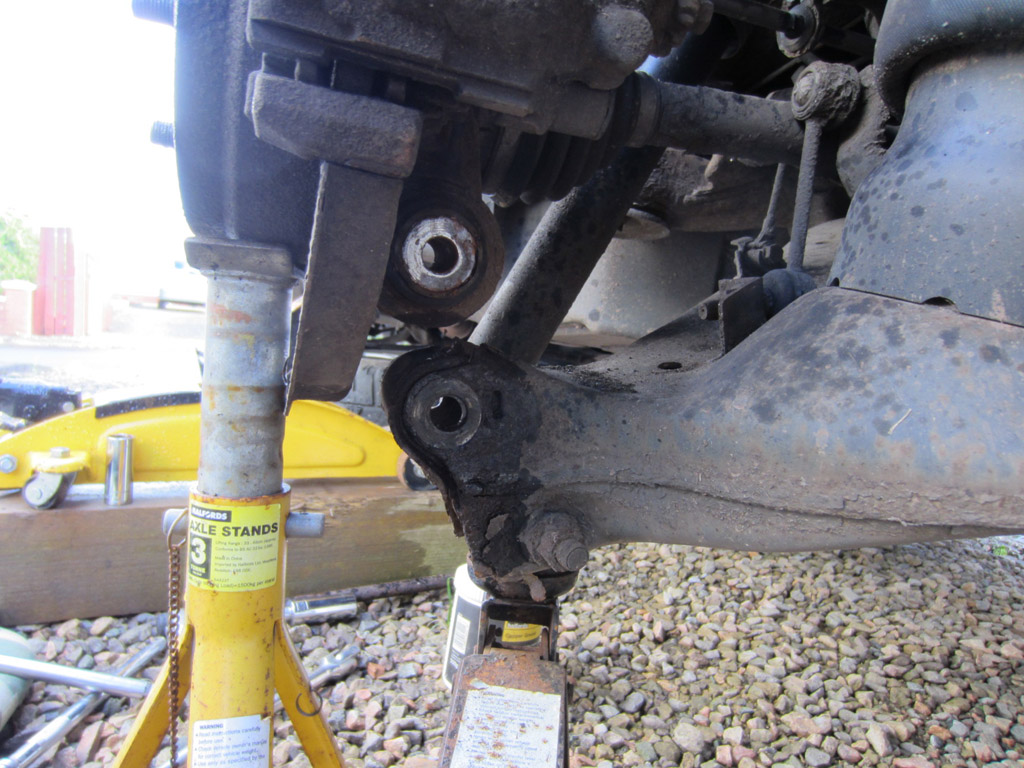
Undo the nut and make sure the bolt can spin freely, then hammer out the bolt. You can then lower the arm out of the way ... see how you're glad you supported the hub now eh?
Click image to enlarge


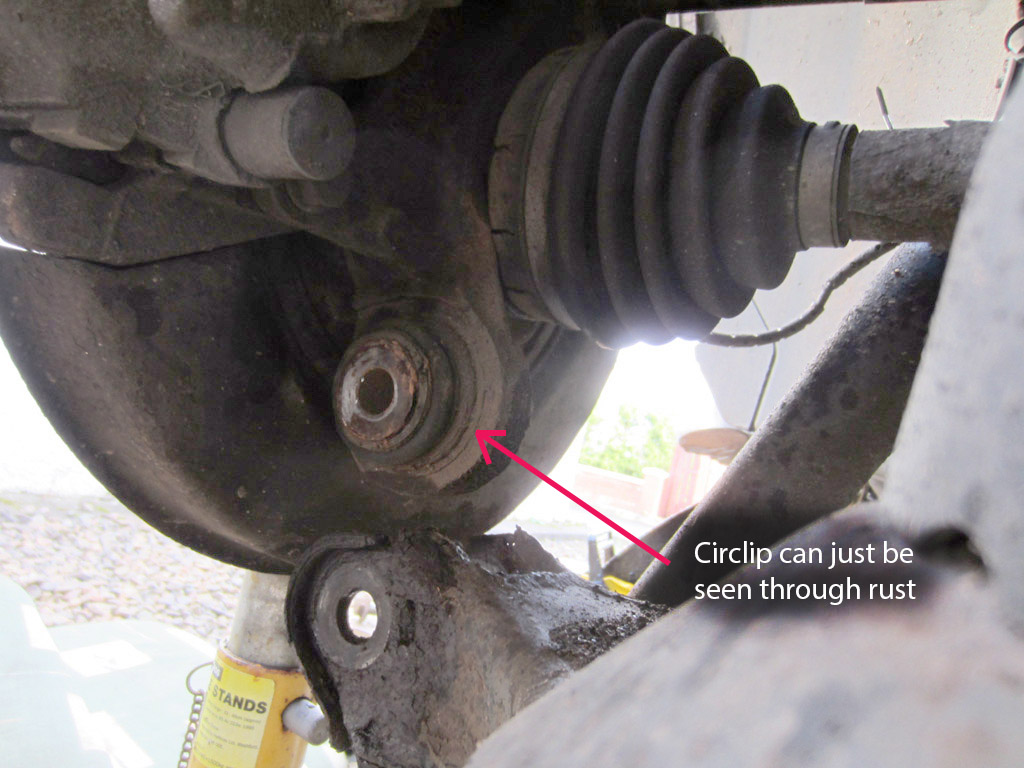
The lower bush is different to the upper one. It can only go in ( and out ) one way, and its held in place by a circlip - see the new one:
Click image to enlarge


Now see the old one: Rolling with laughter .
Click image to enlarge


( At this stage, I removed the caliper and mount for better access )

What you need to do it get a small screwdriver with a thin bladed end and tap it udnerneath the end of the circlip. Keep tapping up and round until it bends out of shape and stays out of the groove:
Click image to enlarge


It should come off easily like this ... dont even consider re-use !


With the clip off, you can setup the press. At this stage, heres another couple of tips:

- make sure the outer diameter of the pushing drift is smaller than the outer edge of the bush ( use the new bush to check ). If its too close, then the drift gets caught in the hub, and needs pulled out itself as well. It doesn;t need to me much smaller ... but just enough to be noticable.

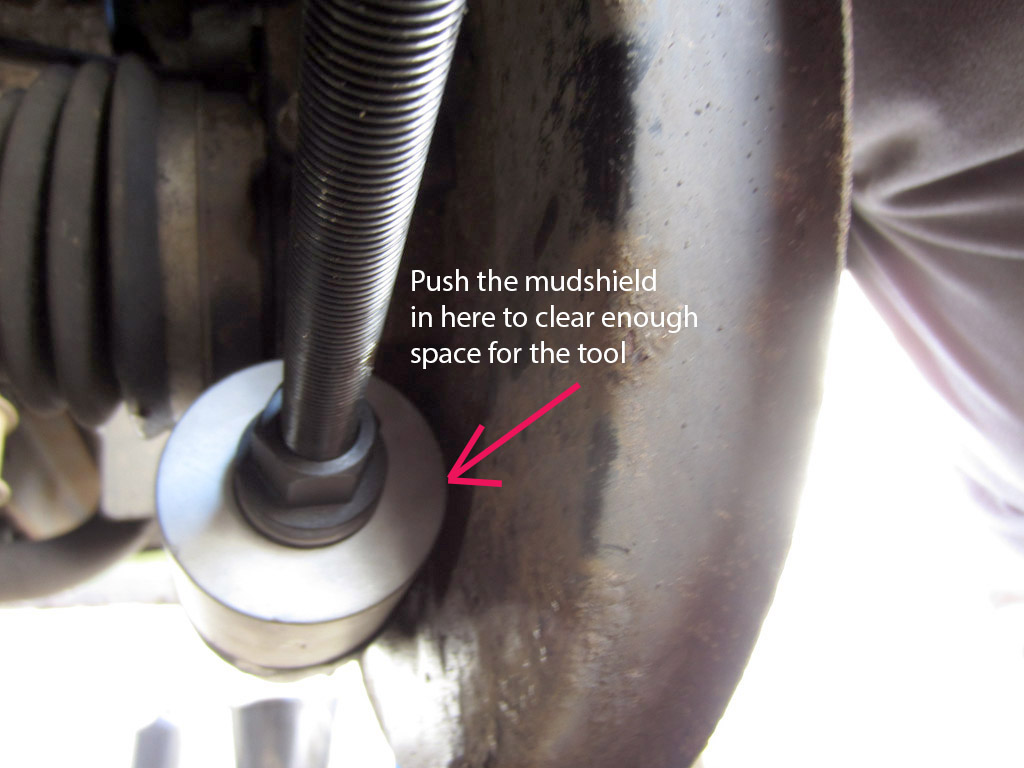
- the press works best if the drifts sit perfectly flat on the faces of the hub ... unfortunately, a protrusion on the mudsheild gets in the way of the catching drift preventing it sitting flat. To sort this, I used a large screwdriver to push that protrusion back towards the disc, using the hub as leverage.
Click image to enlarge


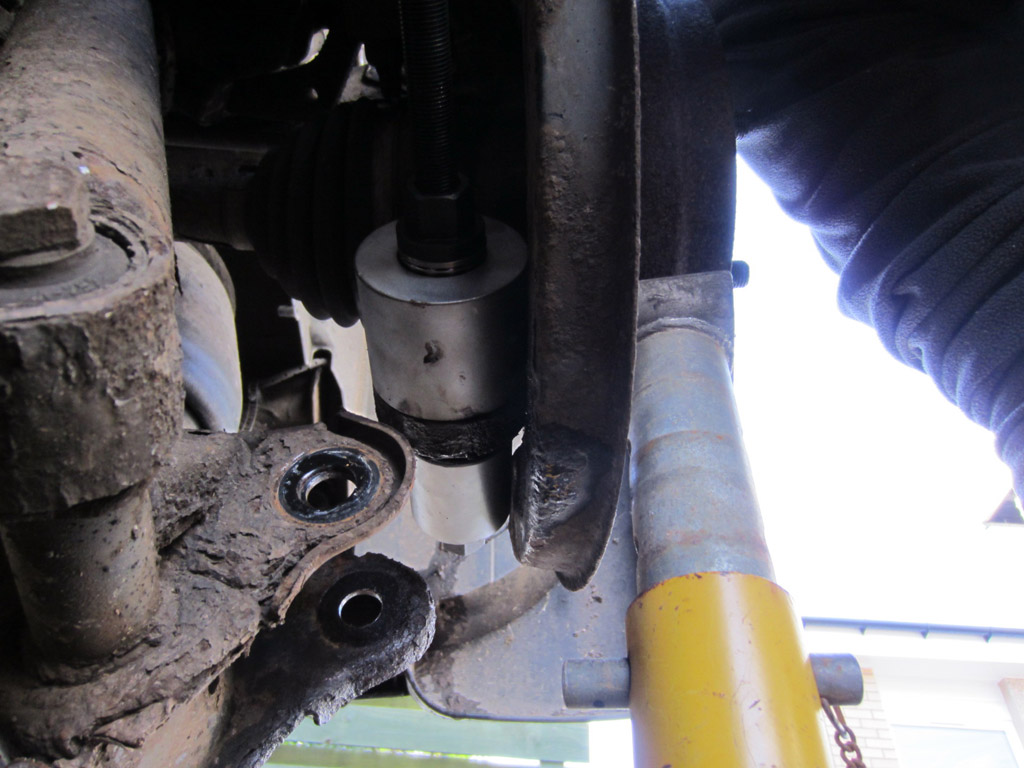
You can see how it can now sit flat:
Click image to enlarge


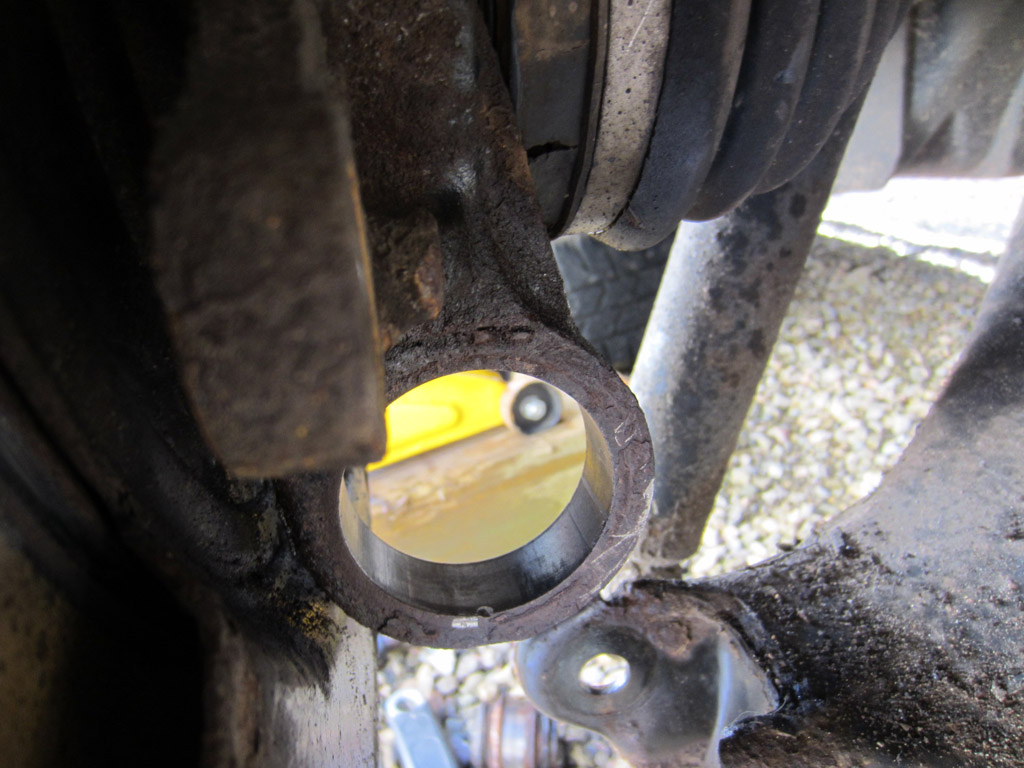
Again, I fired the heat gun and lashings of WD40 onto the hub to help things along before tightening up the press fully. Bush out: At least I took a picture of the hole this time.
Click image to enlarge


Pushing in the new bush is much easier as the side you push on has a large ledge. Again, choose a size which makes the drift sit totally flat on the bush ( it might be a size bigger than you initially think ).

Push the bush back in.
Circlip on.
Raise the arm to meet the hub, new nut and bolt and job done.

( No pic again ... oops ! )

And you're back and running: Thumbs Up
Click image to enlarge


Well, maybe not in my case. The brake pipes were so bad, I decided to order new ones. and when removing the calipers, the rear pads fell apart ... so the RR aint moving ! Big Cry Rolling with laughter V8 or else ...

Last edited by fisha on 11th Sep 2012 8:57pm. Edited 1 time in total

Post #140662 11th Sep 2012 7:11pm
View user's profile Send private message View poster's gallery Reply with quote
Joe90


Member Since: 29 Apr 2010
Location: Hampshire
Posts: 6408

England 

Great work fisha

I've got this job coming up soon... (Making up my own press kit from old jack, sockets and bits of pipe). What I don't have is a heat gun Sad

So no depressurization of the suspension needed ?? This is good news Smile .
Experience is the only genuine knowledge, but as time passes, I have forgotten more than I can remember Wink
Volvo V70 P2 2006 2.4 Petrol 170bhp Estate SE
MG Midget Mk1 1962

Previous: L322 Range Rover TDV8 3.6 2008; L322 Range Rover TD6 3.0 2002; P38A Range Rover V8 1999

Post #140663 11th Sep 2012 8:39pm
View user's profile Send private message View poster's gallery Reply with quote
SteveMFr
Site Sponsor


Member Since: 22 Nov 2009
Location: Strasbourg, France
Posts: 1641

Nice write up! 
RRC 2Dr, RRC 4Dr,
P38, and 2 L322s
(wife thinks I'm nuts - prob right, too)

Post #140664 11th Sep 2012 8:51pm
View user's profile Send private message View poster's gallery Reply with quote
fisha


Member Since: 25 Sep 2009
Location: Scotland
Posts: 1350

2015 Range Rover Autobiography SDV8 Aruba

Joe,

No - I didn't de-pressure the system ... but you need to be careful, when you disconnect the bolts on the hub , especially the bottom bolt, there is nothing stopping the bladder pushing the lower arm downwards ... which is another reason why you need a jack under the arm.

Also, cause your moving the arms through so much movement, if you close and open doors with the ignition off, the car tries to level out by letting air out of the bags ... by the time I put things back to gether and lowered it all to the ground, it was in access height, even though I started the job in off road mode.

Regarding the press kit ... are you considering removing the whole hub to put it in a press?

If so, be warned now, if you think the bolts pictured are rusty ... you aint seen nothing compared to the hub bolt. I seriously have no idea how I would undo that at the moment. Which is why I bought the press kit online. ONe of those tools that just saved soo much hassle. Should have bought one years ago.

Regarding the heat gun ... its just one of those paint stripper things ... been in the garage for years. V8 or else ...

Post #140665 11th Sep 2012 9:08pm
View user's profile Send private message View poster's gallery Reply with quote
nicedayforit


Member Since: 11 Jun 2011
Location: Beside the Solway
Posts: 3972

England 2004 Range Rover Vogue Td6 Giverny Green

Good write up. Thumbs Up Should go in the Wiki.
Can I just ask one question regarding the brake pipes, yours are corroded and are obviously steel. On my car (2004) the brake pipes are as new and appear to be copper- nickel alloy. My mot tester thinks the same. I have no reason to believe mine aren't origonal, they certainly look it. All the brake pipes on the car are the same.
Question, did LR change over to copper-nickel pipes at some time?

If you want steel brake pipes to last just coat them with grease, last the lifetime of the car then.

Post #140698 12th Sep 2012 7:29am
View user's profile Send private message View poster's gallery Reply with quote
fisha


Member Since: 25 Sep 2009
Location: Scotland
Posts: 1350

2015 Range Rover Autobiography SDV8 Aruba

I've ordered the new flex pipes that run down the arms ... easier that way and about £18 a side which is fine. Be interesting to see what they are made of when they arrive.

Trouble is that the body mounted pipe that runs across the rear from one side to the other is badly corroded too. So I need to replace that as well ... which I'll do with copper.

Having had a look at it, the pipe is well hidden behind the tank guards and the exhaust shields that run the length of the car. Going to have to spend some time trying to find a good place to join it .... or do what I did with the old RR and replace the whole run of pipe. *sigh* even then i'll still need to try and find it behind all the other things.

that'll be another big picture write up. V8 or else ...


Last edited by fisha on 12th Sep 2012 8:15am. Edited 1 time in total

Post #140709 12th Sep 2012 7:59am
View user's profile Send private message View poster's gallery Reply with quote
Joe90


Member Since: 29 Apr 2010
Location: Hampshire
Posts: 6408

England 

I am not going to try to take the hub off, do it in-situ just as you did. I can see the need for the jack under the lower wishbone to stop the airbag trying to fill. I guess battery disconnection would also help ?

For the upper bush, you mark the bolt, but then replace it with a new one with no mark? How to ensure its in the right place? I was planning on doing all this then taking for a four wheel alignment (have outer wear problems at the rear in any case) ? .
Experience is the only genuine knowledge, but as time passes, I have forgotten more than I can remember Wink
Volvo V70 P2 2006 2.4 Petrol 170bhp Estate SE
MG Midget Mk1 1962

Previous: L322 Range Rover TDV8 3.6 2008; L322 Range Rover TD6 3.0 2002; P38A Range Rover V8 1999


Last edited by Joe90 on 12th Sep 2012 8:21am. Edited 1 time in total

Post #140710 12th Sep 2012 8:12am
View user's profile Send private message View poster's gallery Reply with quote
fisha


Member Since: 25 Sep 2009
Location: Scotland
Posts: 1350

2015 Range Rover Autobiography SDV8 Aruba

i suppose it would help ... i never bothered. V8 or else ...

Post #140711 12th Sep 2012 8:16am
View user's profile Send private message View poster's gallery Reply with quote
stan
Site Moderator


Member Since: 13 Jul 2010
Location: a moderate moderated moderator moderating moderately in moderation
Posts: 35284

United Kingdom 

took the liberty to wiki this excellent how to... ... - .- -.


Y. O. L. O.
.

Post #140715 12th Sep 2012 8:29am
View user's profile Send private message View poster's gallery Reply with quote
fisha


Member Since: 25 Sep 2009
Location: Scotland
Posts: 1350

2015 Range Rover Autobiography SDV8 Aruba

Quote:
For the upper bush, you mark the bolt, but then replace it with a new one with no mark? How to ensure its in the right place? I was planning on doing all this then taking for a four wheel alignment (have outer wear problems at the rear in any case) ?


The orientation between the eccentric oval of the bolt head and the 6 bolt faces are the same between the new and old bolts. So when I marked the old bolt head, it allowed me to place the new and old bolts side by side and make sure that I new which face should be facing the mark on the arm.

For both sides, the reality was that I chose the longest part of the eccentric oval shape to mark where it met the arm. With that, it wouldn't really of mattered about marking the bolt head as long as I made sure the longest part of the new bolt also met the arm in the same place.

Sounds more complicated than it really is. Mark the longest point of the oval in all cases, and match that with the longest point of the new bolt and you'll not go wrong. V8 or else ...

Post #140765 12th Sep 2012 12:51pm
View user's profile Send private message View poster's gallery Reply with quote
Joe90


Member Since: 29 Apr 2010
Location: Hampshire
Posts: 6408

England 

Thumbs Up .
Experience is the only genuine knowledge, but as time passes, I have forgotten more than I can remember Wink
Volvo V70 P2 2006 2.4 Petrol 170bhp Estate SE
MG Midget Mk1 1962

Previous: L322 Range Rover TDV8 3.6 2008; L322 Range Rover TD6 3.0 2002; P38A Range Rover V8 1999

Post #140786 12th Sep 2012 2:06pm
View user's profile Send private message View poster's gallery Reply with quote
Joe90


Member Since: 29 Apr 2010
Location: Hampshire
Posts: 6408

England 
Top Tip Lower Bush not lining up?

Having failed to tighten up my rear airbag correctly, I had to have that side apart again.

Even with the bag fully deflated I couldn't get it out, so undid the lower arm bush at the hub to get more access.

When I came to refit, the lower arm and the bush were @ 1.5 inches out of line. Nothing I tried would make any difference.

The fix was to (ensure all wheels are chocked), release the handbrake, and put car in neutral. Lo and behold, all the movement you could ever need to get things back together. .
Experience is the only genuine knowledge, but as time passes, I have forgotten more than I can remember Wink
Volvo V70 P2 2006 2.4 Petrol 170bhp Estate SE
MG Midget Mk1 1962

Previous: L322 Range Rover TDV8 3.6 2008; L322 Range Rover TD6 3.0 2002; P38A Range Rover V8 1999

Post #180326 29th Mar 2013 6:28pm
View user's profile Send private message View poster's gallery Reply with quote
Dijit


Member Since: 09 Jul 2012
Location: Glasgow
Posts: 161

Scotland 2007 Range Rover Vogue TDV8 Java Black

fisha wrote:
I've ordered the new flex pipes that run down the arms ... easier that way and about £18 a side which is fine. Be interesting to see what they are made of when they arrive.

Trouble is that the body mounted pipe that runs across the rear from one side to the other is badly corroded too. So I need to replace that as well ... which I'll do with copper.

Having had a look at it, the pipe is well hidden behind the tank guards and the exhaust shields that run the length of the car. Going to have to spend some time trying to find a good place to join it .... or do what I did with the old RR and replace the whole run of pipe. *sigh* even then i'll still need to try and find it behind all the other things.
that'll be another big picture write up.


The brake pipe running transversely across the car at the rear is an absolute doddle if done this way. My 2002 4.4 failed its MOT last year for this. I have access to a ramp. The problem is from below you can hardly see the pipe much less reach it with a spanner.
The answer is to raise the suspension to off road height and go in from above. The pipe once you undo the joints is simply pushed into clips on the subframe. Use a proper brake pipe spanner and you'll have the old one off in ten minutes.
Now I had to replace a number of the pipes and was not prepared to use steel. I bought copper. I then having cut, bent and fitted the first pipe had to to remove it again to allow another to be replaced. I was surprised to find how work hardened the copper had become. I consider that over time these could with vibration fracture. When I investigated I was shocked to discover the Americans have banned copper brake pipes. I had to hunt to find Kunifer and that's great.
So my message is do NOT use copper under any circumstances. If you're used to working with small bore pipe this, from above, is a 30 minute doddle. Couple of other tricks. Remove the master cylinder cap cover the top with a plastic bag and screw the cap back on tight. That stops air getting in and so reduces the brake fluid from pouring out.
Btw, Kunifer is roughly the same price as copper. I have a good source if anyone is stuck finding a supplier. Rehab is for quitters!!!

RR 2007 3.6 TDV8 Java Black *
RR 2007 3.6 TDV8 Zermatt silver *
RR 2000 P38 4.6 Met red *
Mercedes 300TE 4-Matic *
Jaguar 420 (1969) *
Nissan 300Z
Citroen XM 2.5TD X 6
Bentley Continental R
Hydrocon Highlander
Hydrocon Hamilton
Hydrocon Huntly
Am told the ones with a * are to be offered for sale! 😳

Departed
LR 1992 110 2.5TD
RR 2000 Holland & Holland 4.6 LPG
RR 4.2 Supercharged with LPG, Vogue SE 2007 Buckingham Blue
RR 2002 4.4 V8 Zambesi Silver

Post #277948 28th Aug 2014 10:45pm
View user's profile Send private message View poster's gallery Reply with quote
DoubleRL322


Member Since: 05 Jul 2016
Location: Orlando, FL
Posts: 25

United States 2003 Range Rover HSE 4.4 V8 Zambezi Silver

Wow, excellent write up!

Quick question. When you torque the bolts down, do you leave the jack under the lower control arm?

Or are you supposed to lower the jack so that it is no longer supporting the lower control arm before torquing down?

Post #397596 25th Jul 2016 4:34pm
View user's profile Send private message View poster's gallery Reply with quote
Post Reply  Back to top
Page 1 of 3 123>
All times are GMT

Jump to  
Previous Topic | Next Topic >
Posting Rules
You cannot post new topics in this forum
You cannot reply to topics in this forum
You cannot edit your posts in this forum
You cannot delete your posts in this forum
You cannot vote in polls in this forum


Site Copyright © 2006-2024 Futuranet Ltd & Martin Lewis
fullfatrr.com RSS Feed - All Forums


Switch to Mobile site