 | Home > Maintenance & Mods (L322) > How to Troubleshoot/Fix B1A76-15 Fuel Sender No.2 Fault |
 
|
|
|
| Ajmngn Member Since: 25 May 2021 Location: Gloucestershire Posts: 194  
|
MY2011 4.4TDV8
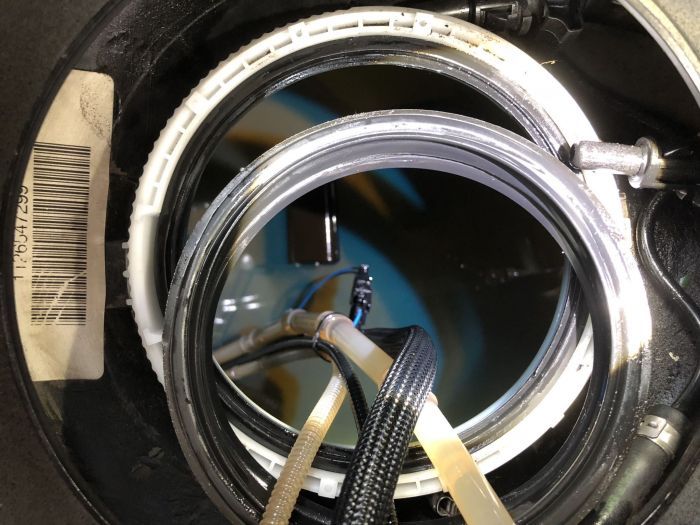
If you are in the boot with the tank in front of you and looking forward, the wires from left to right are: Black - Fuel Sender No.1 (Active) -ve White/Blue - Fuel Sender No.1 (Active) +ve Black - Fuel Pump -ve White/Blue - Fuel Pump +ve Black/Purple - Fuel Sender No.2 (passive) -ve White/Red - Fuel Sender No.2 (passive) +ve This is important to check on your car if doing this, as this will quickly help you to determine which sender unit you are going to test and whether you need to fish the whole pump unit out of the tank or can affect a quick fix as I did today. So, the symptoms I found prior to opening up the fuel tank were as follows: - DTC B1A76-15 not clearing. - IID Tool Live values for Active and Passive Fuel (in BCM List) were reading c.1.5V for Active 'A' Circuit, and c.4.95V for Passive 'B' Circuit. The V represents the amount of fuel in the tank and changes due to more/less resistance in the circuit. The senders are on a 5V circuit and the max V for a full tank is about 3V so I knew something was wrong. - After getting access to the plug on the fuel tank seal I removed the plug to reveal the pins and tested the resistance in ohms across the active and passive circuits. On the Active circuit got c.180 Ohms. On the passive circuit it was c.3000 Ohms (it should have been no more that 1000 if on a full tank). Whilst I didn't know how much fuel I had in the tank (for obvious reasons) I estimated it was about ¼ full. You need to try and be accurate on this as, if you have to go fishing around in the tank to remove stuff then you want as little fuel in there as possible. I had a 12V electric pump and 20L Jerry Can on standby to drain the tank to a workable level if I needed to attempt a more involved repair. Once I had ascertained that the Passive sender circuit was showing a clear issue, I then removed the cap to the tank. To do this you will need to remove the two quick-clip pipes. Just use some needle-nose pliers or similar to pinch the wings together and this allows you to pull the male connector out. You will get a small amount of fuel drip out so stuff some blue roll or similar underneath the connector to keep spillage to a minimum. It's not a lot but you will want to minimise this to prevent the car stinking of fuel afterwards. Thea reason you need to remove the pipes (as I found) is that when you release the metal ring that holds everything down to form a seal, as it unwinds it will catch on the pipes and you won't be able to undo it all the way. So, pipes off firsts then undo the ring with a screwdriver and a hammer to tap it anti-clockwise. Once it spins freely, you can undo by hand, tuck the two pipes you removed out the way and then just pull the whole assembly up perpendicular to the tank. Once you have access, locate the electrical plug connector on the base and find the pair of wires at one end of the plug or the other that correlate to the sender that has the problem. Luckily for me, my problem sender was the passive one, and these wires led me to the connector that is in easy reach about 30cm down the line.
This was a gift as some people have problems with the active sender and this requires a lot more effort, removing the sender units from the tank completely to access them. Anyway, as the Technical Bulletin talks about "fretting corrosion" and me having found what I thought was an open circuit (very high/infinite resistance), the most obvious thing to do was undo and re-connect the plug connector about 20 times to make sure I was getting a good contact and to remove any corrosion if I could. After I did this, and with my fingers very tightly crossed, I checked the resistance one more time and found that it had dropped from c.3000 Ohms to c.170 Ohms. BINGO - no cutting plug connectors off and doing crimp connections today! Once I'd verified the lower resistance and compared to the active circuit, I put everything back together, reconnected the fuel lines and put the plug back on top of the tank, reconnected the battery and fired up the IID with ignition on but engine off. Now the voltage had dropped from 4.95V to a much healthier 1.5V. I cleared the DTCs and refreshed and was very pleased to see that the B1A76-15 code was no longer reappearing. Result!! So, I finished the job by putting everything back to the start (metal cover back on, carpet back down, trim replaced etc). I then turned ignition on 4 times (listed for pump priming under bonnet, when noise stops turn off ignition and repeat) and then started the car. Everything back to normal fuel gauge reading correctly again and no more fault code. I doubt this will come back anytime soon and if it does, maybe I repeat the process or maybe I cut off the plug and crimp it all together. However, I am pretty confident I won't see the fault code for quite a while and can now go on holiday next week knowing that I won't break down because of this, it will probably be something else instead! 2010 4.4TDV8 Vogue SE in Santorini Black with Ivory interior 2017 Audi SQ5 3.0 V6T Quattro in Volcano Red 2001 Audi Allroad 2.5 TDI manual with low-range in Highland Green. Currently SORN whilst undergoing some serious restoration! |
||||||
|


|
|
| All times are GMT + 1 Hour |
< Previous Topic | Next Topic > |
Posting Rules
|
Site Copyright © 2006-2025 Futuranet Ltd & Martin Lewis
![]()
