![]() | Home > Technical (L322) > L322 Rear sub frame bush replacement info |
![]() ![]() |
|
|
gilesharrison Member Since: 04 Aug 2018 Location: Cumbria Posts: 163 ![]() ![]() ![]() |
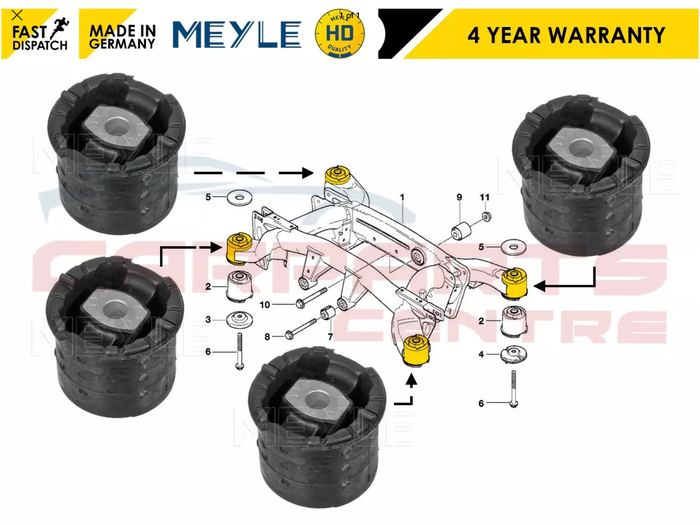
Last weekend, I decided to crack on and replace my rear sub frame bushes on my 2008 TDV8. They've been an advisory on my MOT for a couple of years and they tyre place recently refused to adjust my rear tracking as they felt there was too much movement in the rear sub frame.
So the other thing that Joe90 struggled with was making a press to remove the bushes. I admire what hi did but I wasn't looking for a simpler option. There are a number of specific presses available for the BMW application. There is a Sealey tool at £225 but a remarkable similar looking kit from a brand called Satra, also on eBay, at £65 approx. I bought the cheap one and was very pleased with the quality of the tool. It is bearing driven and the pressing plates have all the indentations to align correctly with the bushes to allow accurate orientation and prevent the bushes being twisted on installation. The tool allows all the tightening to be performed from the bottom end of the press, closest to the ground, both on removal and installation of the bushes. This has the big advantage that you do not need to lower the subframe very far at all to create space for the tool. This means that I did not need to remove the exhaust or any pipework/ wiring to complete the job. Definitely buy yourself a 24mm ratchet spanner. There's lots or spannering to do and it speeds things up no end. You'll thank me! The one thing that is essential is that you deflate the air suspension. If you don't, the wish bones drop right down and the strut becomes fully extended preventing the subframe being lowered enough. I used my IID to deflate the airbags but I'm sure there's other ways. So basic plan on how to do it (to 2008 TDV8 but all very similar I'm sure): 1. Deflate air suspension. Jack and and support rear of car by the body jacking points. Remove rear wheels. 2. Loosen all the 4 sub frame bolts by a couple of turns. Leave two of the bolts in situ and remove the bolts from the other side. Supporting that side of the subframe with a traolley jack or something, lower it. You only need about 50mm of space above the bush. This may take a bit of levering or you may need to jack up the wish-bone/ strut a bit if the strut is fully extended. 3. Put the press tool in to place and remove the old bushes on that side. Clean up the bushing surfaces in the subframe and bit (mine were pretty tidy). Check the orientation of the bush - there are arrows to point front-rear of the car. Lightly grease the new bush and press it in until the tool bottoms out. 4. Once you've done both bushes on that side, lift the subframe back up with your jack and replace the bolts, don't fully tighten yet. Now do the other side. Retighten the subframe to body bolts to 165nm, as per the workshop manual. 5. Wheels on, suspension reactivated. Done! The rear end of my car now feels much more solid and the car follows a line much better through uneven road surfaces. I didn't have any real noises prior to doing this job so that's unchanged. Car feels marginally stiffer at the back end but in a good way, not a bad way! Hope that helps. Took me about 3h in total. PS. It's very unlikely that I will ever use that tool again so I feel anyone wants it, I'm happy to sell it for £40 inc postage. Used once, prefect working order. EDIT I've had some Discussion with Superspoons regarding this procedure. He purchased the same X5 bushes which I used and fitted them. Unfortunately, he has had some problems with the rubber of the bush deteriorating around the upper edges where the top plate fits. He contacted me to discuss this and wanted me to make it clear to everyone that the parts whichever are used are NOT identical to the genuine LR parts. The genuine parts have a slightly different bush for the front and rear sets of bushes on the rear-subframe. The BMW X5 bushes are all identically. Following our discussion, I got my car in the air again to have a good look at my replaced bushes and check their condition after about 3000 miles. They are all totally fine. The only thing I would stress is that the bushes must be installed in the correct front-rear orientation and that the top plate which sits between the bush and the car body is located in the recess of the rubber bush. If this is done, I can't really see what could cause damage to the bush. Anyway, you pay your money, you take your choice. The genuine LR bushes are undoubtedly the ideal choice, but they're significantly more expensive. The BMW X5 bushes have worked fine in my experience (so far!). Last edited by gilesharrison on 31st May 2020 8:24am. Edited 3 times in total |
||||||
![]() |
|
stu1 Member Since: 06 Dec 2013 Location: UK Posts: 276 ![]() ![]() ![]() |
Brilliant write up |
||
![]() |
|
Ansi Member Since: 07 Nov 2014 Location: Muenchwilen TG Posts: 150 ![]() ![]() ![]() |
|
||
![]() |
|
gilesharrison Member Since: 04 Aug 2018 Location: Cumbria Posts: 163 ![]() ![]() ![]() |
Thank you. Hope it helps.
|
||
![]() |
|
Superspoons Member Since: 24 Jun 2010 Location: East Hertfordshire, UK Posts: 394 ![]() ![]() ![]() |
Excellent - Need to do mine so PM sent regarding the tool |
||
![]() |
|
gilesharrison Member Since: 04 Aug 2018 Location: Cumbria Posts: 163 ![]() ![]() ![]() |
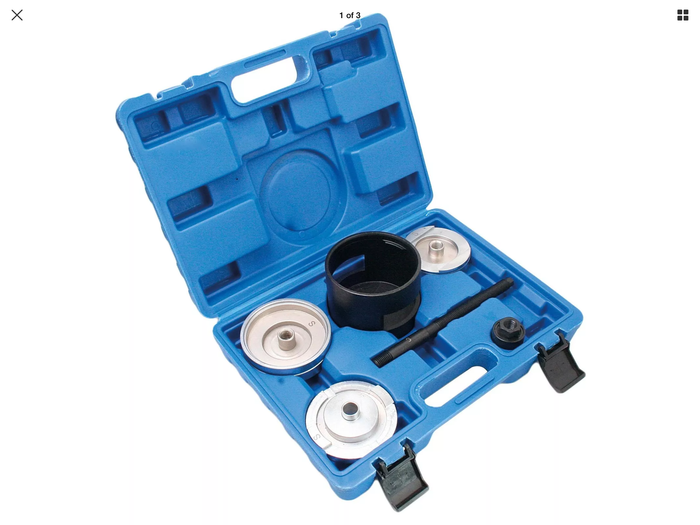
Tool is Satra S-XRB16 but if you just search for ‘BMW E53 rear sub frame tool’ on eBay you’ll find them.
|
||
![]() |
|
Swipe Member Since: 31 Aug 2018 Location: Rustington, West Sussex Posts: 101 ![]() ![]() ![]() |
Good write up, this is one job of a long list that I wanna do for my RR. 2004 Autobiography TD6 Java Black |
||
![]() |
|
gilesharrison Member Since: 04 Aug 2018 Location: Cumbria Posts: 163 ![]() ![]() ![]() |
My tool is now sold to rjff. Many thanks Richard.
|
||
![]() |
|
Superspoons Member Since: 24 Jun 2010 Location: East Hertfordshire, UK Posts: 394 ![]() ![]() ![]() |
I've just found the tool on the manufacturers website for those who need one -
|
||
![]() |
|
Caesium Member Since: 21 Sep 2021 Location: Essex Posts: 454 ![]() ![]() ![]() |
Did the recipient of the tool get round to using it and need to pass it on... ?
|
||
![]() |
|
dhallworth Member Since: 10 Oct 2011 Location: Glasgow Posts: 3179 ![]() ![]() ![]() |
I bought one of those tools for 60 quid off eBay. It was utter |
||
![]() |
|
Caesium Member Since: 21 Sep 2021 Location: Essex Posts: 454 ![]() ![]() ![]() |
My MoT test advisory was to get them done and it failed on rear brake pipes so I decided to do them both at the same time.
|
||
![]() |
|
Davidmudley Member Since: 27 Dec 2021 Location: Surrey Posts: 80 ![]() ![]() |
Great write up, I’ll be tackling this soon with LR bushes (2 x rear subframe) and the tool. Which lube should be used prior to fitting the new bushes? Am I right in thinking it should be silicone based synthetic waterproof grease type rather than petroleum based or does it not make a difference? Thanks Current: Range Rover L322 4.4tdv8, Porsche 911 (996) Carrera 2, BMW 535d Touring, Skoda Fabia, BMW S1000XR |
||
![]() |
|
dhallworth Member Since: 10 Oct 2011 Location: Glasgow Posts: 3179 ![]() ![]() ![]() |
Land Rover sell their own lubricant for doing the job. I'm not sure what it is as it's all Land Rover branded. The part number is LR012582. They call it a sealant.
|
||
![]() |
|
![]() ![]() |
|
All times are GMT + 1 Hour |
< Previous Topic | Next Topic > |
Posting Rules
|
Site Copyright © 2006-2025 Futuranet Ltd & Martin Lewis
