| L322 2007MY -> Cubby box phone section gas strut replacem | |
If your cubby box lid is like ours, it’s in danger of getting broken due to being dropped shut frequently – as the gas strut lifting the phone holder section appears to do nothing after 10 years use.
Spotting a genuine LR (Stabilus) replacement gas strut online for just over £10, I decided it was worth replacing.
I found some info on-line to help, but only for RRS & pre MY 2007 (slightly different designs), but no easy “How to”, so here’s a few words / photos to help anyone else who wants to change their’s – it’s not difficult, but you do need to be careful not to break any of the plastic lugs !
Tools needed :
T10 Torx key (minimum 30mm long ), Medium flat blade screwdriver, Long thin nose pliers
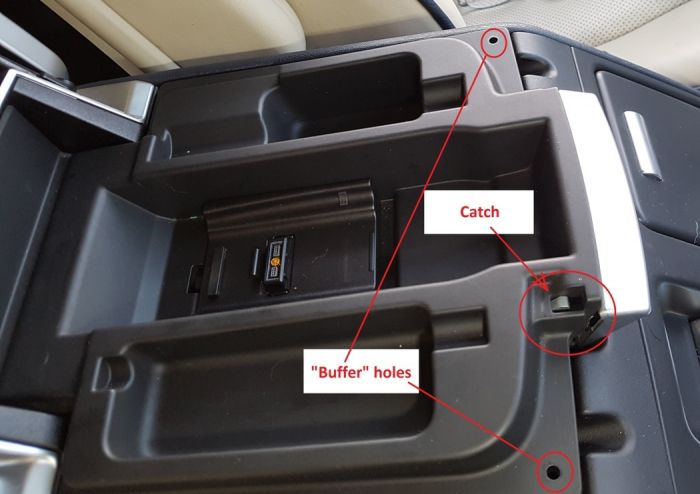
Start by opening the cubby box lid & removing the 6 off T10 torx screws, while holding the phone holder section so it doesn’t flex / break anything when you get to the last screw. Also so that you don’t lose the rubber “buffers” at the front edge which are just a loose fit.
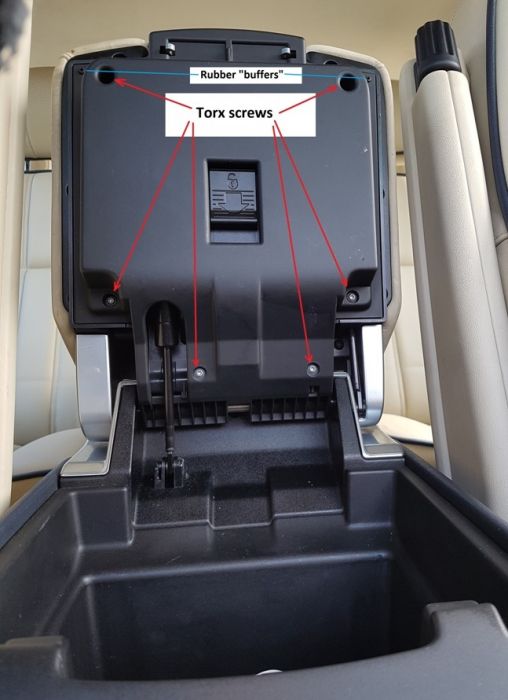 | | Click image to enlarge |
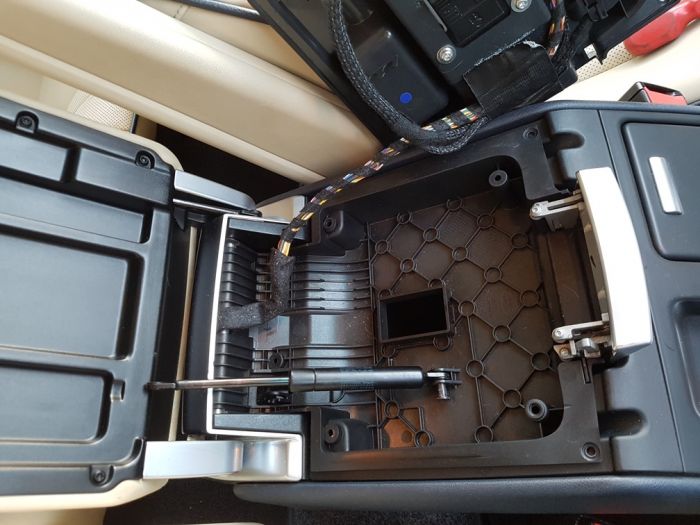
Move the cubby lid catch mechanism forward slightly so that the phone holder section can be lifted up at the front & then eased forward out of the way.
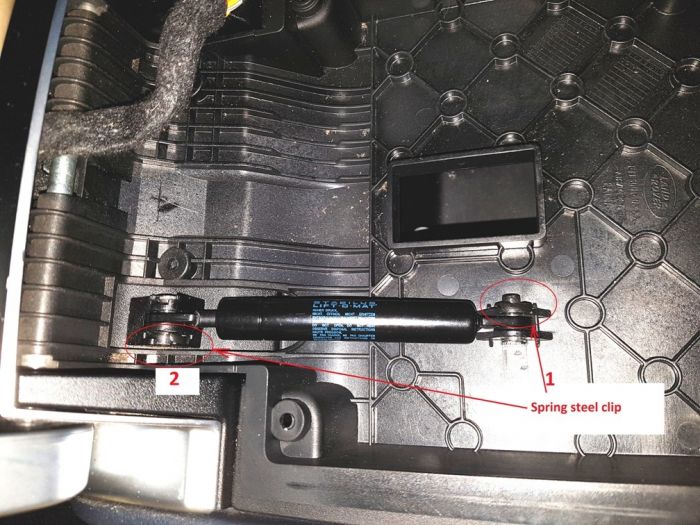
Beware there’s loads of cable between the phone holder & the main cubby box - which can be disconnected if you want, but it’s long enough to allow the phone holder to be just propped on one side, leaving you access to the top end of the gas strut “1” & a view of the bottom end “2”.
Start by removing the top end “1” first - as it’s easiest this way to manage any remaining tension in the gas strut (I learnt this the hard way - lol).
You’ll see there is a spring steel clip on the end of the locating pins that fix the gas strut in place.
It’s relatively easy to prise this off the groove in the pin after rotating the clip into the easiest access position for your screwdriver blade (keep your fingers on the clip while removing it to prevent it just flying off !).
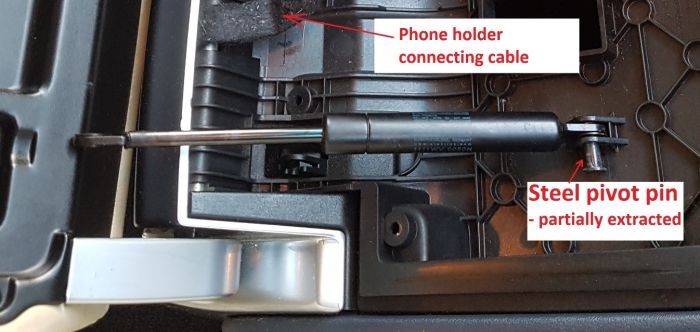
The steel locating pin is a fairly tight fit inside a black plastic bush in the gas strut end, but BEWARE you can’t knock it out because the lugs on the plastic lid do not appear able to withstand much abuse.
I used the thin nose pliers to grip the small end of the pin & the side of the plastic lugs & progressively squeezed harder until the pin started to push through. Once it was flush at the small end, I then grabbed the large end of the pin with the pliers & rotated it while pulling it gently out.
Once the top end is out you can open the lid & repeat the process on the lower pin.
BEWARE the lower pin is inserted / removed from the opposite direction to the pin at the top !
Now’s the time to check that you’ve got no burrs / rough edges on the ends of the pin that fit through the plastic bushes in the gas strut. If you have, use a file, emery paper etc to smooth them down. Also, before fitting the new gas strut, check which side of the plastic bush in the gas strut is easiest to start the steel pin in & align the strut accordingly for re-fitting (on ours, it was the smaller side of the bush which appeared to have a slightly larger dia hole than the other side).
Re-assembly, is as they always say, just the reverse of dis-assembly, starting with the gas strut through the hole in the cubby lid & attaching the lower locating pin first.
Because the pins are such a tight fit, again I had to use the pliers – initially using them to grip the large end while rotating the pin to get it to move inwards, while making sure it was square to the plastic bush in the end of the gas strut & the plastic lug on the lid. I then located the pliers on the large end of the pin & the outer edge of plastic locating lug on the cubby lid & progressively squeezed the pliers to force the pin in.
Repeat on the top locating pin & re-fit the steel clips in the grooves in the pins.
Now re-fit the rubber “buffers in their locating holes & re-fit the phone holder section & 6 torx screws.
Job done !
In cold weather the cubby lid on ours now opens & stays wherever it’s lifted to & when warm, it slowly & majestically rises up to the fully open position ! Paul,
2001 Discovery 2 TD5, 211,000 miles & climbing
2006 FFRR TDV8 Vogue 145,000 miles & climbing
Member of Midland (Land) Rover Owners Club, www.mroc.co.uk
|


![]()


