bebechoon
Member Since: 22 Apr 2014
Location: In ze middle of Frainsch nul part
Posts: 454


|
| 2005 MOST (touch-screen) reversing camera retro-fit | |
My LHD November 2004 Td6 is a ‘2005’ model, the ‘intermediate’ model which seems to have a mishmash of parts and technologies. For a long time I have wanted to install a reversing camera but, while there are write-ups for older, non-touch-screen models, as far as I can see there are no detailed write-ups for the later touch-screen model. I knew, however, that I am not alone in having attempted this installation (see for example http://www.fullfatrr.com/forum/topic6231.html), but available info is dated and a little incomplete.
Although I am a reasonably competent DiY-er, I have no real mechanical, electrical or engineering expertise and so this task on my pride and joy was a major undertaking for me. But I did it, so you can too!
Requirements:
- An NTSC reversing camera with an appropriate length (+/- 6m) of thin RCA video cable and 12V power feed connections. (I had already acquired a cheap NTSC reversing camera from a local Norauto, a sort of French ‘Halfords’.)
- An SMB to RCA (FAKRA compatible) Nav Screen cable, available from this site’s shop: http://www.disco3.co.uk/shop/nav-screen-ca...e-p34.html).
- An appropriate moment – and motivation – to start the work, plus courage, resolve and determination. (For me, that meant a beer or three in my belly!)
Not having a garage, I have to work outside, so the weather had to be right (no chance of rain, not too hot, not too cold). In addition, my Fatty has to be useable at all times, so there was no question of leaving it in bits. So I decided I’d undertake the job in stages.
Stage I was to remove the top of the dash, connect the cable to the back of the head unit and reassemble, all as per the dash removal section in Haylands’ excellent Wiki write-up “How to … Fit Android Head Unit to 2002-2005” http://www.fullfatrr.com/forum/topic29219.html.
- Removing the top dash is itself quite a daunting task for the un-initiated, but Pete’s guide gives very detailed and practical info.
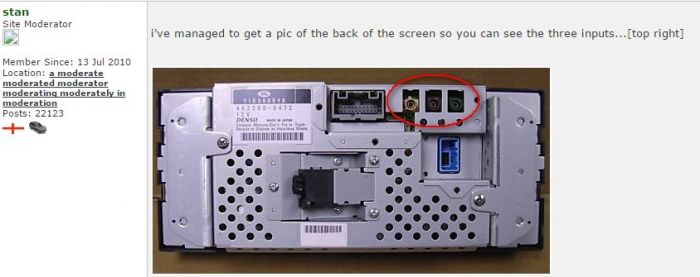
- Having removed the dash panel, I released the head unit (still following Pete’s ‘How-to’) and connected the special Nav Screen cable to the spare socket (of 3, the other 2 being taken up by goodness knows what) at the back – a simple push fit but make sure it is fully home. (See photo below – thank you and all credit to Stan):
There is not much room to work with, unless you unclip the other connectors (I didn’t).
- I then connected the camera cable (normal RCA video cable) to the other end of the Nav Screen connector cable and ran it under where the dash panel would sit, round to the side, and down towards the diagnostic socket area for later routing to the back of the car.
- And then I re-assembled the dash …
The whole procedure was much as Pete described, though I feel he played down the difficulty – at least for a novice. A certain amount of resolve is required … but, as with all jobs, when you’ve done it once the next time will be so much easier!
If Pete will forgive me, I would simply add the following:
- I found removing the dash end panels easier with a plasterer’s spatula and by attacking the shorter top edge first. The longer, downward-sloping forward edge seemed to me to bend too much and risked breaking.
- The clips holding the end air vents in place seemed to be metal, and I found I could bend them inwards without having to hold them open, thus freeing at least one hand. (Conversely, they had to be bent back outwards again on refitting.)
- The front two screws (of 6 in all) holding the head unit in place were absolute b***ards! Firstly, you need a very long-shafted (15 cm is good) torx driver, and secondly the torx bits should be magnetised. Even with all this, I still managed to lose one of the two down a black hole, probably to rattle in the dash for evermore.
- I found refitting the end caps without marking the dash pretty much impossible. They seemed to come out with a ‘ping’, so putting them back in place was hard, to say the least. But the slight damage is not really visible.
- Take care on refitting the air vents. The vanes in one of mine somehow became detached; fixing that was extremely fiddly!
When all was reassembled, a quick check – and yes, the radio still worked, the SatNav worked, no ‘Bongs of doom’ … all looked good.
Stage II (a couple of days later when I could find no more excuses not to carry on): re-configuring the CCF files for reverse camera capability (with my IID tool), then connecting up the camera to see if it all worked.
Well it didn’t. What a surprise!
I did a Video Inputs Test (in the hidden settings menu – the '753 hack' – see Wiki) and immediately got a camera image, so I knew all my work so far was good. PaulB on this forum had already given me a pointer, saying that when he installed his it didn’t work at first either. He contacted GAP who suggested the MultiMedia Module needed updating.
So I contacted those nice (and extremely helpful) people at GAP who confirmed that “updating the Nav unit does fix it on older vehicles”. This involves enabling the Nav On Move feature (see Navigation ECU section in the IID tool User Manual (p65-68 in my Version 1 3, Firmware V3.0 manual). Reloading your IID tool with the “Special” firmware V3.01is required. (Afterwards you will need to put your IID tool back to the ‘normal’ version V3.00 as the special build does not perform the standard diagnostic tasks.) Once loaded, plug the tool into the diagnostics socket; you will be asked to switch on the ignition, and then the process runs automatically for 78 minutes. (Don’t forget to connect an external power source …)
NB: This enabling procedure will NOT work on MultiMedia Module firmware versions 1030 or lower – see the MMM firmware version page (p69-70 in my manual) for details.
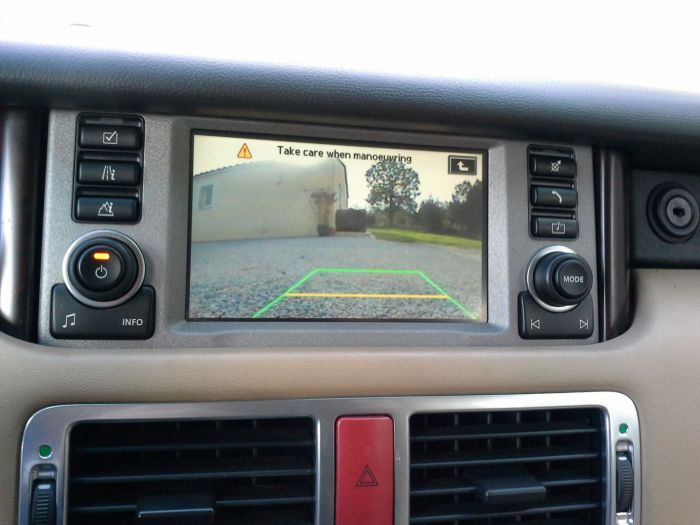
When the process was finished, I connected up my camera (video and power) and – hey presto! – the camera image automatically showed on the screen!
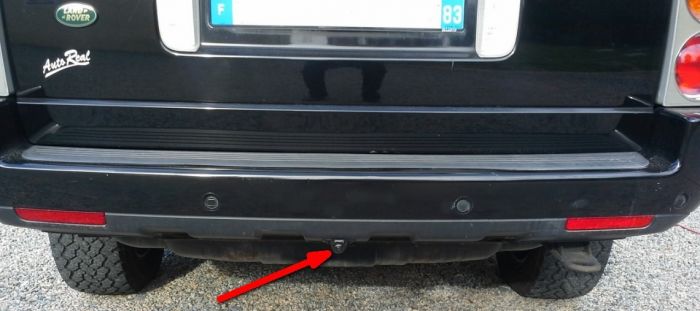
Stage III Having found a suitable position for the camera (just below the rear bumper in my case), I fitted it and then ‘hid’ the video cable from where it emerged by the diagnostic socket, through the footrest, along the side under the carpet-retaining plates, and on to the boot. (I managed to do this without removing any trim as there is enough space between the carpet and the trim to push the cable under). Then through the spare wheel well, from where I connected the camera power feed to the reversing lamp white/yellow positive wire (happily this does not seem to affect the light-check module) and the earth wire to a suitable ground nearby. I then drilled a tiny hole in the lower tailgate wiring harness rubber grommet to pass the camera video cable through to the outside and on down to the camera under the rear bumper.
Job done! No one could have been more surprised than me when I found it all worked!
Here’s a photo of the screen and camera position:
A word here for the IID tool and the GAP team. Firstly, in my view, this tool is worth every penny of its price, and mine had already paid for itself in savings. Secondly, this installation would have been impossible without it (or a similar tool with the same capabilities). And as for the support from the Technical team – well, excellent! Being in Canada they are 6 hours behind French time (5 hours for UK time) so there can be a time-difference delay, but my E’s sent were answered almost immediately, or as soon as they opened in the morning. An excellent tool, and excellent after-sales service – as has been mentioned elsewhere on this forum. It's "bĂ©bĂ©choon", ackcherly, with accents. 'Steve' to my chums.
20 years ownership of Solihull products, ALL GONE NOW, sniff!
Current motor: Suzuki S-Cross 4WD auto, 1.4 petrol. Oh so reliable! 7 years now and no problems. Oh, all right then, a leaking shocker replaced under guarantee.
Previous:
TD6 HSE L322 Auto FF
2.5 TDi 4-door Classic
Disco II
And my 1st Rangie: in 1995, a 2-door VM 2.5 diesel Classic
Not to mention the Lada Niva before those. (I said not to mention it!)
Last edited by bebechoon on 22nd Nov 2015 9:01am. Edited 1 time in total
|


![]()


