Advertise on fullfatrr.com »

Home > Maintenance & Mods (L322) > 2010-2012 4.4 TDV8 Front Strut (VCD) Replacement
Post Reply  Down to end
Page 1 of 1
Print this entire topic · 
JMC


Member Since: 01 Feb 2009
Location: Aberdeen-Angus
Posts: 755

Scotland 2012 Range Rover Westminster TDV8 Orkney Grey
2010-2012 4.4 TDV8 Front Strut (VCD) Replacement

First thing to say about the front strut replacement on the later 4.4 TDV8's is that it's much easier that anyone might expect. Shocked

We are talking about undoing five nuts on the wheel, three nuts on the strut, a small brass nut for the air, a couple of torx screws and three nuts up top! That's it!! If you've read what's in the wiki about doing this on an earlier car, you might expect additional trouble due to the wheel arch liners and the VCD on the dampers. Nothing could be further from the truth.

A leaky air strut is an age related issue. My car had 57k miles on it when the drivers side started to sink overnight and there was an occasional yellow triangle on the dash for a 'Suspension Fault'. The suspension airbags don't last forever, so if you have an issue - do them both.

Tools Required:

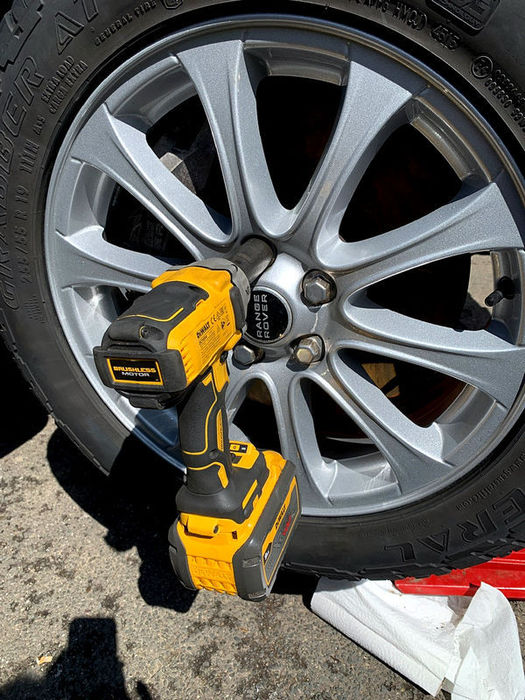
Ideally - An Impact Gun (1/2"). A standard 1/2" ratchet spanner will suffice, assuming no problematic nuts/bolts
Impact Sockets - 22mm, 18mm, 16mm
Open Ended Spanner - 12mm
Torx Socket - T30 (six pronged star)
A good trolley jack

Time to complete - circa 30mins.

Difficulty level - basic!

The usual caveats apply in terms of personal safety, suitable jacking tools and vehicle supports.

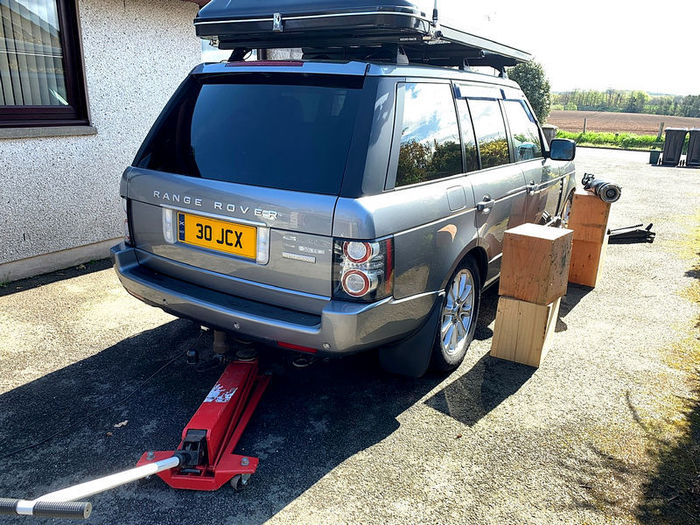
Jack the car up at the front and secure the vehicle with appropriate axle stands. I actually used several bits of tree to have the whole vehicle up in the air.


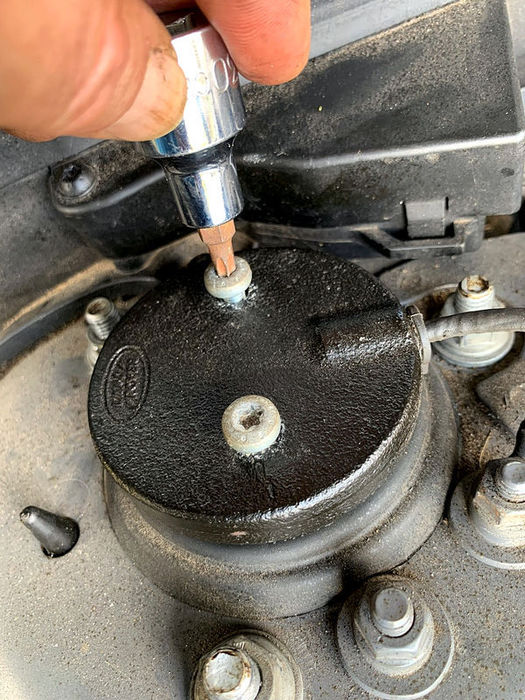
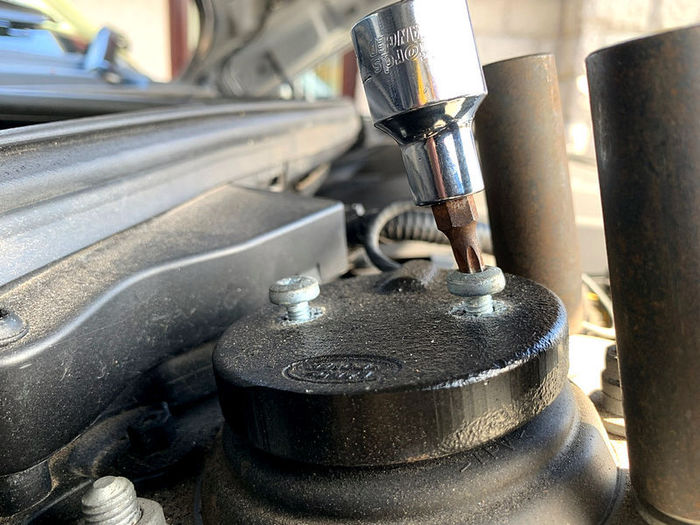
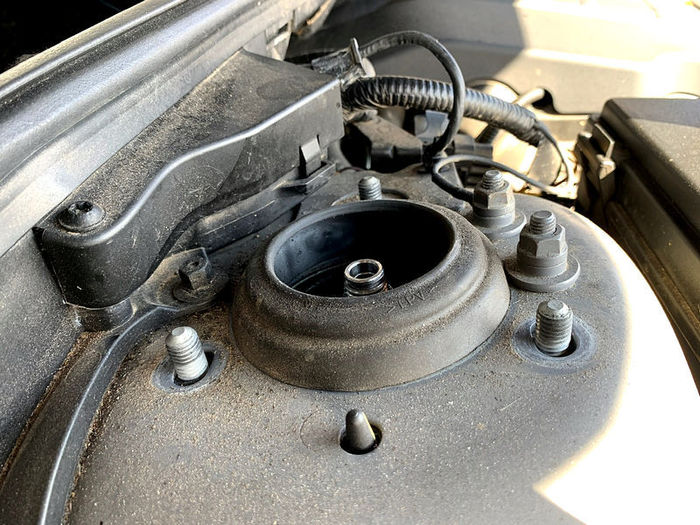
Remove the two Torx screws from the top of the strut


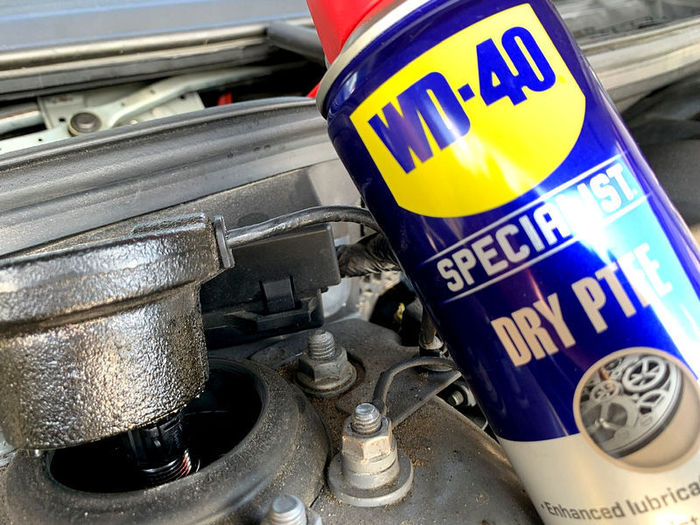
I found that some PTFE lube helped on the rubber to make the next bit more compliant


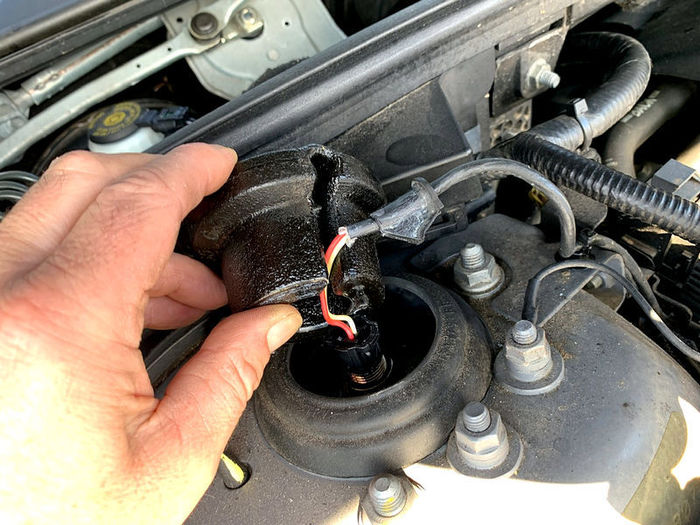
Extract the (heavy) lump of metal and work the cable/rubber mount free from it


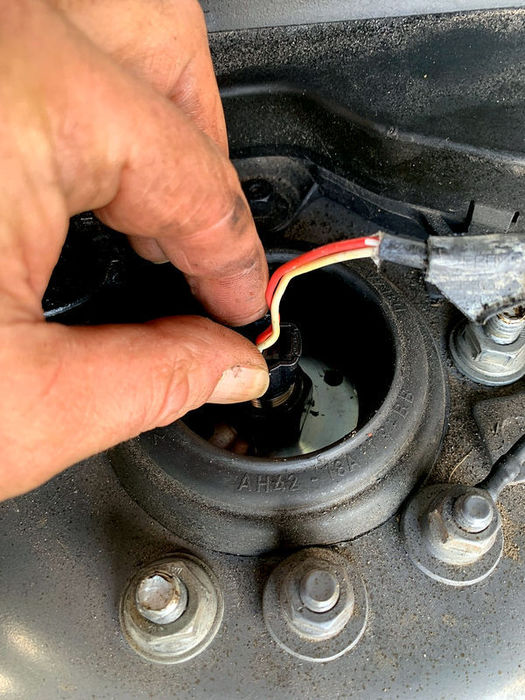
Put the metal lump to the side and then pinch the VCD connector to remove it from the strut top.
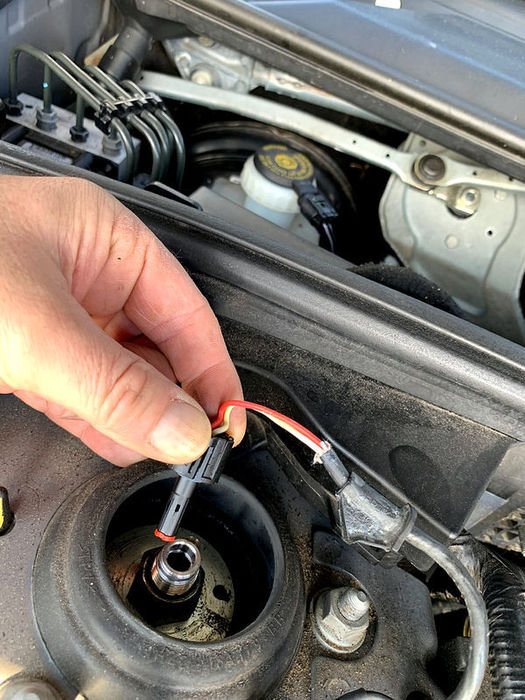
Click image to enlarge


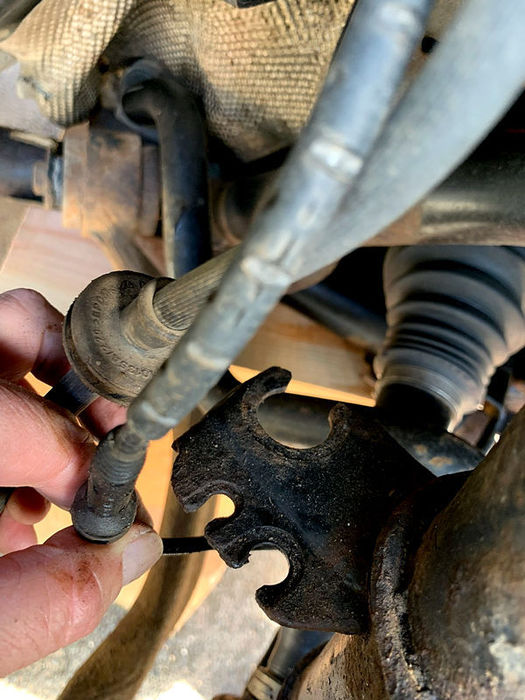
Remove the (18mm) nut from the top of the Anti-Roll-Bar (ARB) Drop Link. If it doesn't come straight off, an open-ended spanner in the back will hold the spindle to allow the nut to come off.
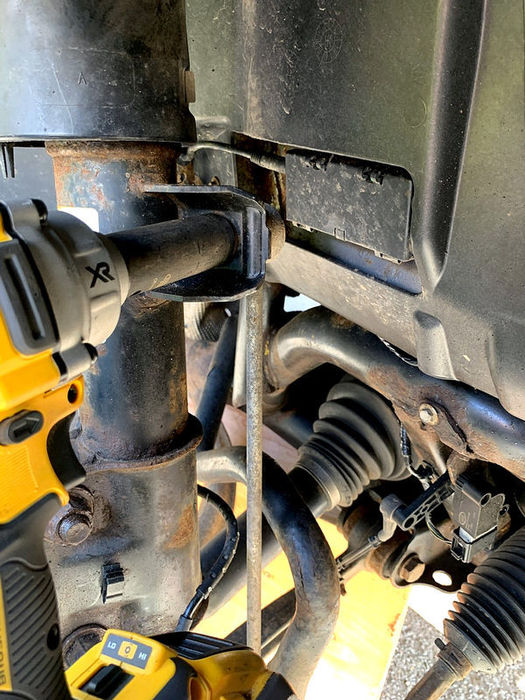
Click image to enlarge


The strength of the ARB will pull the bolt off the horizontal, so jack up the bottom of the ARB until the bolt is free to be extricated from the mounting plate on the strut.
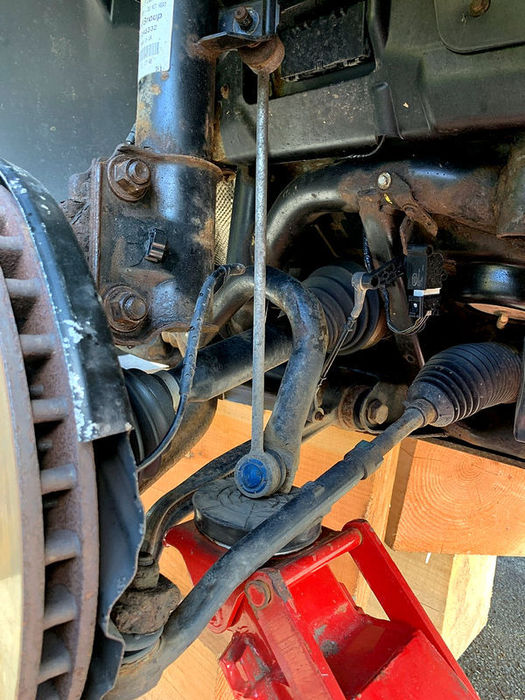
Click image to enlarge


Like so! Move the ARB drop-link out of the way.
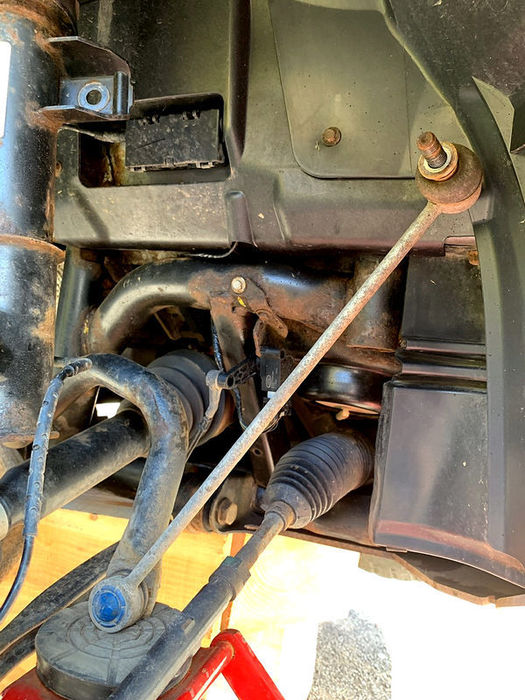
Click image to enlarge


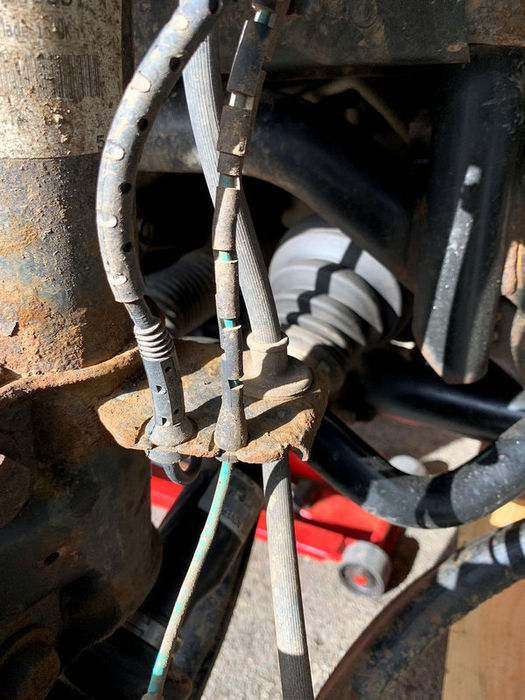
Gently pull the brake hose and associated cables away from their fixings on the strut. Divers side has two, passenger side has three.

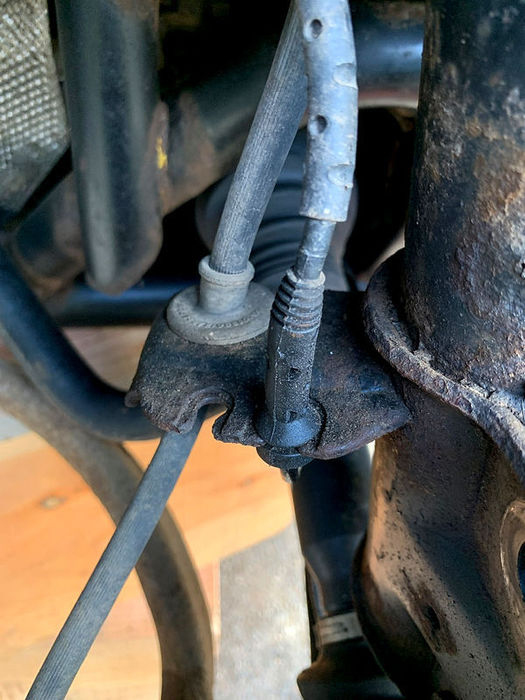
Click image to enlarge

(Passenger Side)
Click image to enlarge


As with so many things, a little bit of lube can help with this bit! Laughing

Click image to enlarge


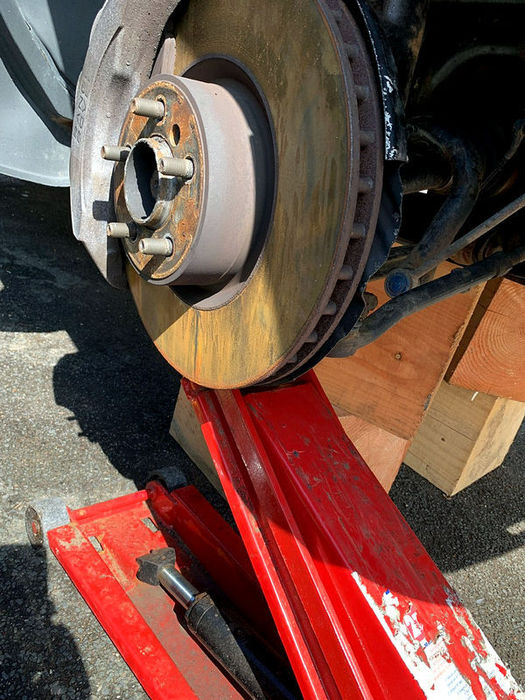
Now get your trolley jack under the hub assembly. Don't jack it up yet - just get it in there ready to take the strain.
Click image to enlarge


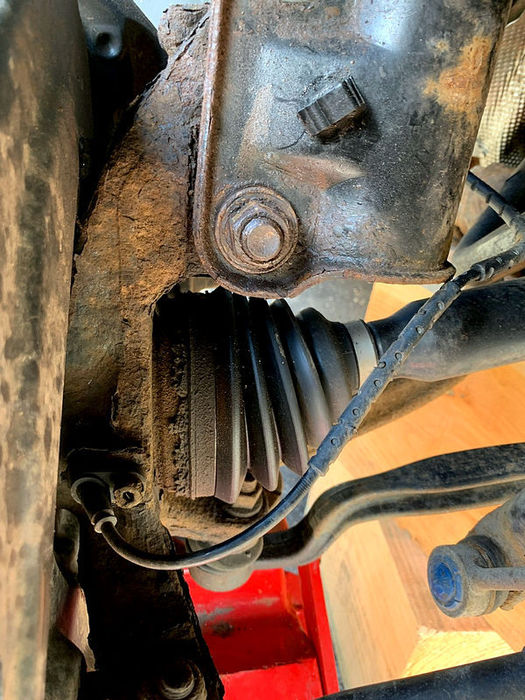
Prepare to loosen the two big 22mm bolts holding the hub to the strut.
Click image to enlarge


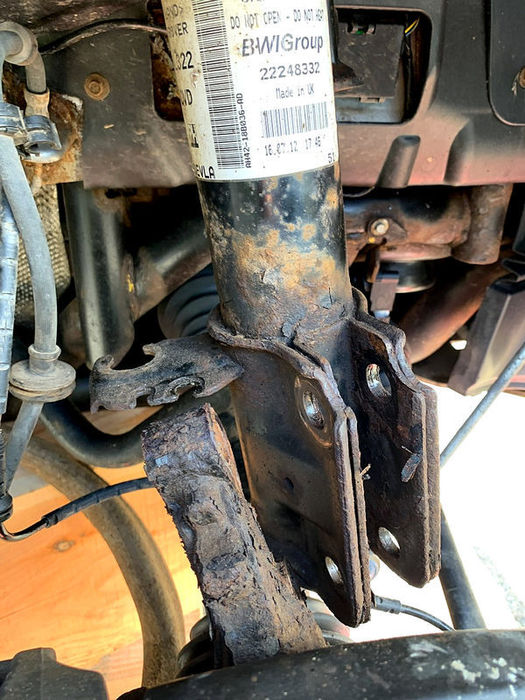
Mine came out very easily, but I've heard horror stories of bolts seized in place. A 'rattle gun' will help immensely here, as the 22mm can be used on both the nut and the bolt. Once it all comes free, the hub will drop onto the jack and the strut will move freely from the base in the wheel arch.
Click image to enlarge


Next, find something just to help steady the strut, as you're about to do something where gravity will take some effect on this large lump of metal.... I stuck a bit of decking board in there, but other options are available. You're just looking for something to prevent the whole strut from dropping to the tarmac when you release the top bolts.


Undo the three top (16mm) strut nuts. They shouldn't be too tight and the strut should drop onto whatever you have used to steady the ship underneath. It is possible to do this with one hand on the strut in the arch. Alternatively, get someone to hold the strut while you undo the top nuts.


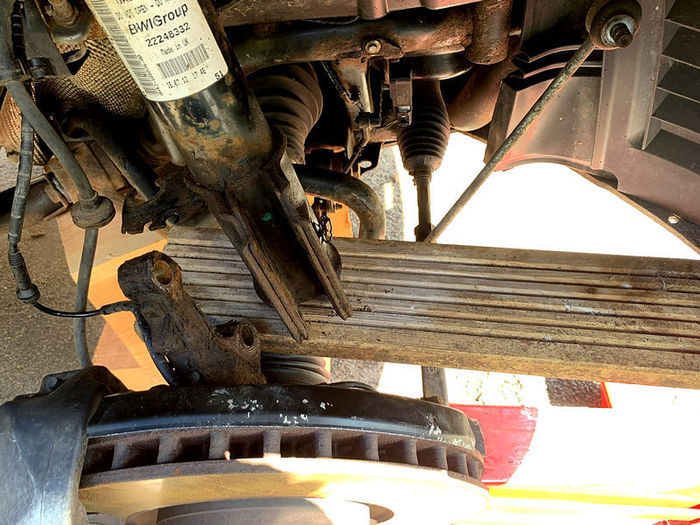
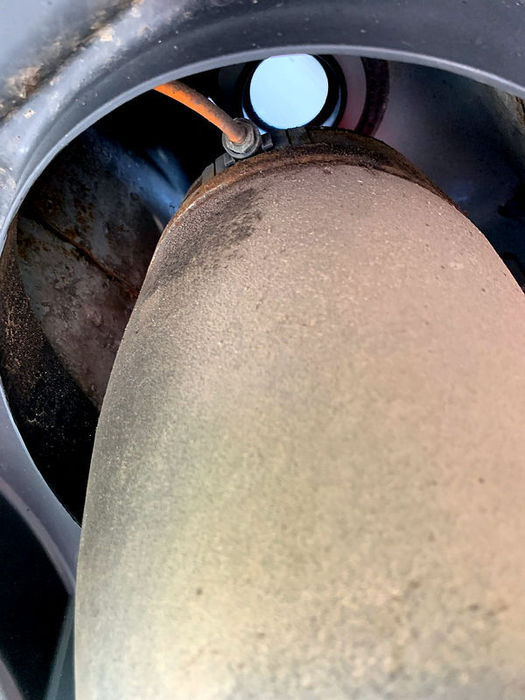
Once the strut drops a bit, you can see the air line (and the sky) from underneath!
Click image to enlarge


The bottom of the strut can now rest somewhere on the suspension if necessary
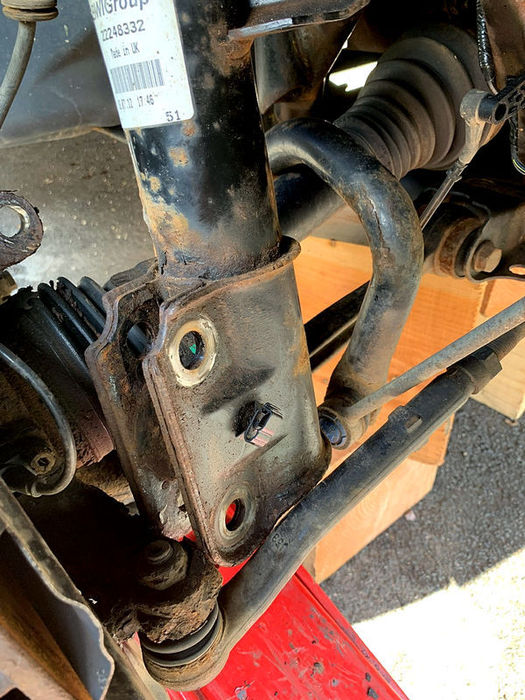
Click image to enlarge


Take the 12mm open-ended spanner and undo the brass airline connector. If the bag is already burst, this will just come undone. If you are replacing an old bag which is still full of air, this will begin to leak air pressure as you undo it.
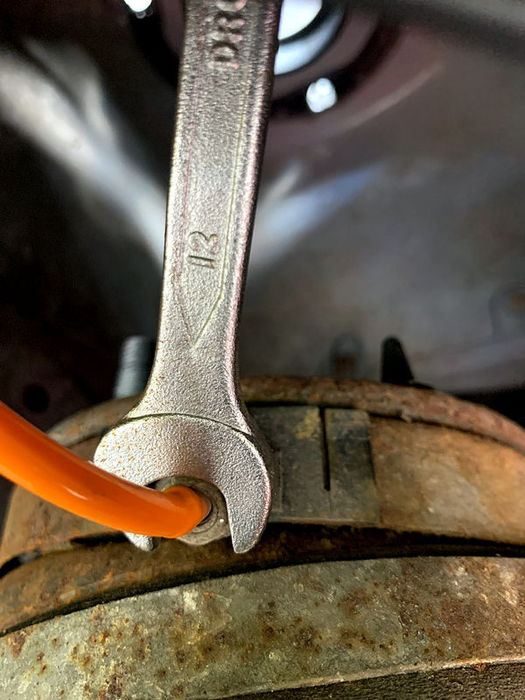
Click image to enlarge


Now that everything is undone, you can extricate the old strut from the wheel arch and lay it to the side.
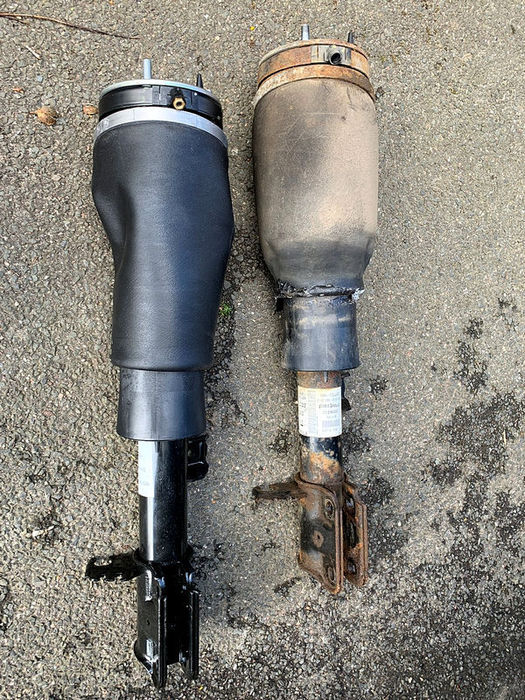
Click image to enlarge


The new strut comes with a new brass connector and collet, but you can just remove these from the strut and use the existing connector on the car.
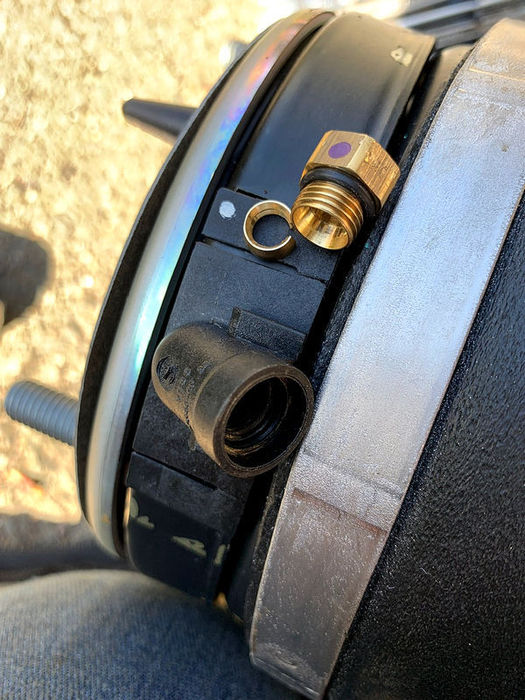
Click image to enlarge


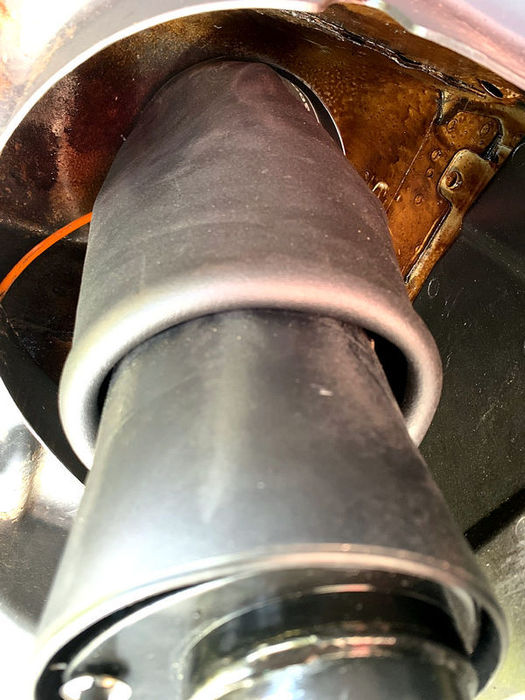
Reassembly is a straight-forward reversal of the foregoing. I took the opportunity to use a spray-on rust inhibitor product on the underside of the strut top mounting before offering the new strut into the space and re-attaching the air-line. Note that the book says this only requires a torque of about 3.5Nm, but I may have nipped it up a bit further than that!
Click image to enlarge


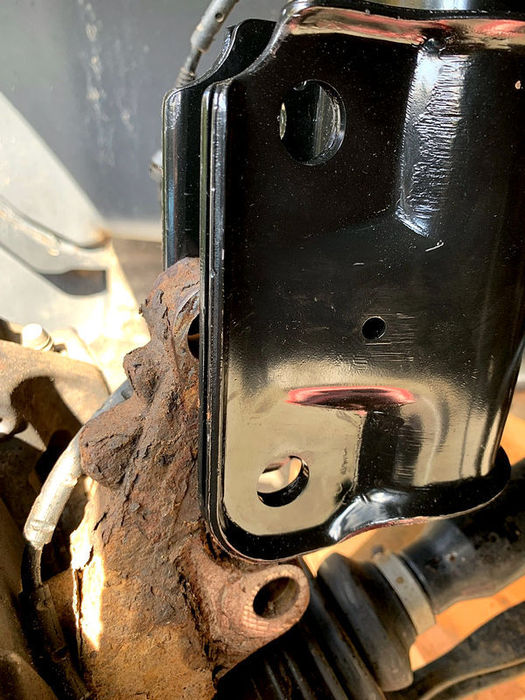
And this is where the trolley jack is needed to bring the hub up to the level where you can match the bolt holes. I ordered new bolts and nuts for this rather than re-using the old ones.
Click image to enlarge


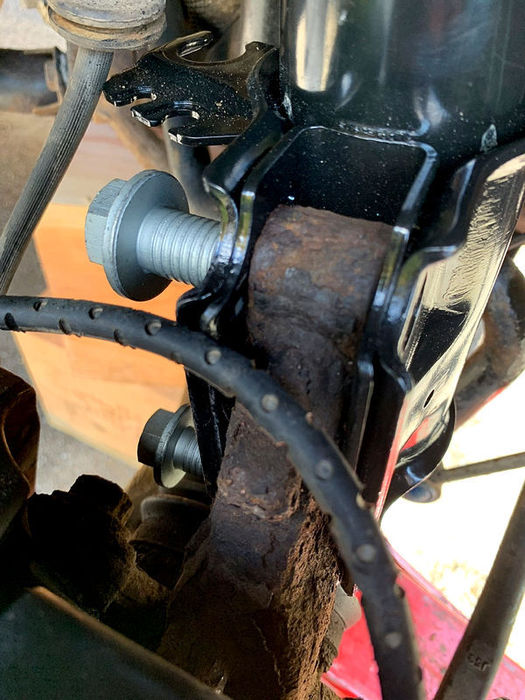
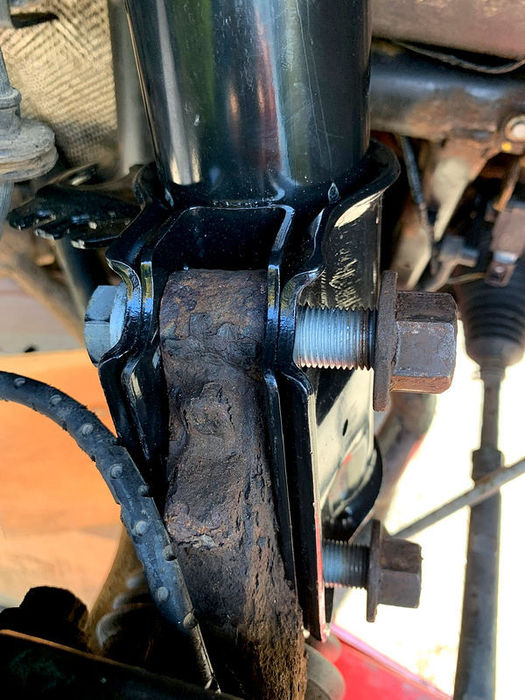
Once alligned, stick the new bolts in from the rear towards the front.
Click image to enlarge


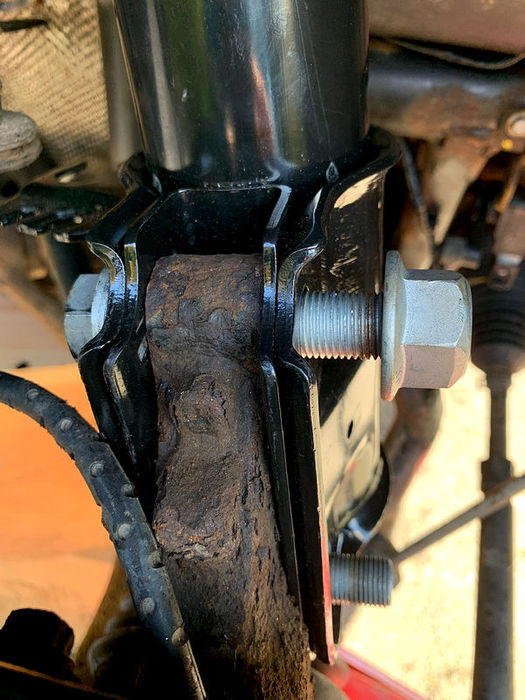
The new nuts then go on...... Until you discover that the new nuts are 23mm and not 22mm! Then you find that you don't have a 23mm socket!
Click image to enlarge


So the old 22mm nuts have their P45's shredded and they go back on the new bolts! Tighten as required - we will torque them up at the end!
Click image to enlarge


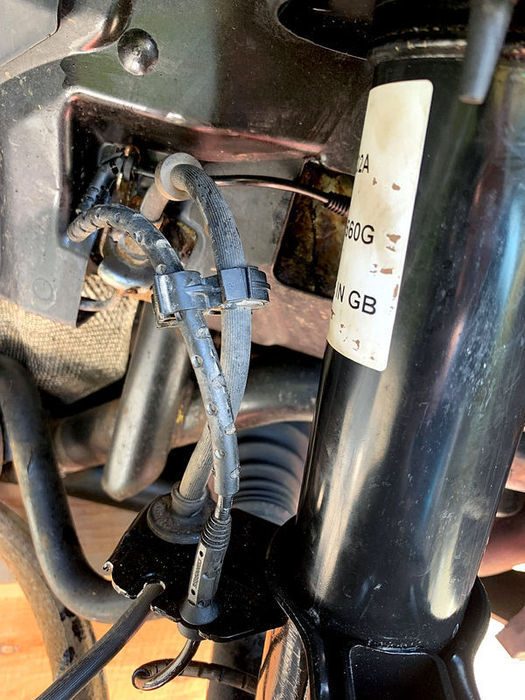
Refit the brake hose and electrical line(s) by push-fitting back into their respective slots.
Click image to enlarge


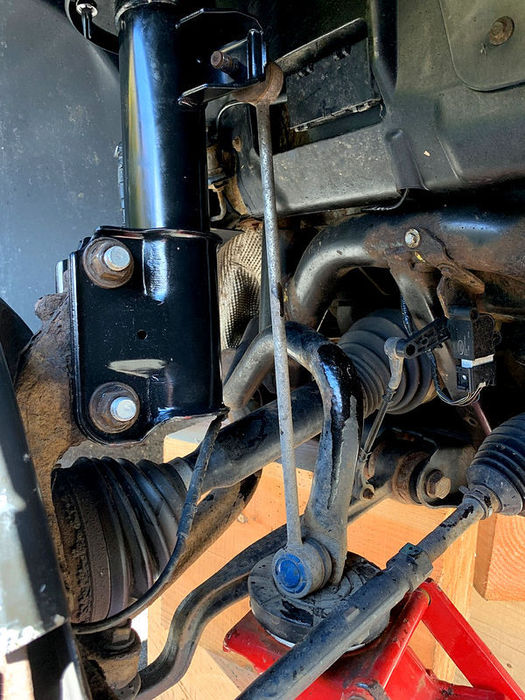
Use the trolley jack to get the ARB drop link aligned and get the nut back on it.
Click image to enlarge


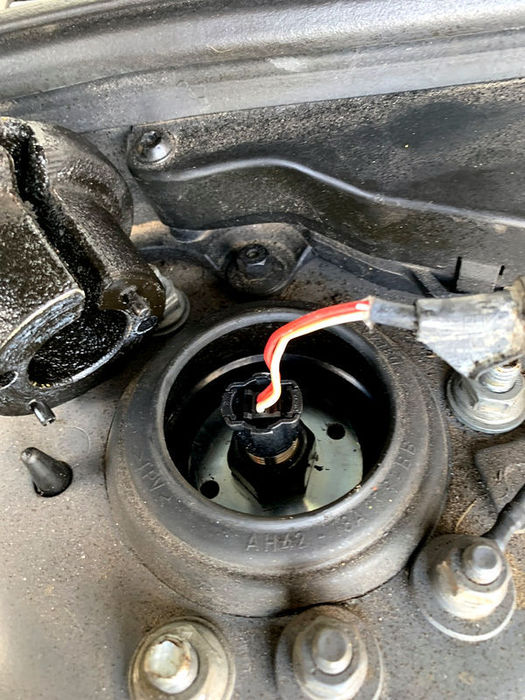
Push the VCD connector back into place (gently push and twist to locate it correctly)
Click image to enlarge


Click image to enlarge


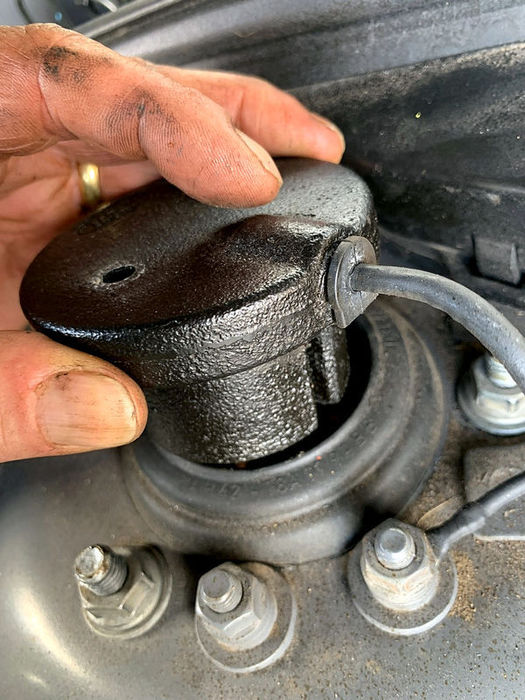
Relocate the cable into the lump of metal that goes on the top
Click image to enlarge


And refit the two Torx screws

Click image to enlarge


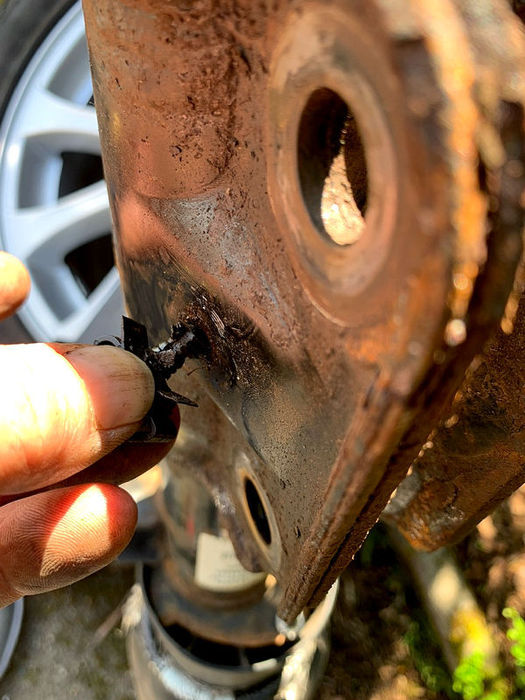
Go back to the old strut and carefully remove the plastic cable clamp - I got long nose pliers underneath it and carefully prized it out.
Click image to enlarge


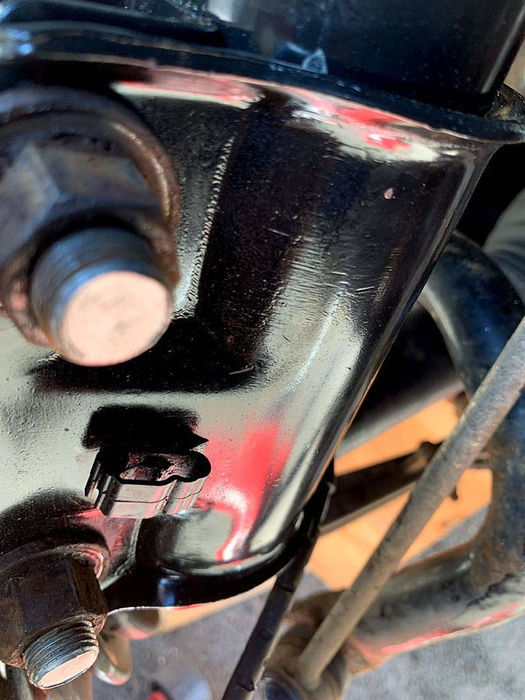
Then simply push it into place in the new strut,
Click image to enlarge


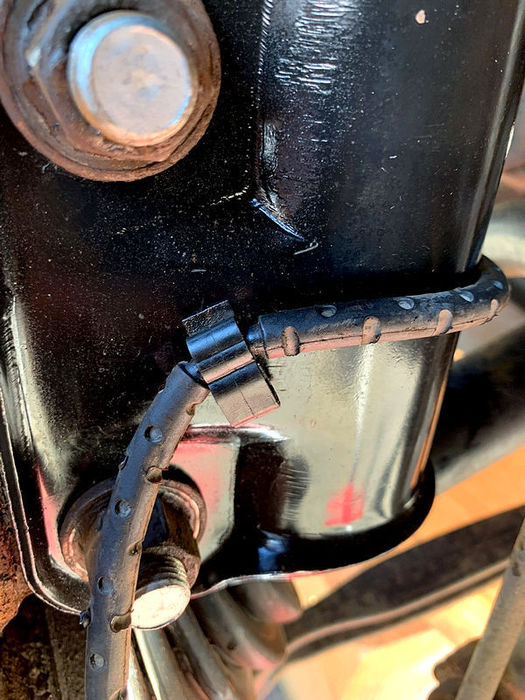
And relocate the cable into the plastic clamp.
Click image to enlarge


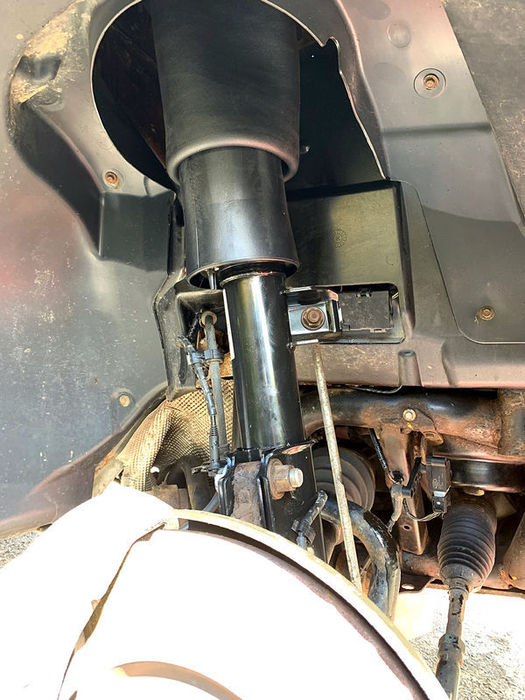
Torque the two main strut-to-hub bolts up to 250Nm and the top ARB bolt to 100Nm
Click image to enlarge


Refit the road wheel.

Click image to enlarge


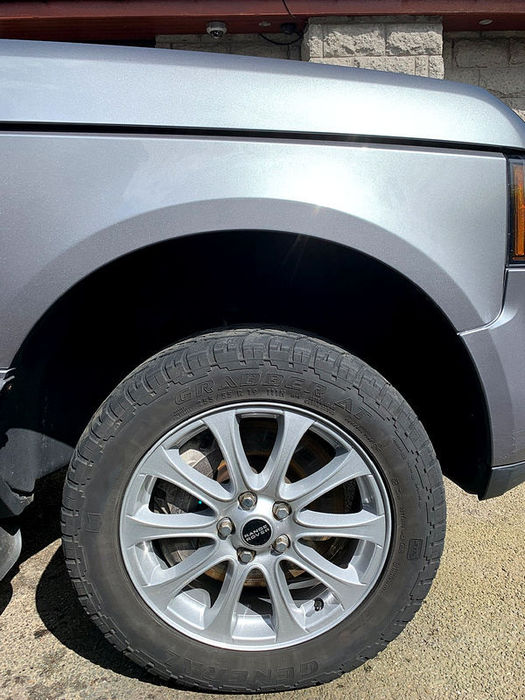
Get the car back on the ground and torque the road wheel to 140Nm.
Click image to enlarge


Now torque the three strut top bolts to 56Nm. Start the car, set the required suspension height and go for a road test. If it all goes to plan, the car should be perfectly fine and there's no need to do anything with a GAP tool or such like.

As with all things, E&OE, caveat emptor, the value of investments can go down as well as up, don't do drugs and you are responsible for your own actions! Mr. Green The older I get, the more I realise that people confuse wrinkles for wisdom Smile

Last edited by JMC on 2nd May 2023 8:35am. Edited 3 times in total

Post #663235 1st May 2023 9:31pm
View user's profile Send private message View poster's gallery Reply with quote
Haylands


Member Since: 04 Mar 2014
Location: East Yorkshire
Posts: 8245

England 2014 Range Rover Autobiography SDV8 Loire Blue

Excellent, comprehensive write up... Bow down Bow down

The last one I did the bottom strut bolts were totally seized and required a large amount of heat to get them out, couldn't even get them spinning with an HGV 3/4" rattle gun... So before doing anything check you can get the nuts off and the bolt is free to turn.... Thumbs Up Pete
__________________________________________________
2014 L405 Autobiography SDV8 4.4 Loire Blue Ebony interior
2011 L322 Vogue SE 4.4 TDV8 Baltic Blue. Parchment over Navy Interior. Sold
2012 L322 Autobiography 5.0 Supercharged Ipanema Sand, Jet Interior. Sold
2002 L322 Vogue 4.4 V8 Epson Green, Ivory over Aspen Interior (Fatty Offroader) Sold
-Click for Project Fatty off roader-

Post #663238 1st May 2023 9:38pm
View user's profile Send private message View poster's gallery Reply with quote
DrRob


Member Since: 16 Apr 2015
Location: Petersfield, Hampshire
Posts: 4304

United Kingdom 2011 Range Rover Vogue SE TDV8 Buckingham Blue

Thumbs Up
One for the Wiki page for sure Bow down Gone to a good home: 2011 4.4 TDV8 Vogue SE Buckingham Blue with Ivory and clear glass = "Rory"
2025MY Defender D350 90 in Silicon Silver on coils
1974 Series 3 Lightweight = "Millie"
Many, many other Landies over the years
My preferred specialist: www.glenrands.co.uk
--------------------------------------------------

Post #663255 2nd May 2023 6:55am
View user's profile Send private message View poster's gallery Reply with quote
sako243


Member Since: 26 Dec 2013
Location: Wales
Posts: 610

United Kingdom 2011 Range Rover Vogue TDV8 Santorini Black

I'll add to this (unfortunately didn't take any photos) that you can now get genuine bag kits for a fraction of the price of a complete strut (about £220 including VAT). I recently replaced both on mine and it's only an extra 5 minutes or so on-top of what you have described to replace the bag itself rather than the entire strut.

Part numbers are LR051700G and LR051702G - they are handed.

Once you have the strut off the vehicle then:
- Using a screwdriver prise the lock washer off the plastic nub at the bottom of the bag
- Undo the (24mm if I recall) nut at the top of the strut, an impact will usually do this but there is provision for an Allen key and open-ended spanner if it just spins.
- Flip the strut upside down on the bench
- Using a rubber mallet tap around the plastic lower sleeve to pop the bag off the strut (some wiggling may be required).

- Ensure the tower is clean (I used a bit of brake cleaner, wiped it off and then gave it quick blast with some silicon spray to lube it up).
- Assembly is in this order:
- Large spacer, large o-ring, spacer, o-ring, spacer
- Plastic "crinkle" seat for the bump stop
- Rubber bump stop
- Metal bump stop cap (concave surface facing down to the bump stop)
- Small nylon spacer, small o-ring, spacer, o-ring
- Slide bag over ensuring you have the correct side and also lining up the locking pin
- Install rubber bush (there will be a smooth side and one with a lip, lip faces down towards the bag
- Reuse old metal bracket that the VCD bit bolts to, curved face down
- Install new nyloc nut and torque up (do not badly over tighten as this will crush the bush into the strut top and necessitate the use of a grinder to remove the bag in future).

Now here I pulled the bottom of the bag over the large O-rings as best as I could then pressurised the air-bag to help seat it properly. LR state 5 bar for testing purposes but the bags will handle much more from their spec, in my experience 5 bar is plenty to seat it.

I had the bits lying around that I re-used an old brass coupling, a spare bit of plastic air-line then various fittings to allow me to plug the air-bag into my tyre-inflator on the workshop compressor. This allowed slightly more control than an unrestricted 10-bar from the compressor.

Basically just fill slowly and you'll find the bag will leak past the big O-rings at the bottom but if you hold the air on and then wiggle it slightly so that the bottom face starts sealing then the air will expand the bag, raise the strut, top out and then start pushing the bottom sealing face of the bag over the o-rings.

You can then deflate and install the locking star washer over the plastic nub - I used a deep 10mm socket to hit it with a hammer.

At this point re-install is per the original post. Ed

Post #663258 2nd May 2023 7:03am
View user's profile Send private message View poster's gallery Reply with quote
Merchy


Member Since: 14 Feb 2021
Location: North Wales
Posts: 1192

United Kingdom 2006 Range Rover Vogue Td6 Zermatt Silver

Excellent write up JMC Bow down This is a perfect example to show what an excellent forum this is, with members going out of their way to help others.
IMHO this site is the best car forum I have ever used, from excellent 'How to guides' to threads with a cracking sense of humour, so a big thank you to the members and our esteemed moderators on here.

Being a very well travelled village idiot, my input probably hinders more than helps others Embarassed but as Nursey tells me, it helps with the therapy one needs when you own an older FFRR Thumbs Up

Post #663276 2nd May 2023 9:49am
View user's profile Send private message View poster's gallery Reply with quote
DrRob


Member Since: 16 Apr 2015
Location: Petersfield, Hampshire
Posts: 4304

United Kingdom 2011 Range Rover Vogue SE TDV8 Buckingham Blue

sako243 wrote:
I'll add to this (unfortunately didn't take any photos) that you can now get genuine bag kits for a fraction of the price of a complete strut (about £220 including VAT).

They have been for a while albeit from Advanced Factors. Had one fitted about a year or so ago. Good to know LR are doing them now too Bow down Gone to a good home: 2011 4.4 TDV8 Vogue SE Buckingham Blue with Ivory and clear glass = "Rory"
2025MY Defender D350 90 in Silicon Silver on coils
1974 Series 3 Lightweight = "Millie"
Many, many other Landies over the years
My preferred specialist: www.glenrands.co.uk
--------------------------------------------------

Post #663289 2nd May 2023 1:07pm
View user's profile Send private message View poster's gallery Reply with quote
JMC


Member Since: 01 Feb 2009
Location: Aberdeen-Angus
Posts: 755

Scotland 2012 Range Rover Westminster TDV8 Orkney Grey

Thanks for the positive comments folks! Thumbs Up

It's nice to be able to document something for others to follow if they need it. It doesn't take much more than a quick pause at each stage to snap a shot with an iphone. Whistle

Incredible to think that during the twelve years of ownership of a 3.6 TDV8 Vogue, I never even ventured to do an oil change on it.

In less than two years of having the 4.4, I've bought a GAP tool, done two oil changes, changed all the air, pollen & fuel filters, sorted the leaking oil cooler, replaced the drivers door mirror after an altercation with a hired campervan on a narrow road, and now I've replaced both the front VCD struts. Cool

Love this vehicle more than anything else I own, or have owned previously! Razz The older I get, the more I realise that people confuse wrinkles for wisdom Smile

Post #663337 3rd May 2023 7:57am
View user's profile Send private message View poster's gallery Reply with quote
telly-addict


Member Since: 22 Mar 2019
Location: Morayshire
Posts: 138

Scotland 2011 Range Rover Vogue TDV8 Stornoway Grey

sako243 wrote:
I'll add to this (unfortunately didn't take any photos) that you can now get genuine bag kits for a fraction of the price of a complete strut (about £220 including VAT).


Or from Aerosus for £189 inc vat and delivery (x2 fronts)!

Plus I will add that we are talking just a bit more than 5 mins if, like in my experience, you find the big O rings unwilling to allow the bag and shock to come together! Cam

2011 TDV8 Vogue in Stornoway Grey

Post #665277 28th May 2023 8:44am
View user's profile Send private message View poster's gallery Reply with quote
JayGee


Member Since: 27 Jul 2021
Location: London
Posts: 3245

United Kingdom 2012 Range Rover Vogue 4.4 V8 Orkney Grey

Worth checking out some reviews of Aerosus parts on the L322 ( I.e Sam's motors and machines) before you think they are worth the saving. 2012 TDV8 Vogue (L322)

Post #665280 28th May 2023 9:16am
View user's profile Send private message View poster's gallery Reply with quote
dingg1


Member Since: 29 Jun 2013
Location: PORTUGAL
Posts: 1345

2007 Range Rover Vogue SE 4.2 SC V8 Stornoway Grey

I only have aerosus as a reasonable option unfortunately due to import costs

New struts fitted two weeks ago, no problem whatsoever, however two years, ago I just changed bags, one failed on inflation pulling the rubber bag from under the clamp, in fairness aerosus dealt with the problem quickly with a full refund.

No complaints from me with the company or product, even though I suspect that like most of the other suppliers they're manufactured in China

Post #665281 28th May 2023 9:39am
View user's profile Send private message View poster's gallery Reply with quote
chdavis


Member Since: 28 Nov 2021
Location: Washington DC
Posts: 44

2012 Range Rover Autobiography 5.0 SC V8 Galway Green

I just finished this job using the factory service manual and I have to say this write up is a lot better. Either way, easy job. Having two jacks is key, as you point out, to level the spindle with the air strut assembly and sway bar link.

I have been hitting my lower bolts with penetrating oil for the last year or so every time I’ve had the wheels off, and this plan has worked with tremendous results. I was able to take them out by hand once they were loose.

My first time doing this job on my 2012, I destroyed two bolts beating them out with a metal mallet and air hammer. I didn’t want to go through that debacle again with my 2011 autobiography - ha! 2012 Range Rover HSE | 2011 Range Rover Autobiography | 2010 Range Rover Sport Supercharged
2020 Tesla Model 3 Performance, 2013 Mercedes-Benz G550, 2008 Ferrari F430, 2007 Volkswagen Touareg V10 TDI

Post #667572 26th Jun 2023 4:42am
View user's profile Send private message View poster's gallery Post Reply
Post Reply  Back to top
Page 1 of 1
All times are GMT

Jump to  
Previous Topic | Next Topic >
Posting Rules
You cannot post new topics in this forum
You cannot reply to topics in this forum
You cannot edit your posts in this forum
You cannot delete your posts in this forum
You cannot vote in polls in this forum


Site Copyright © 2006-2024 Futuranet Ltd & Martin Lewis
fullfatrr.com RSS Feed - All Forums


Switch to Mobile site